What you’ll be able to do after reading this guide:
- Have viewers control different Snapchat filters on your stream using a MixPlay board and chat commands
- Have viewers able to change certain Snapchat filter triggers like changing emoji heads
- Have Snapchat filters go off on triggers like donations and follows
- Allow only certain people to change the Snapchat filter, like subscribers, high ranks or currency usage
- Be able to have Snapchat filters go on for a set amount of time then turn back to normal
- Control Snapchat filters with a Stream Deck for manual overrides
- Configure Snap Camera for OBS
What you’ll need:
- Snap Camera
- Either Firebot or Mix It Up
- OBS or Streamlabs OBS
- Mixer account
- MixPlay board
If you’re new to handling MixPlay boards, check out my guide on how to make LED Cat Ears and scroll down to LET’S MAKE A MIXPLAY BOARD! If you need additional assistance, comment below and I’ll gladly help.
Let’s favorite some filters
We’re going to favorite two filters and trigger things using hotkeys. If you need additional assistance on the Snap Camera side of things, they have pretty good documentation located here.
- Open up Snap Camera
- Select the correct webcam [click cogwheel to change it]
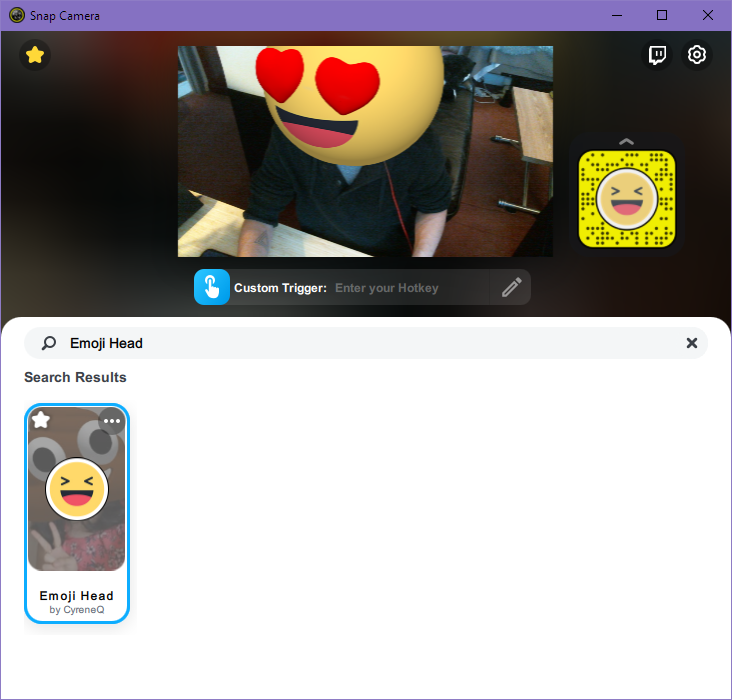
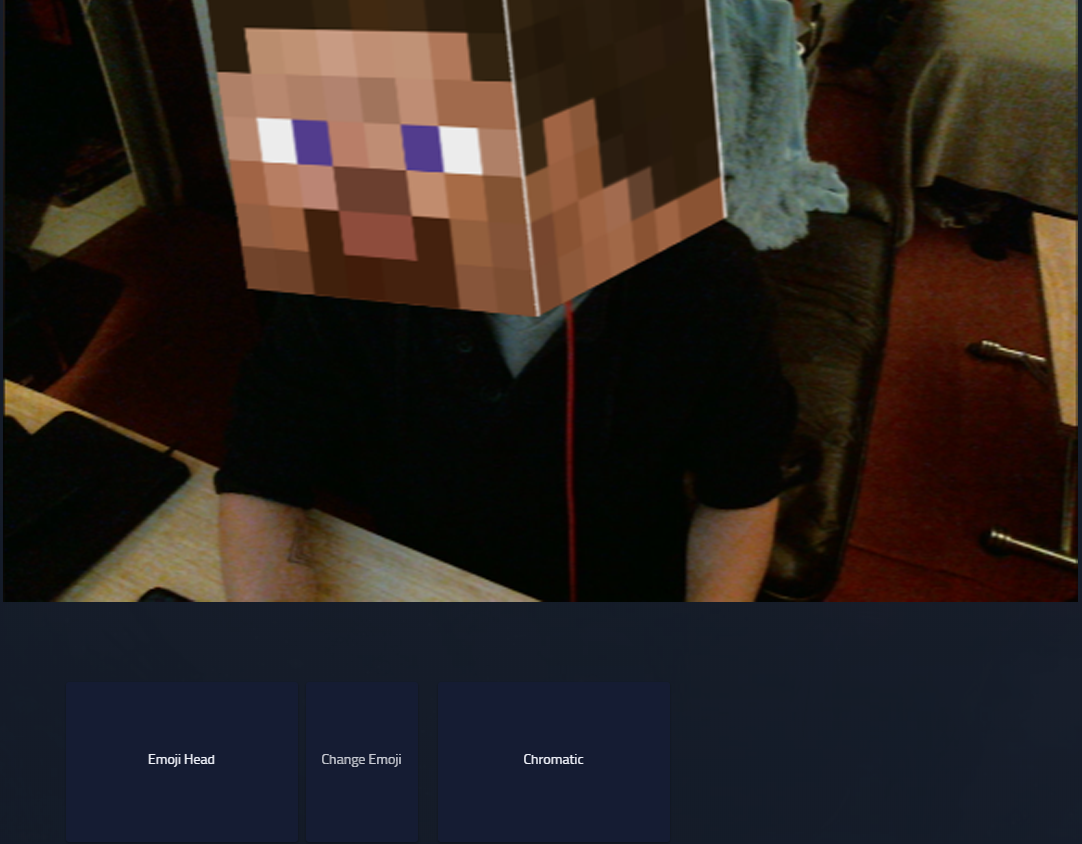
- Click Search Lenses and type Emoji Head
- Hover over Emoji Head and click the star icon
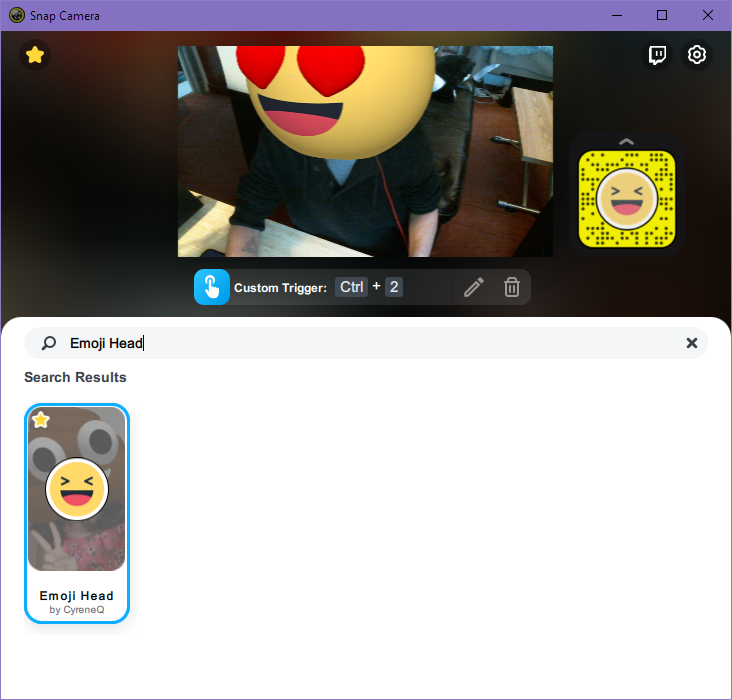
- Click Custom Trigger then hold CTRL and hit 2
- Search for Chromatic and favorite it
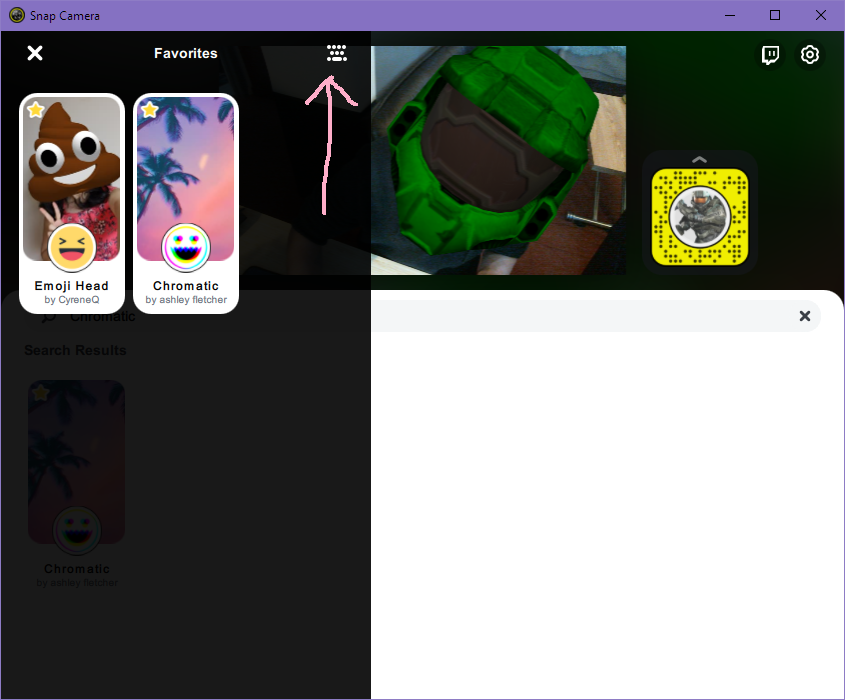
- Click the gold star on the top left, which shows your favorites
- Click the Hotkeys button
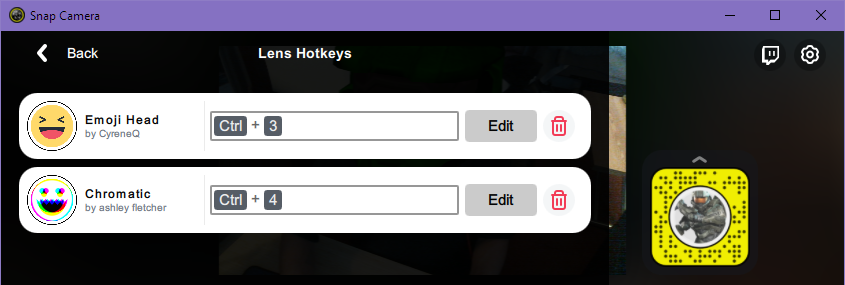
- Click Add Hotkey for Emoji Head, then hold CTRL and press 3
- Click Add Hotkey for Chromatic, then hold CTRL, press 4 and click Save
- Click the cogwheel button on the top right taking you to Settings
- Click Edit on Turn Lens On/Off, then hold CTRL and press 1
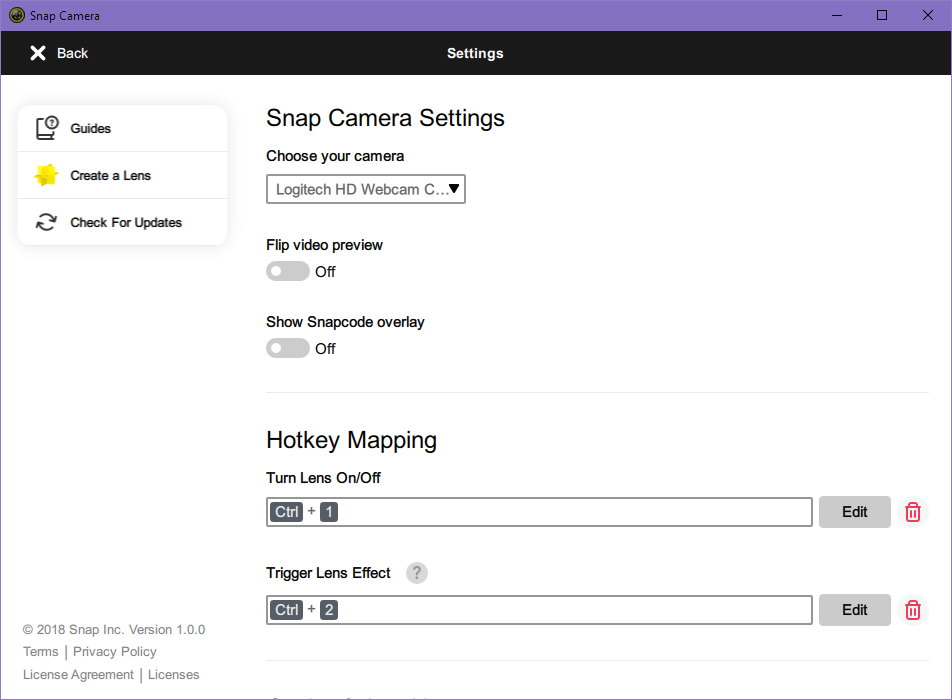
- Click the X on the top left to close Settings
- Try all hotkeys to make sure they’re set correctly:
CTRL + 4 – Turns you chromatic
CTRL + 3 – Puts an emoji on your head
CTRL + 2 – Changes the emoji on your head
CTRL + 1 – Turns off the filter
Adding Snap Camera in OBS
Do not try to capture Snap Camera as a game or window as you’ll see, depending on the filter, info about the filter pop up. Instead we’ll be adding it the clean way.
- Open OBS
- Add a new source by clicking the + under Sources, select Video Capture Device and name it Snap Snap
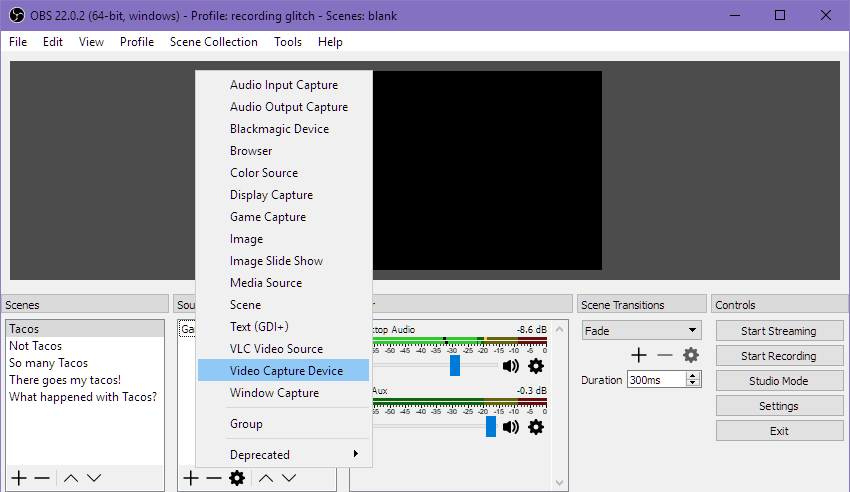
- Select Snap Camera on the Device menu then click OK

- Move the camera feed to your liking as you usually would in OBS
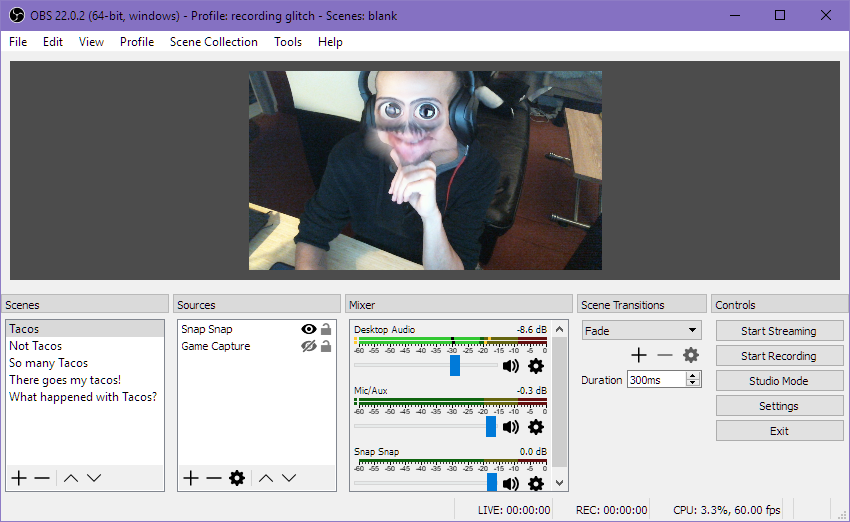
Hopefully that was an easy set up for you; if you run into issues though, try closing and reopening the Snap Camera app or OBS – and if that doesn’t help, head over to the Snap Camera FAQ. If you need more help just let me know!
Add MixPlay buttons
We’re going to create three buttons on our MixPlay board. If you haven’t set up a MixPlay board and don’t really know how to create buttons, you can look at my other guide which lays it out a little better. There are also an abundant amount of YouTube videos showing how to use the MixPlay board as well.
- Go to the Developer Lab and go to [or create] your MixPlay Project
- Go to the Build tab
- Add three buttons and place them on the Large Grid
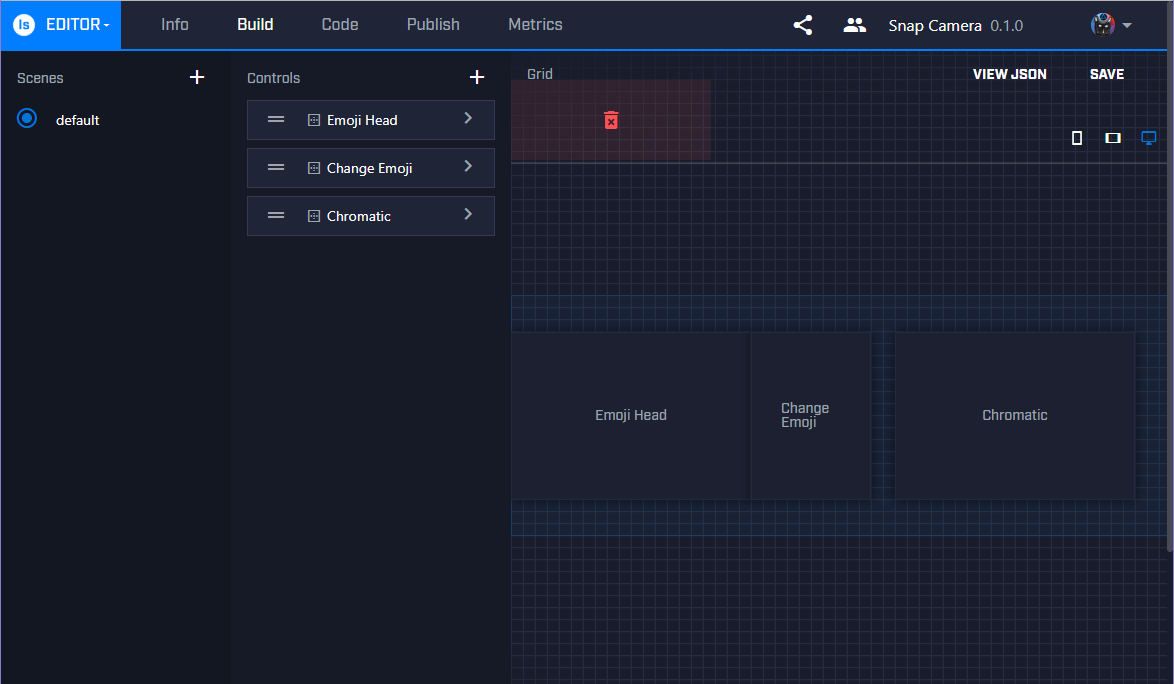
For your final board be sure to place the buttons on all grids, otherwise users on certain devices, like Xbox or a cell phone, cannot access the buttons you’ve placed.
Snap Camera and Mix It Up
Now it’s time to add the viewer interactivity part of this. If there is something that this guide doesn’t cover and you’d like to do it in Mix It Up, chances are this Wiki would answer it.
As stated before, you can use Firebot as well for the MixPlay integration – that section is right after this, so if that’s what you need just keep on scrolling.
Setting up buttons to change filters
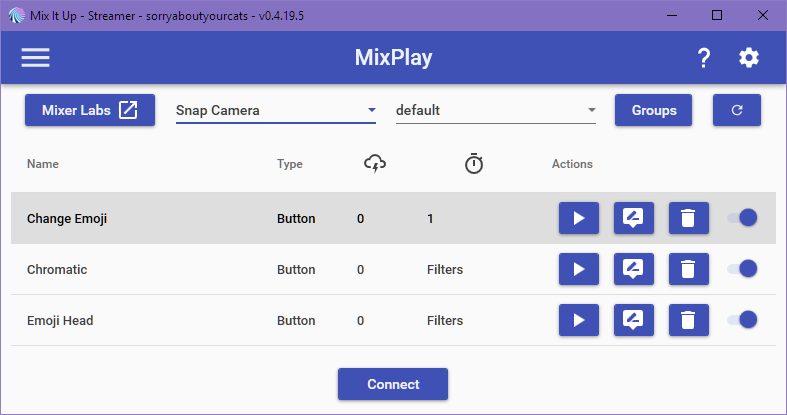
- Open up Mix It Up, click the Menu button and go to MixPlay
- Click Game and select your MixPlay board
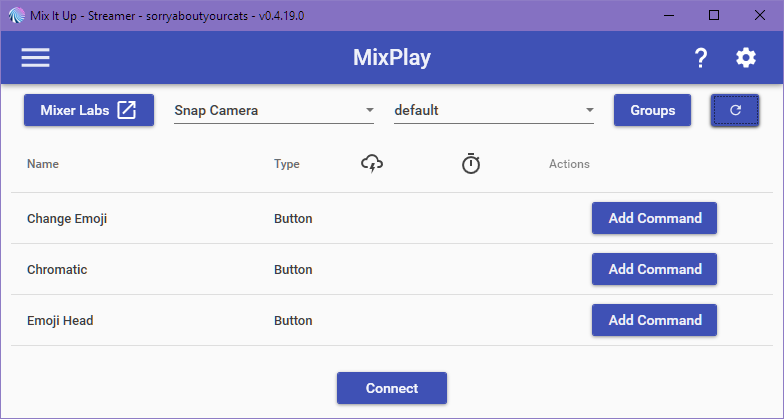
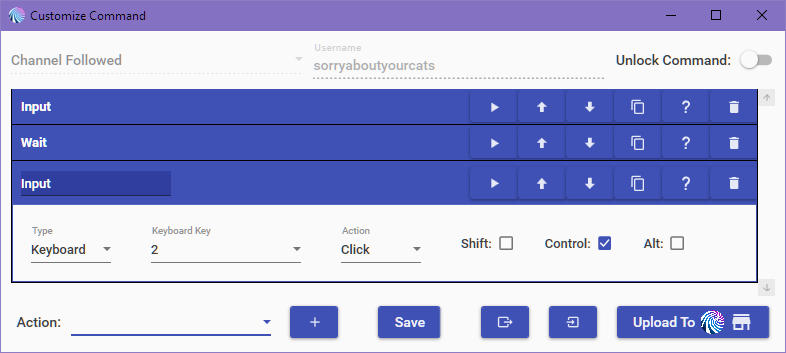
- Click Add Command for Chromatic, then click Advanced Command
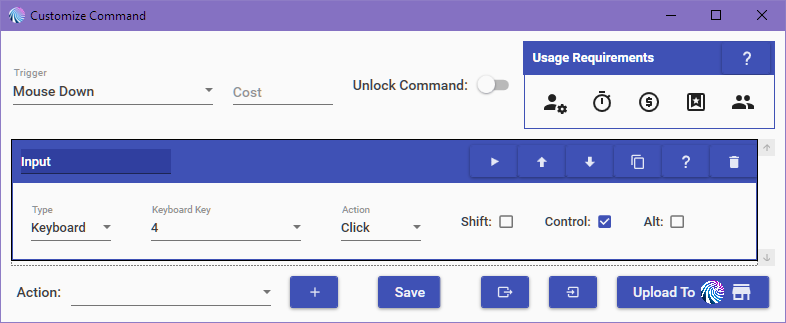
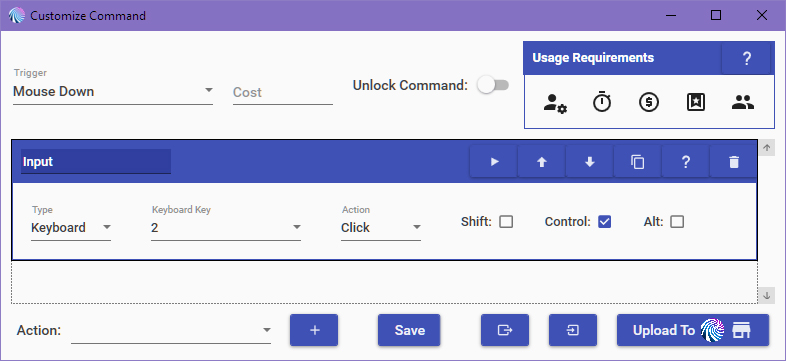
- Click Action menu and select Input (Keyboard & Mouse), then click the +

- For Input – Type: Keyboard, Keyboard Key: 4, Action: Click, Control: Checked
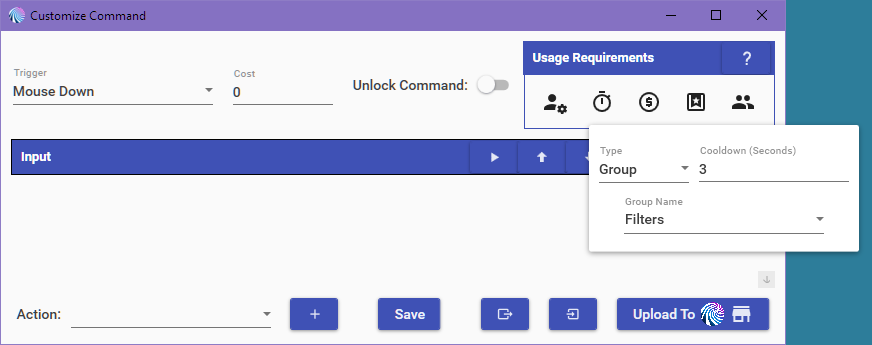
- Under Usage Requirements click the Cooldown button and set it – Group | 3 seconds | Filters
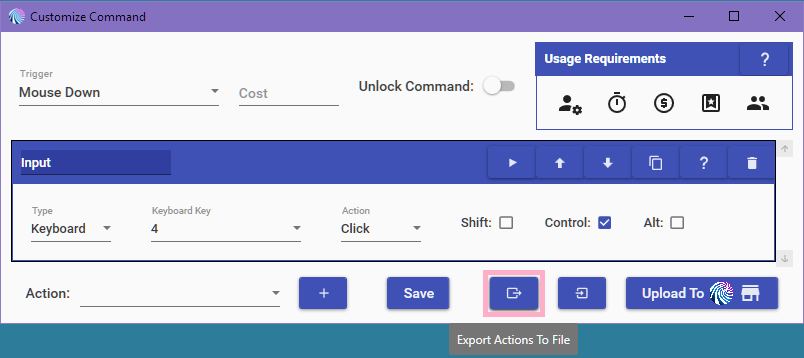
- Click Export Actions To File, name it and save the file
- Click Save and it should take you back to the MixPlay section
- Click Add Command for Change Emoji, then click Advanced Command
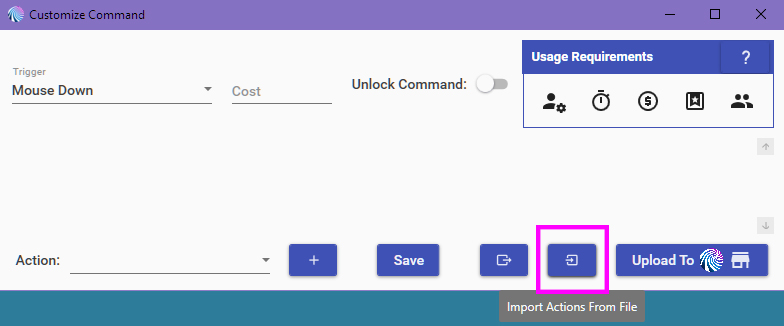
- Click Import Actions From File and select the file you saved in step 7

- For Keyboard Key, change the 4 to 2

- Click the Cooldown button and set it – Individual | 1 second
- Click Save and head back to the MixPlay section
- Click Add Command for Emoji Head, then click Advanced Command
- Click Import Actions From File and select the file you created in step 7
- For Keyboard Key, change the 4 to 3
- Click the Cooldown button and set it up the same way as Chromatic – Group | 3 second | Filters
- Click Save and head back to the MixPlay section
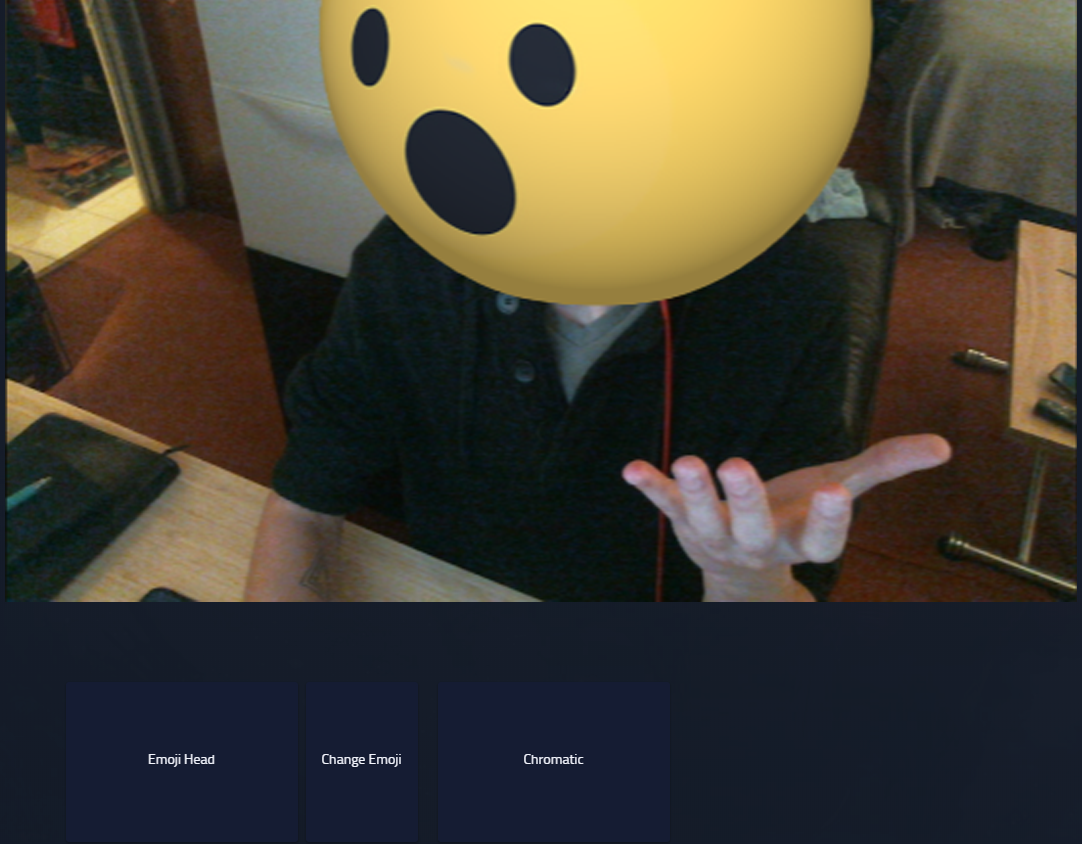
- Click the Connect button, head to your channel and test away
Setting up alerts to change filters
Mix It Up has event triggers for things like donations or a spark milestone reached. For this guide we’ll be having the Emoji Head pop up, then switch Emojis and turn back off when a new follower occurs.
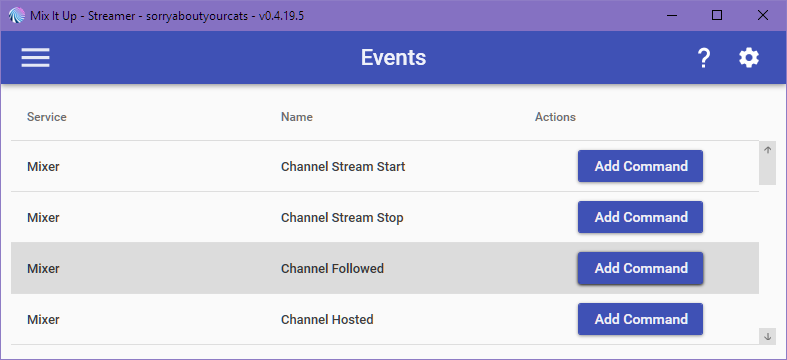
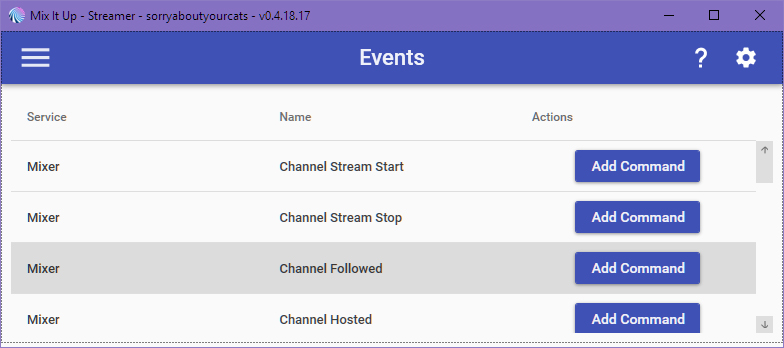
- Open up Mix It Up, click the Menu button and go to Events
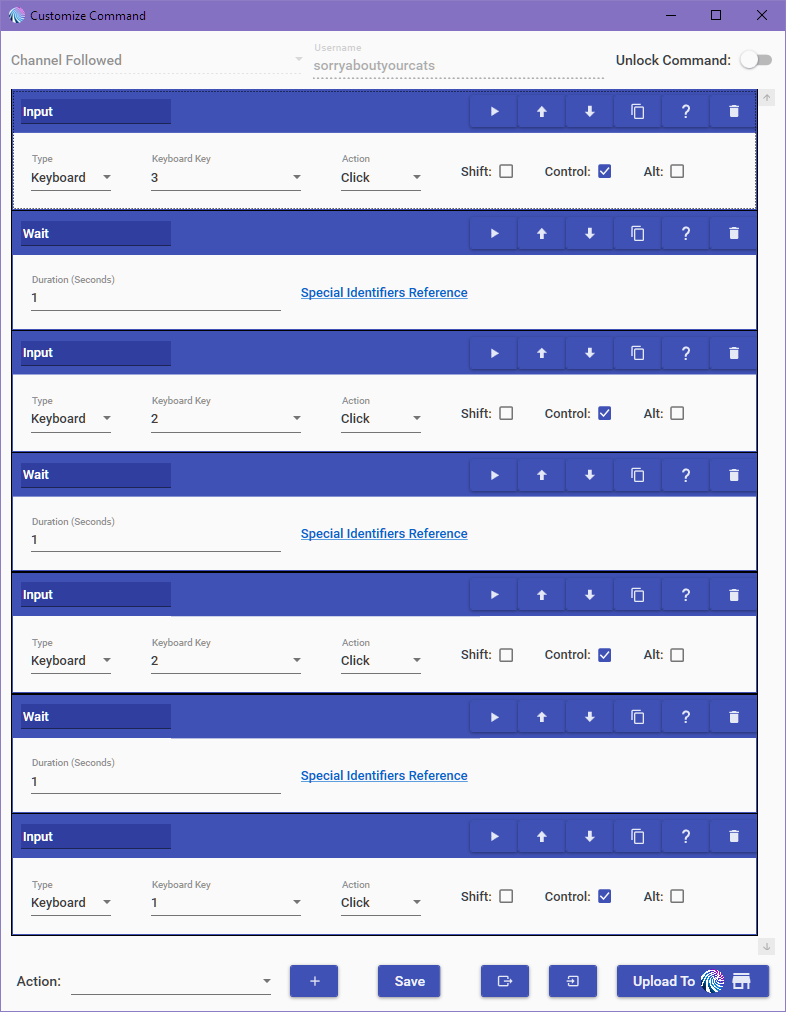
- For Channel Followed, click Add Command and then Advanced Command
- Click Action menu and select Input (Keyboard & Mouse), then click the +
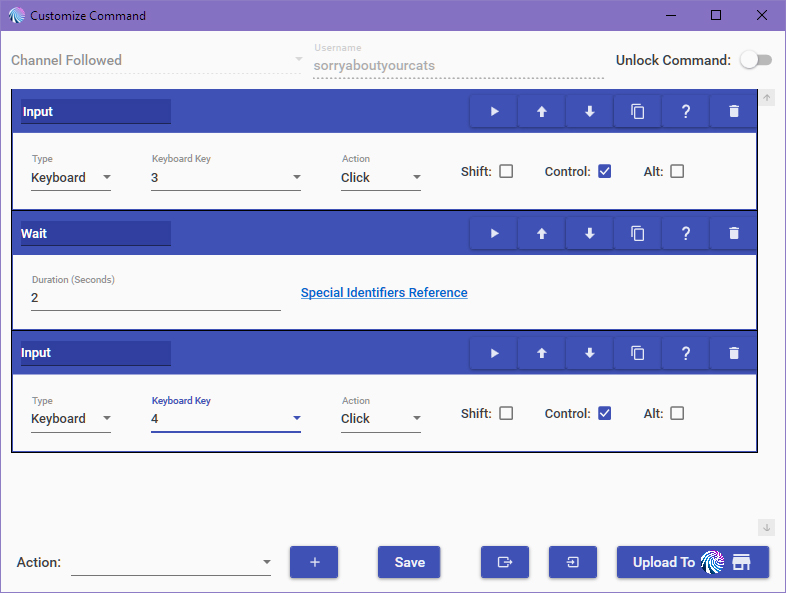
- For Input – Type: Keyboard, Keyboard Key: 3, Action: Click, Control: Checked
- Click Action menu and select Wait, then click the +
- For Duration (Seconds) put 1 second
- Click the Duplicate button on the Input action
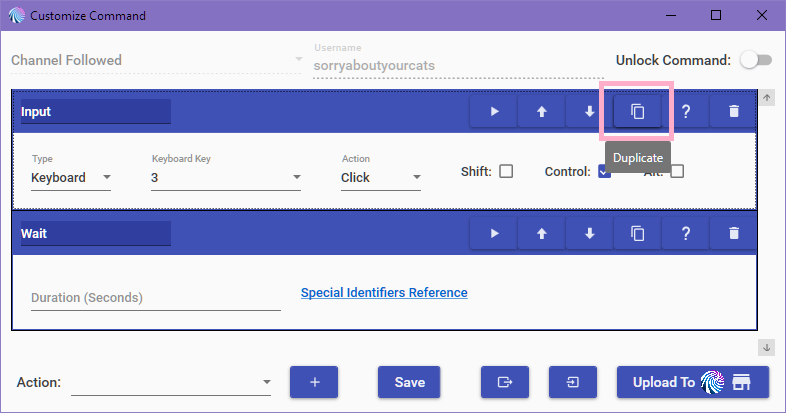
- Change the Keyboard Key from 3 to 2 on the duplicated Input action
- Click the Duplicate button on the Wait action
- Click the Duplicate button on the 2nd Input action
- Click the Duplicate button on the Wait action
- Click the Duplicate button on the 2nd Input action
- Change the Keyboard Key from 2 to 1 on the last duplicated Input action
- Confirm settings
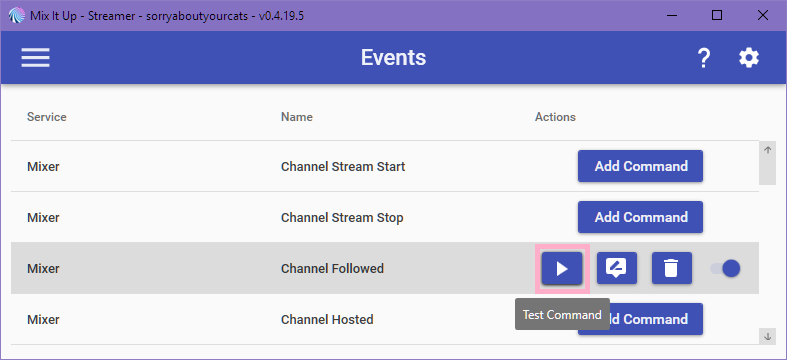
- Test it by clicking the Test Command button or have someone follow you
You can get really creative with alerts & buttons, so experiment and have fun.
If for whatever reason something isn’t working, let me know and we’ll figure it out.
There are some tips below so if you’re not interested in the Firebot side of things just scroll to the bottom.
Snap Camera and Firebot
We’ll be setting up three buttons that viewers can click to change your filter. For a more in depth look at what Firebot can do, be sure to check out this Wiki.
Setting up buttons to change filters
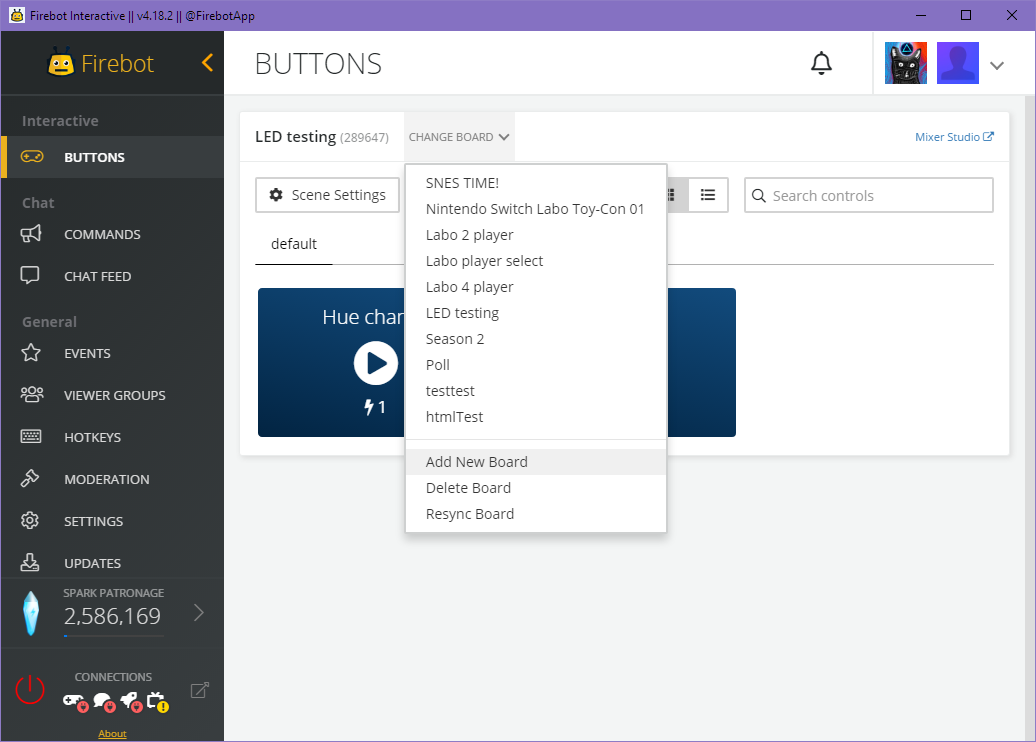
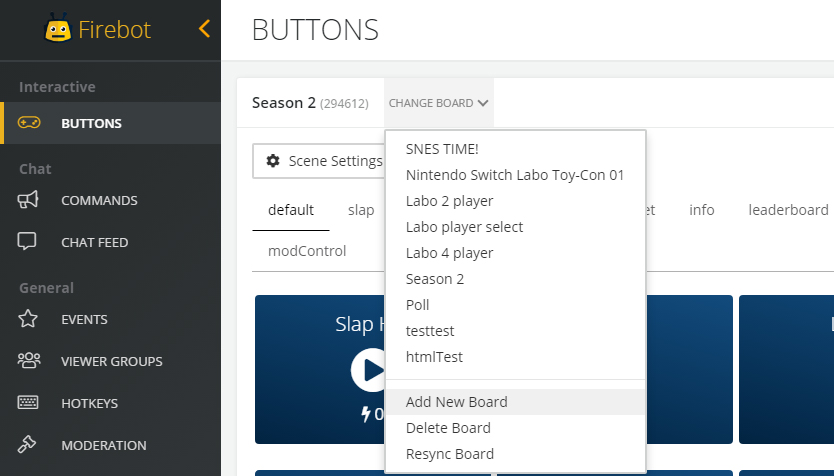
- Open Firebot and add your board [or use an existing one]
- Hover over Emoji Head and click EDIT
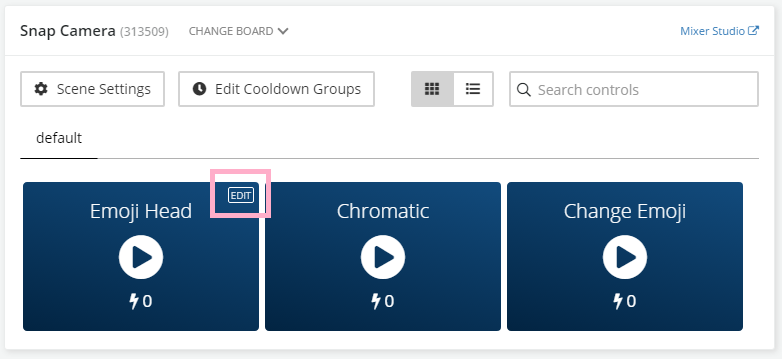
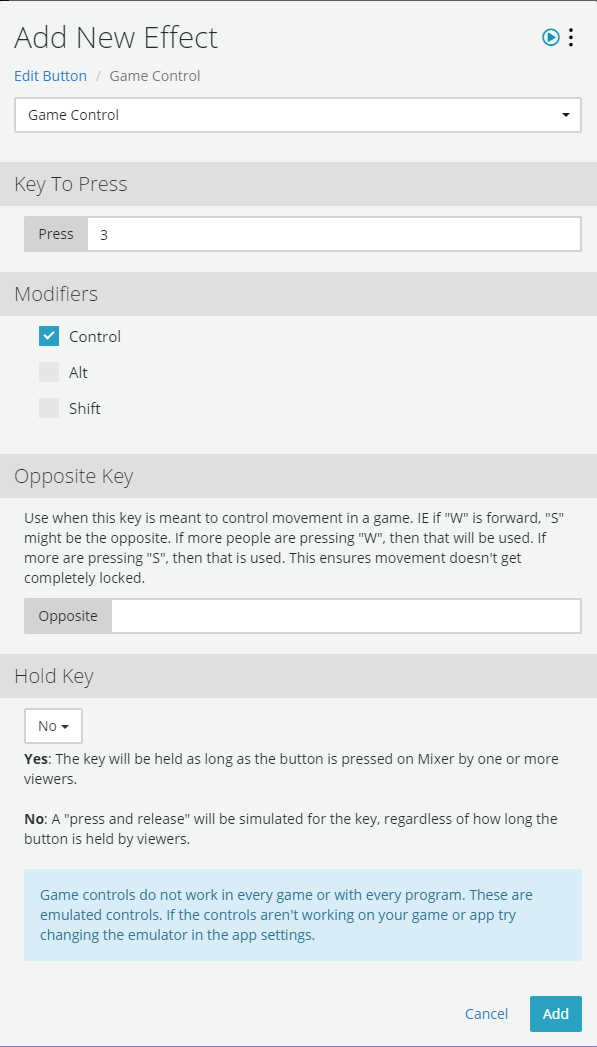
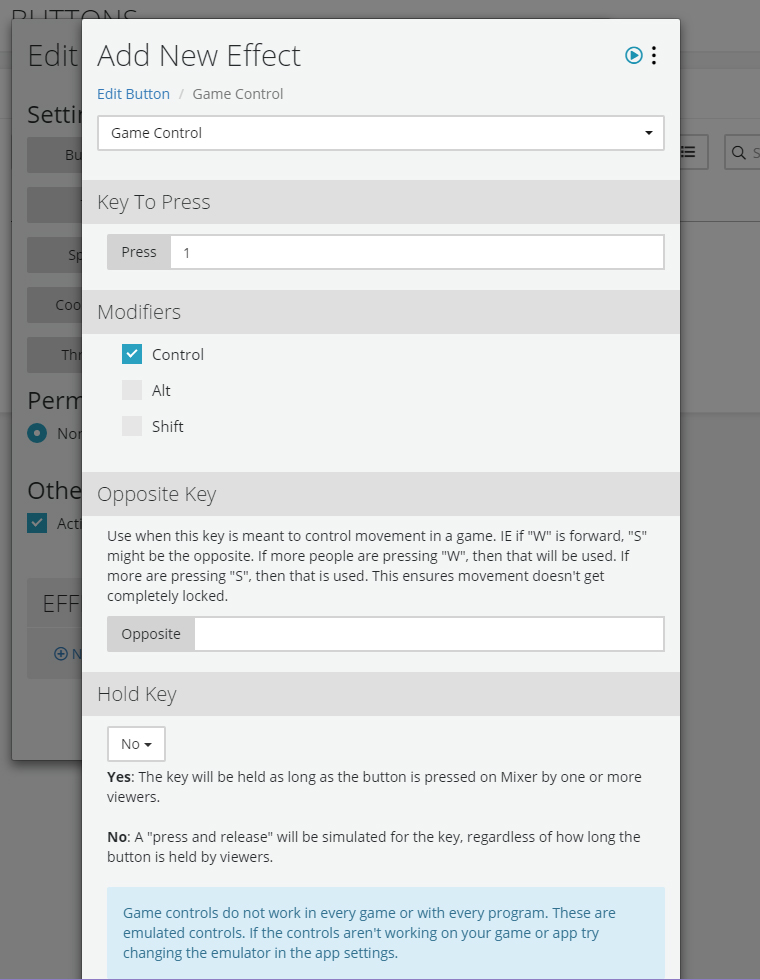
- Click + New Effect and select Game Control
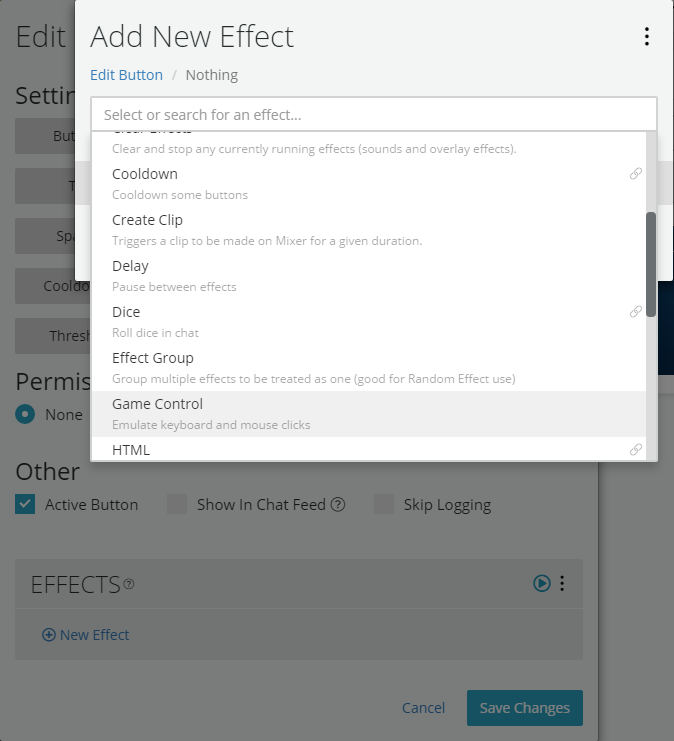
- Set – Key To Press: 3 | Modifiers: Control, then hit Add
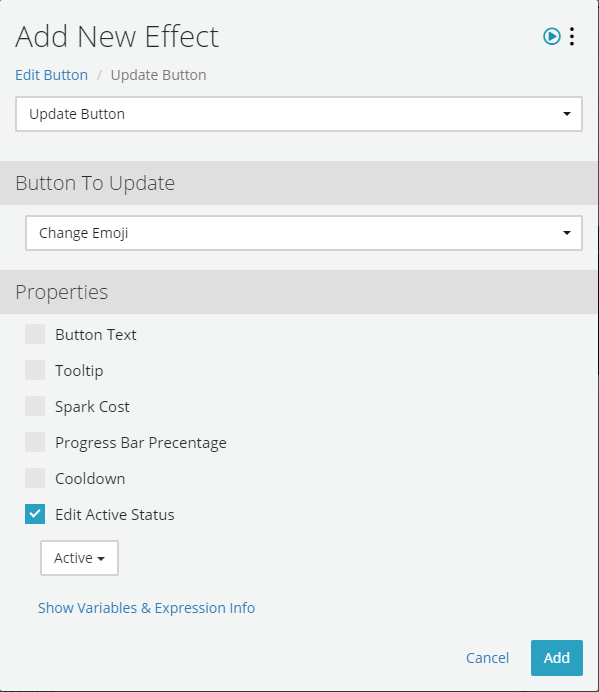
- Click + New Effect and select Update Button
- Pick Change Emoji from the Button To Update dropdown menu
- Check Edit Active Status and select Active, then click Add
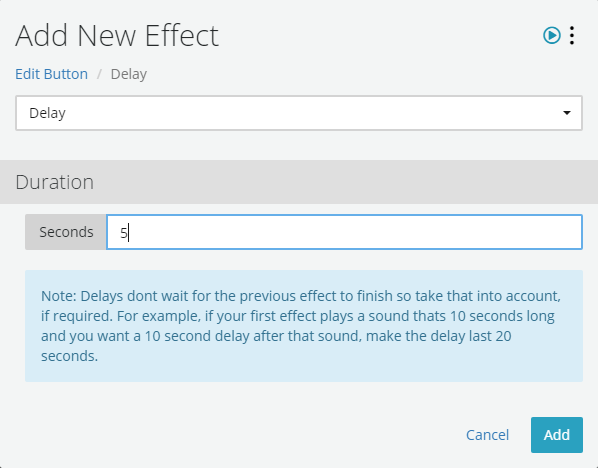
- Click + New Effect and select Delay
- Set the duration to 5 seconds, then click Add
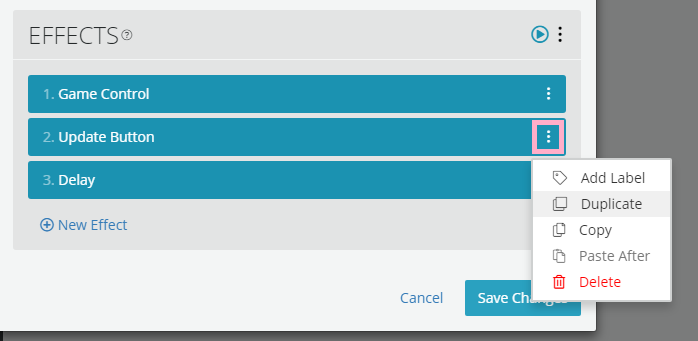
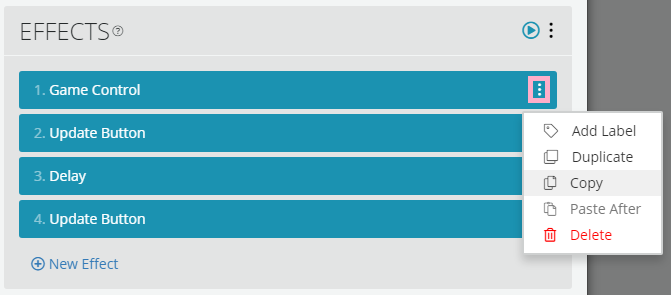
- Click the menu button for Update Button and select Duplicate
- Drag Update Button from the third row down to the fourth row
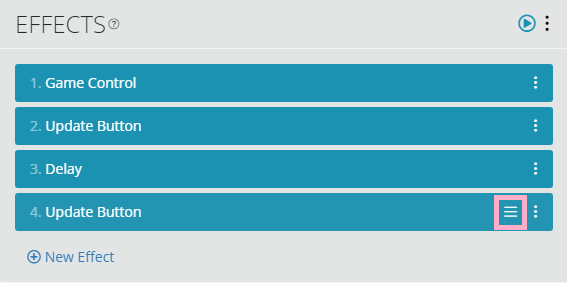
- Click the duplicated Update Button that’s on the fourth row
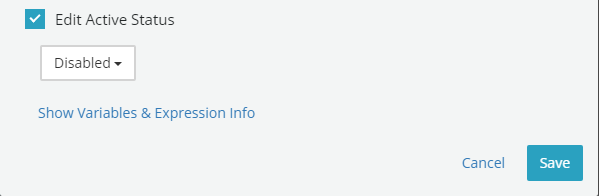
- Under Edit Active Status, change Active to Disabled, click Save
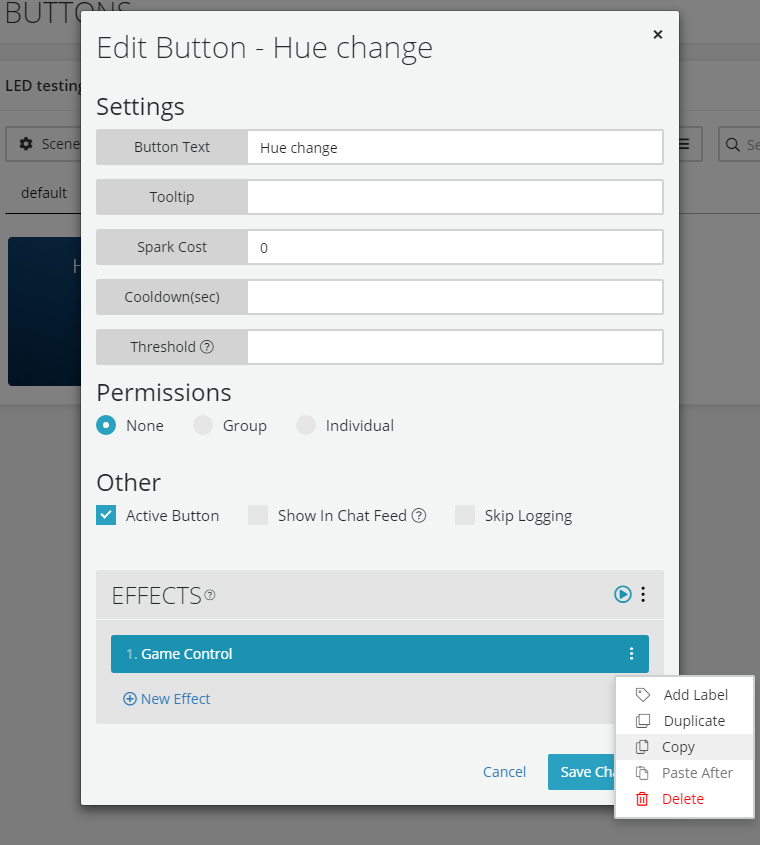
- Click the menu button for Game Control and select Copy
- Click Save Changes
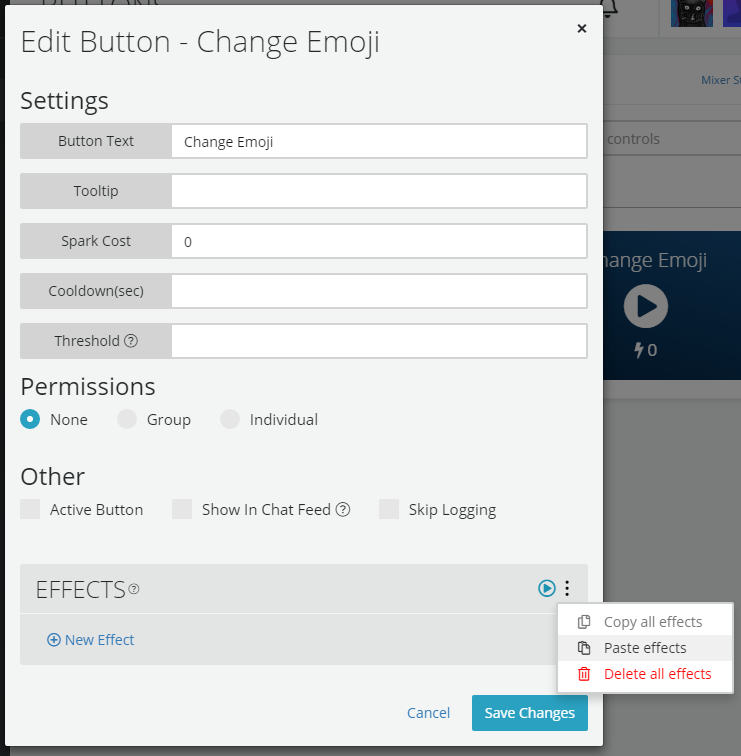
- Hover over Change Emoji and click EDIT
- Uncheck Active Button
- Click the EFFECTS menu button and select Paste effects
- Click on the newly pasted Game Control
- Under Key To Press, change 3 to 2, click Save
- Click Save Changes
- Hover over Chromatic and click EDIT
- Click the EFFECTS menu button and select Paste effects
- Click on the newly pasted Game Control
- Under Key To Press, change 3 to 4, click Save
- Click Save Changes
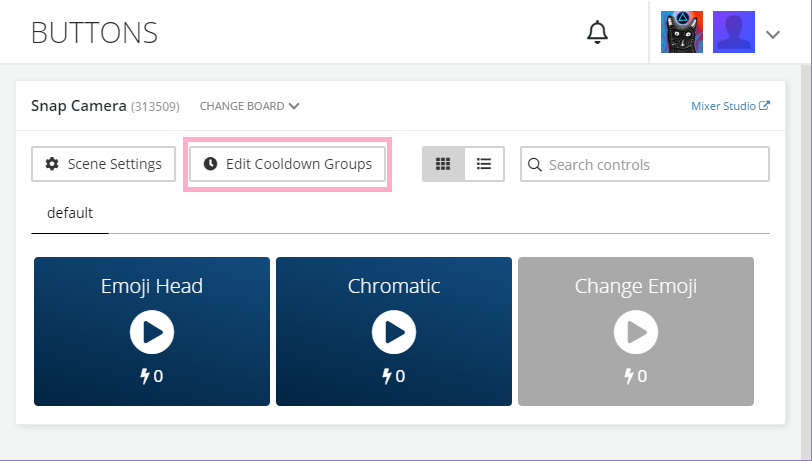
- Click Edit Cooldown Groups
- Click New Cooldown Group
- Name the group and set the cooldown for 5 seconds
- Under Which buttons should cool down together? select Emoji Head & Chromatic
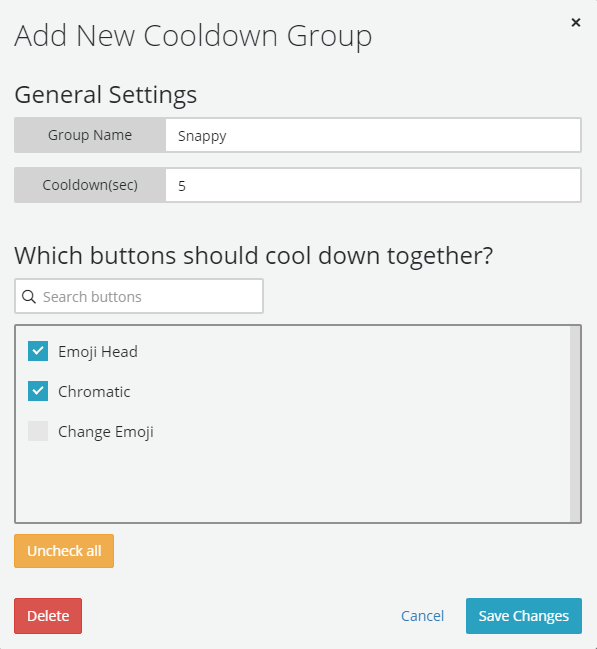
- Click Save Changes and then Close
- Connect Firebot using the power button on the bottom left, go to your channel and test away
If someone clicks the Chromatic button, the filter will change to Chromatic, but if someone clicks the Emoji Head button, the ability to change the Emojis is allowed and viewers will be able to mess with it for 5 seconds before getting disabled.
Setting up alerts to change filters
Firebot has the ability to trigger effects for things like new follows or new subscribers. For this guide we’ll be having the Emoji Head pop up, then switch Emojis and turn back off when a new follower occurs.
- On the left menu Click on EVENTS
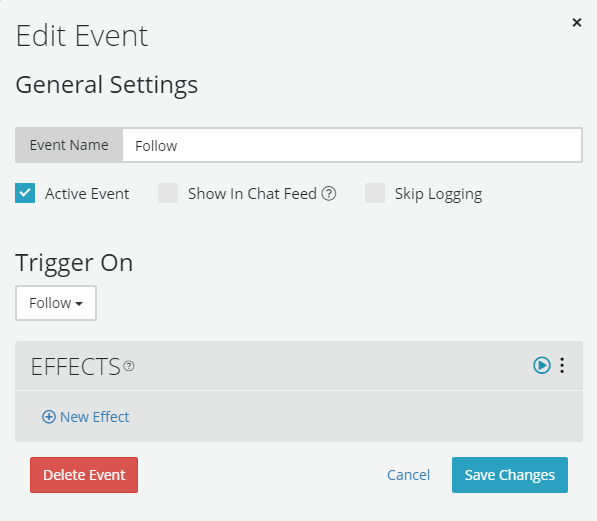
- Click + New Event on the top
- Name the Event, select Follow for the Trigger On and check Active Event
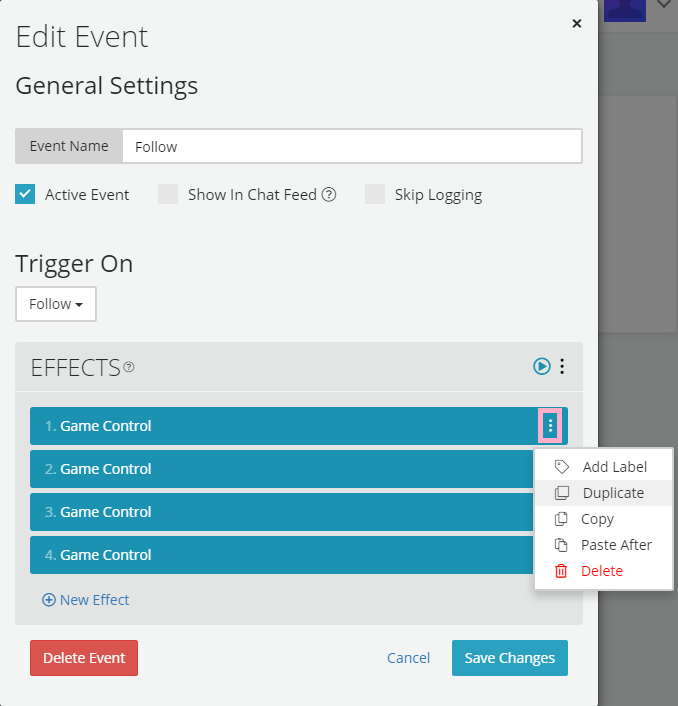
- Click + New Effect and select Game Control
- Set the Key To Press to 3 and Modifiers to Control then click Add
- Click the menu for Game Control and select Duplicate – do this three times
- Click the second row Game Control
- Change Key To Press from 3 to 2
- Click the third row Game Control
- Change Key To Press from 3 to 2
- Click the fourth row Game Control
- Change Key To Press from 3 to 1
- Click + New Effect and select Delay, set the duration to 1 second and click Add
- Duplicate Delay two times and move each Delay between each Game Control
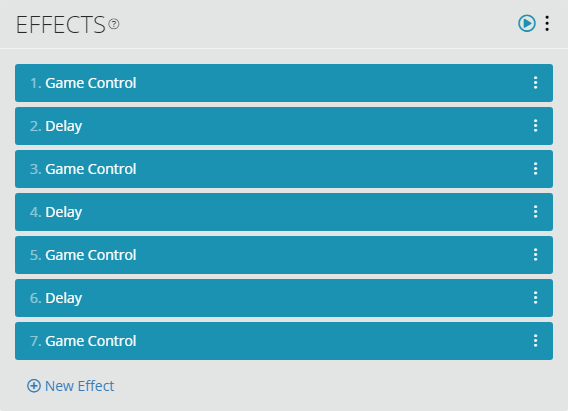
- Confirm settings – these are Game Controls 1 3 5 & 7 and it needs to be in this order to work
- Click Save Changes
- Click the play button to test the effect or have someone follow you, then rejoice

You can go crazy with this, so be creative and have some fun! If you run into issues just let me know and I’m sure we can figure it out.
Tips and tricks
Snapchat Lens graphic buttons
You can have the Snapchat Lens graphic for your buttons instead of just text.
- Open Snap Camera
- Hold CTRL and hit 3 to turn on Emoji Head [or just search]
- Click the Lens graphic on the right to expand the options
- Click Copy Lens Link

- Paste link into your browser [Chrome, Firefox, Netscape Navigator, etc.]
- Right click on the graphic and go to Copy image address [or image whatever]

- Go to your MixPlay board in Mixer’s Developer Lab
- Resize the Emoji Head button to make it a square
- Edit the Emoji Head button properties, paste the image address for Background Image and add the tooltip

- If you only want the graphic, click Emoji Head under Text and hit space, adding a whitespace
- Hit Save on the top right
- Open up Firebot or Mix It Up
- Refresh the board in Firebot or Mix It Up


- Connect Firebot or Mix It Up and go on your channel – success!

Timed filter
Remember that we set up CTRL + 1 to turn the filter on or off. This means that you can have a button turn a filter on, wait X amount of time, then have either Firebot or Mix It Up trigger CTRL + 1 to turn it off. I know we went over this in the guide for alerts, but this can be applied to anything. Just keep in mind that it works as a toggle switch, meaning don’t accidentally use it in the reverse manner.
Stream Deck
That sexy device from Elgato can also change the filters – just open up the Stream Deck software, drag the hotkey and set the correct trigger.

Restrict filter change to subscribers, high ranks or spark spenders
If you want only certain people to be able to change your filters, you can do this with Firebot or Mix It Up. With Firebot, just edit the button and change the permissions to Group, then select who is allowed to do it; keep in mind as of this post, rankings only work with Mix It Up.

With Mix It Up, you can also restrict the buttons for people that have high ranking / currency.


For additional info on how to use these restrictions for buttons, check out the Firebot Wiki and the Mix It Up Wiki.
Change filter with chat commands
If you read the guide above on how to make a MixPlay button work with Snap Camera, then you’ll find this process pretty similar. To spare being redundant I won’t be going over the creation, but I will tell you where to go to add the chat command.
In Firebot go to COMMANDS on the left, then click + New Command and add the Game Control command. You can go to one of the MixPlay buttons we set up before, copy the Game Control effect and paste it here, then change the key accordingly to the filter.

In Mix It Up, click the Menu button and go to Commands, then make a new advanced command. You can load up the command we made before and alter it accordingly to the filter you want.

Using the example above, if someone in chat typed in !emojihead, it would trigger the Emoji Head filter – keep in mind that Mix It Up automatically adds the ! so you don’t need to.
Random filter
Although I have yet to do it [and can figure it out if anyone wants it], you could use something like AutoHotkey to trigger a random filter for the viewer. The script would basically wait for a keypress, then send CTRL + [random integer] and change the filter.
Yay, we’re done!
Hopefully you have everything working and will reign supreme with stupid silly filters going off at random on your stream from your viewers – it’s fun as funk! If this has helped you in any way or if you need additional support, just let me know below.
Have fun.
sorryaboutyourcats

Guide for letting viewers control your @Snapchat filters [and change on events like new follows / donos plus Stream Deck control] right here: https://t.co/cW7pBdRIgc
Needed: @FirebotApp or @MixItUpApp, @TheSnapCamera & @WatchMixer account.
Need more help with this? Let me know! pic.twitter.com/mTMCzjNaRy
— sorryaboutyourcats ̡̳̙̲̭͞
(@SryAbtYourCats) January 4, 2019

So what are we going to have viewers be able to funk with today? Lights!
After this guide you’ll be able to:
- Have viewers change the colors of your Hue lights via MixPlay buttons
- Have Hue lights trigger effects and color changes for alerts like follows, hosts, subs or donations
- Have viewers trigger colorloop and light flash effects
- Have Hue lights controlled using a Stream Deck
Gimme da’ lights
If you haven’t purchased any Hue lights yet, be sure to get the newer generation lights.
There is a drastic difference in colors as seen here. Gen 3 are the ones I use.
This kit includes a Hue bridge (which is needed) and two newer generation Hue lights. I’d also recommend this LED strip as it’s both vivid and easy to slap on anywhere. There are plenty of other Hue products you can use too – just do your research before purchasing, as with any product.
Setting up WinHue
We’ll start with WinHue, the program that controls the Hue lights for Windows.
After we have a few hotkeys set up, we’ll go over the Mixer side of things.
This should be set up on the same computer as your MixPlay control program [like Firebot & Mix It Up].
If you have a dedicated streaming computer set it up on there.
Setting up WinHue is fairly straightforward:
- Download WinHue 3.0.1386 here [hotkeys seem to be borked on newer version when I tried it]
- Install and open WinHue
- Connect your bridge [be sure to hit the button when it asks]
- Make sure it finds all your lights [easy to set up via phone app]
- Rename the lights [double click the light to turn it off/on to ensure it’s the right one]

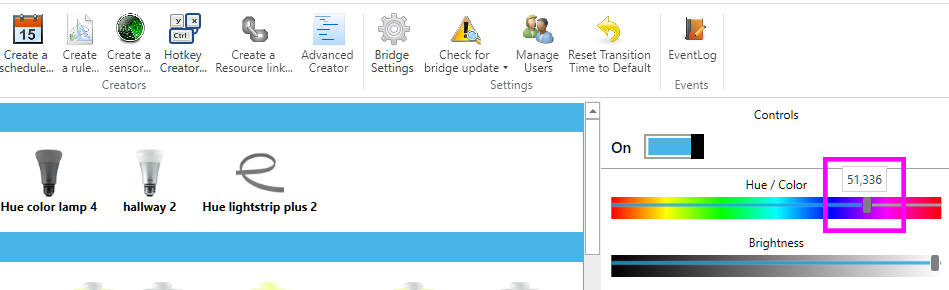
Let’s make hotkeys
Open the HotKey creator in WinHue and let’s start messing around.
I’ll only be going over the features that I see useful – for additional info head over to the wiki.

Let’s go over some of the values we can change and then we’ll funk with some examples.
Select Lights for a single light and Groups for multiple lights [you can make a group inside WinHue].
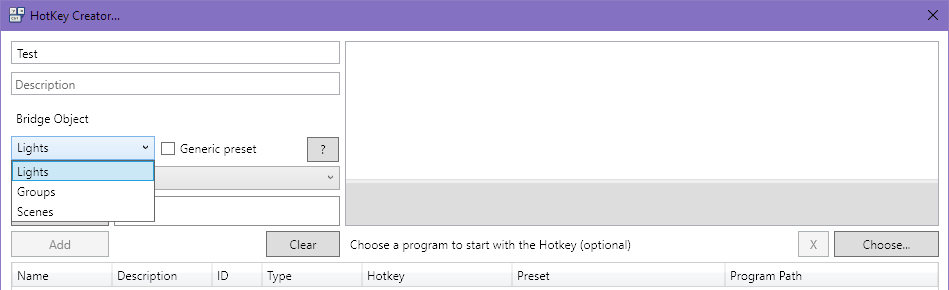
The next dropdown menu will let you pick the light or group.
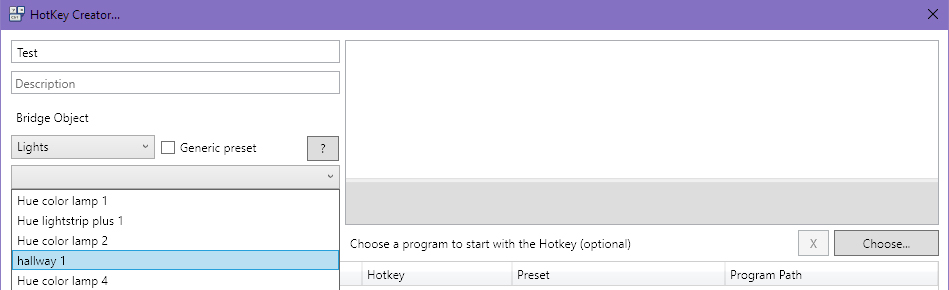
You should see the right side fill up with stuff after selecting the light.
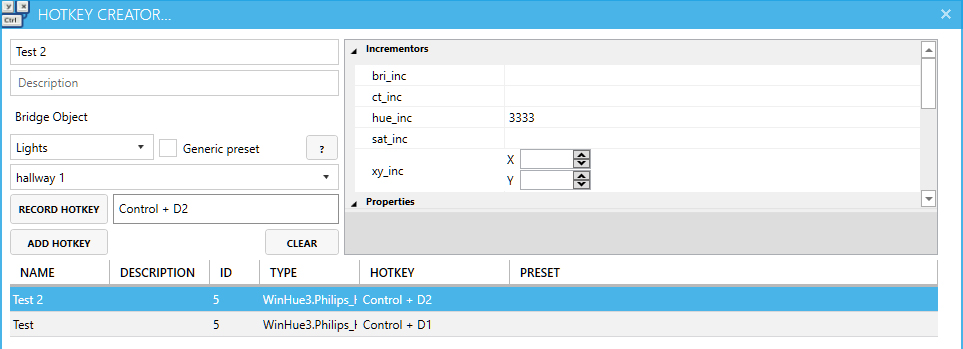
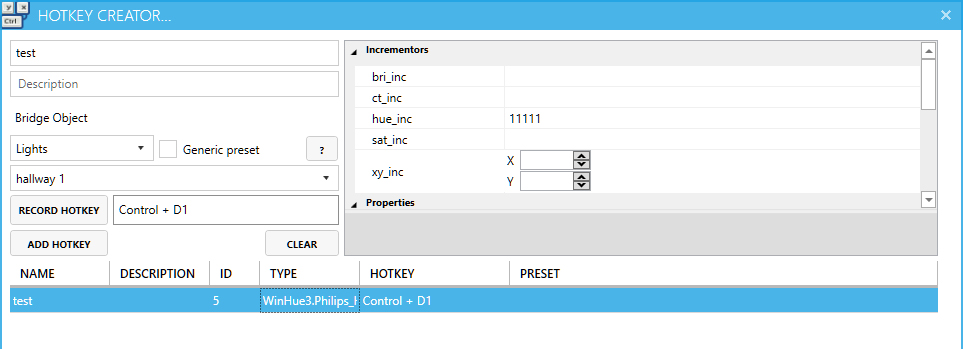
Let’s make the hotkey! Click Record Hotkey and press a combo of two keys – hold CTRL and hit 1 for this test.

Now it’s time to go over the incrementors & properties.
Adjust any incrementors and it’ll add/subtract the value relative to whatever the current value is.
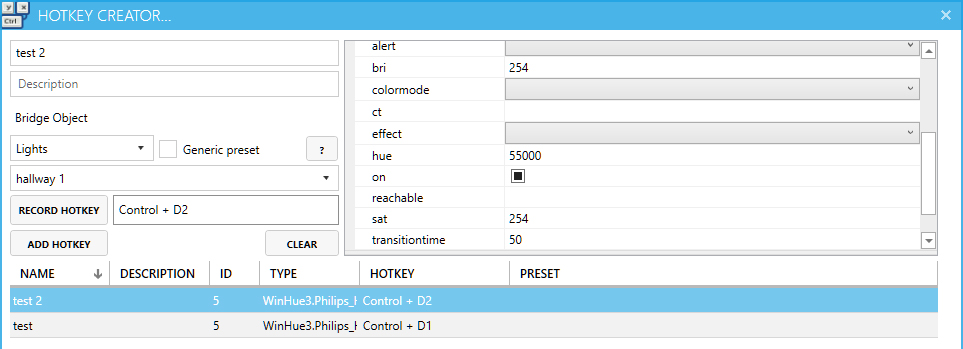
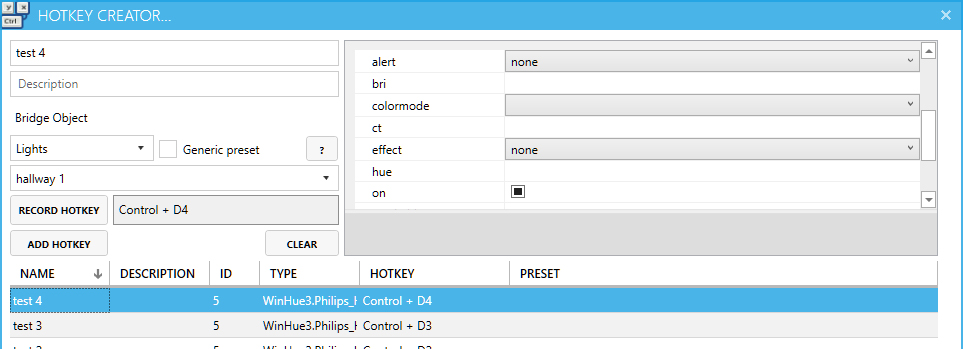
Adjust any properties and it’ll just set whatever value you throw at it.
A hotkey can have a few different incrementors and property adjustments so you can mix and match if you’d like.
Incrementors
bri_inc [0 = min brightness | 254 = max brightness]
Increases or decreases the brightness of light/group. To decrease just do -X.
This value does not loop – if you’re at 234 brightness and you add 50, your light will be set to 254 brightness.
hue_inc [0 = red | 22,000 = green | 44,000 = blue]
Increases or decreases the hue value (color) of the light/group. To decrease just do -X.
This value loops – if you’re at 55,000 hue (pink) then add 22,000 more, you’ll be at 11,195 hue (yellow).
sat_inc [0 = no color | 254 = max color]
Increases or decreases the saturation (color potency) of light/group. To decrease just do -X.
This value does not loop – if you’re at 227 saturation and you add 65, your light will be set to 254 saturation.
Properties
alert [select = blink once | lselect = blinks a lot | none = stops the blinking]
The selected light/group will blink off and on.
effect [colorloop = loops all the colors | none = shuts off colorloop]
The selected light/group with cycle through all the colors.
bri [0 = min brightness | 254 = max brightness]
Sets the brightness of the light/group to whatever value you set.
hue [0 = red | 22,000 = green | 44,000 = blue]
Sets the hue of the light/group to whatever value you set.
sat [0 = no color | 254 = max color]
Sets the saturation of light/group to whatever value you set.
transitiontime [0 = instant | 4 = default]
Transition time between color adjustments, done in multiples of 100ms.
Tips
Instead of inputting a random number to get the exact color you want, just move the control slider for the values.
Adjusting hotkeys automatically saves.
Just click the hotkey on the bottom, make the adjustment on the right and close HotKey Creator.
You can also erase a hotkey just by clicking on it and hitting the delete key on the keyboard.
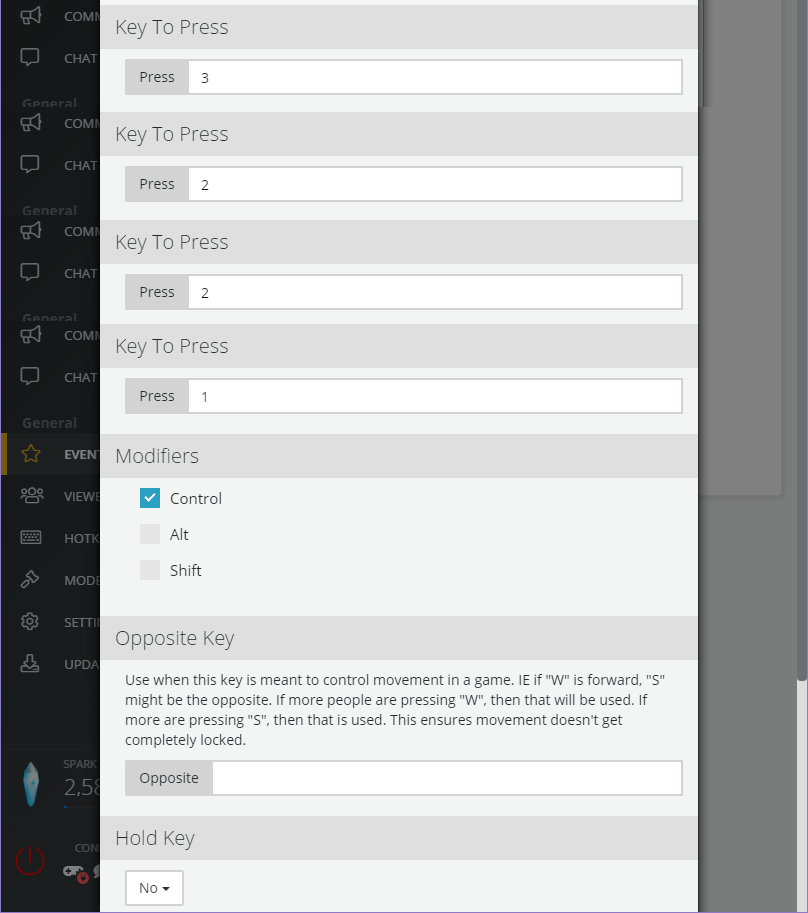
Make these examples
We’re going to make a few hotkeys – two that work with a button press and two that are triggered with an alert.
These hotkeys will work with both Firebot & Mix It Up. Open the HotKey Creator back up and let’s get to it!
Increases hue | CTRL + 1
Slowly sets color to pink | CTRL + 2
Turns on colorloop & flashes a few times | CTRL + 3

Turns off colorloop & stops the flashing | CTRL + 4
Close out the HotKey Creator and test the hotkeys – you should be able to trigger all of them.
If they don’t work, make sure the correct hotkeys are recorded and your settings are one to one of my screenshots.
Connecting with Mixer
There are two popular tools for Mixer that integrate with MixPlay – Firebot & Mix It Up.
Regardless of which one you use, you’ll need a MixPlay board for viewers to interact with.
You can create the board by heading over to the Developer Lab, logging in and creating a board.
[If you need help on how to create a board from scratch, follow my cat ears guide.]
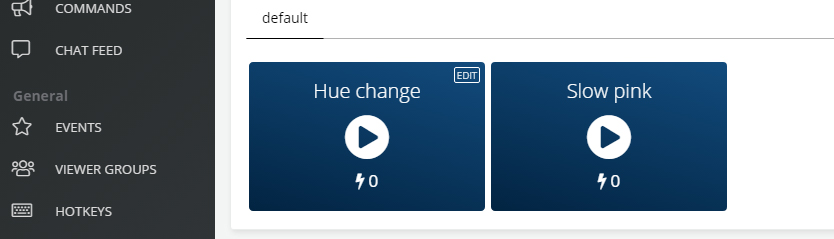
Make sure you create two buttons on the board – Hue change & Slow pink.
We’ll be setting it with Mix It Up next. If you’re using Firebot just scroll past it.
Mix It Up & Hue lights
We’re going to start with having two MixPlay buttons that can alter the lights.
- Go to MixPlay and select the board you created in the Developer Lab from the dropdown menu
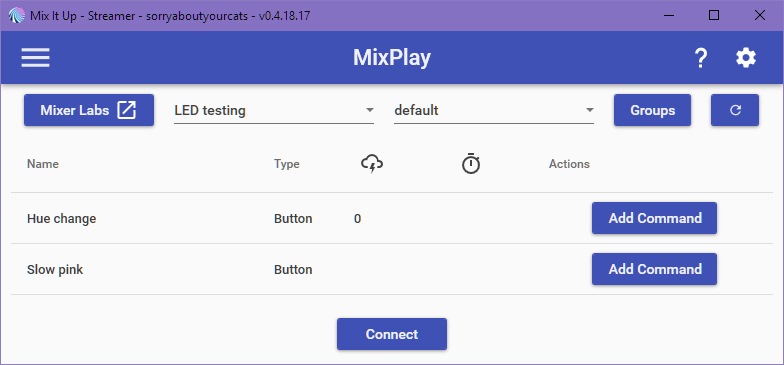
- Click on Add Command for Hue change and select Advanced Command
- Create new action Input (Keyboard & Mouse)
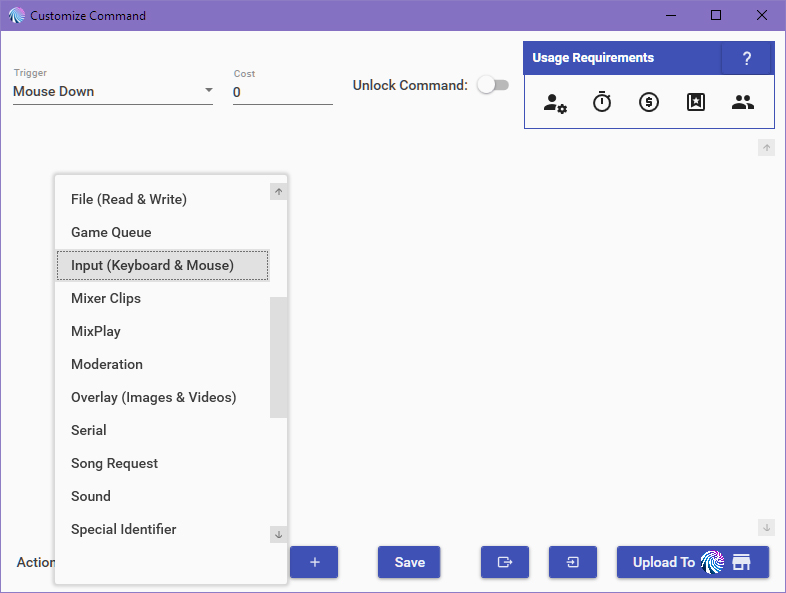
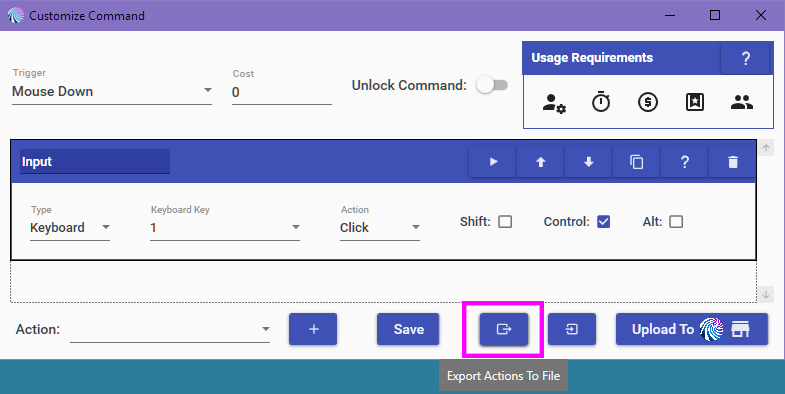
- Set type to Keyboard, Key to 1, Action to Click and check the Control checkbox

- Export the Actions to a file
- Hit Save
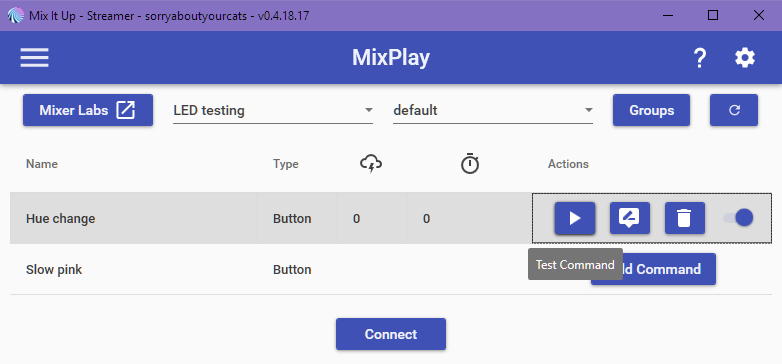
- Test the button
- Add command to Slow Pink and select Advanced command
- Import Actions from a file (pick the same file you exported before)
- Expand Input and change the Key from 1 to 2
- Save it and go back to the MixPlay page then click Connect
- Go on your channel, click the buttons and have fun with the pretty colors
The next thing we’ll be doing is setting up an alert when someone follows!
Mix It Up alert trigger
- Go to Events and click Add Command under Channel Followed, then select Advanced Command
- Import Actions from a file (pick the same file you exported before)
- Expand Input and change the Key from 1 to 3
- Add Wait Action and set it to 2 seconds
- Duplicate the Input action then change the key from 3 to 4
- Hit Save then hit the Play button on the Events page
That should get you started on how to get this all set up! Have fun customizing it to your heart’s desire.
If it doesn’t work for whatever reason or you get stuck, let me know in the comments below or on Twitter.
Firebot & Hue lights
We’re going to make two MixPlay buttons that can mess with the lights.
- Head to the Developer Lab, grab the code of your new board and put it into Firebot
- Hover over Hue change and click EDIT
- Click New Effect, select Game Control and set the pressed key to 1 and Control for Modifier, then click Add
- Click on the Game Control menu, Copy it then click Save Changes
- Hit the Play button on Hue change to confirm it works
- Click the EDIT button on Slow pink
- Click the EFFECTS menu and Paste Effects
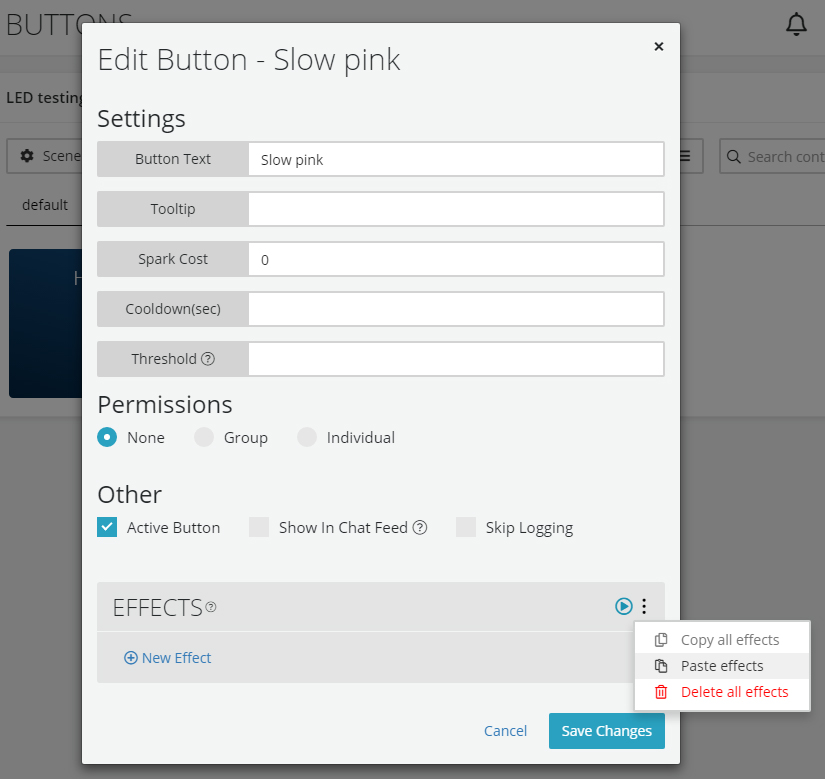
- Click Game Control and change Key To Press from 1 to 2, then click Save, then Save Changes
- Click the play button to test
- Connect Firebot to MixPlay, go on your channel and click the buttons for light fun time!
Firebot alert trigger
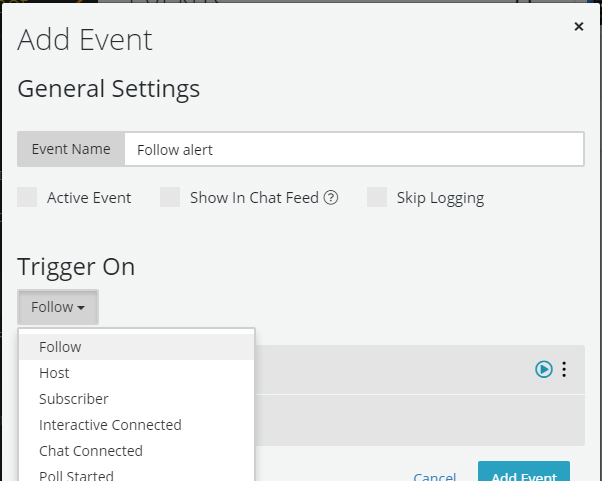
- Go to the EVENTS page and click on New Event

- Name the event and select Follow from the Trigger On dropdown menu
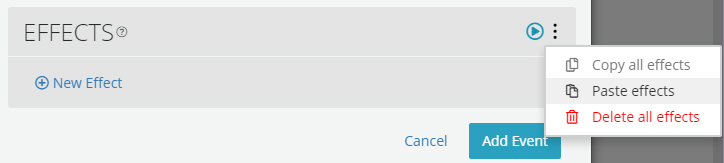
- Click the EFFECTS menu and Paste Effects
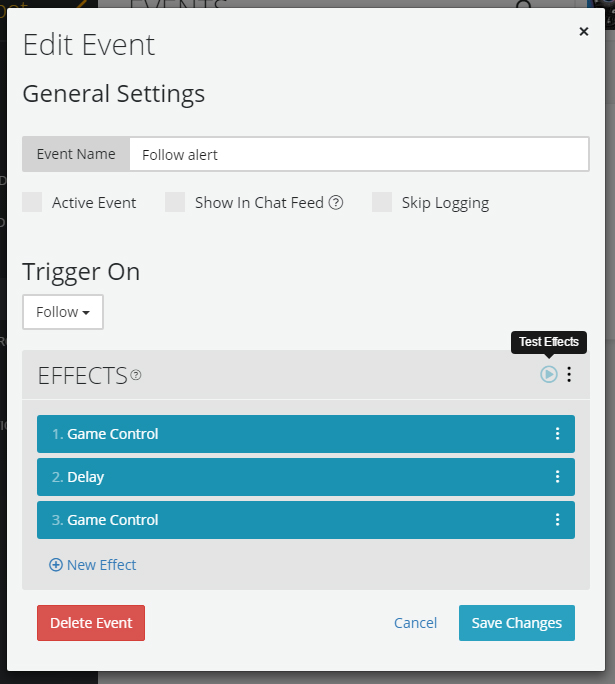
- Click Game Control and change the Key To Press from 1 to 3 then hit Save
- Click New Effect and select Delay then set Seconds to 2 and hit Add
- Click the EFFECTS menu again and Paste Effects… again
- Click Game Control on the newly pasted item and change the Key To Press from 1 to 4 then hit Save
- Click the Test Effects button on the EFFECTS section and rejoice at the funky lights!
This should set you on your path towards customized lights! Have fun funking around.
If it doesn’t work for whatever reason or you get stuck, let me know in the comments below or on Twitter.
Stream Deck
It’s also useful to have the Stream Deck control Hue lights, just in case you want things back to normal.
All you have to do is drag the Hotkey button to your grid and set up the hotkey that’s assigned in WinHue – easy!
Yay pretty lights!
With WinHue combined with Mixer’s MixPlay [using Firebot or Mix It Up], you can do a lot of fun things with Hue lights. I hope you enjoyed this guide on how to set up the Hue lights to work with Mixer’s MixPlay and alerts.
There is more customization using Processing, like creating light patterns [e.g. emulating cop lights].
Since my 2016 guide is long gone, I’ll have to recreate it eventually – so look out for it!
Thanks for reading,
sorryaboutyourcats
Updated guide on controlling Hue lights with @WatchMixer‘s MixPlay using @FirebotApp, @MixItUpApp & the Stream Deck. https://t.co/1vnpGPcKtZ pic.twitter.com/u00ONAEZZu
— sorryaboutyourcats ̡̳̙̲̭͞
]]>
I must warn you that this is version 1 and that certain things may be a tad ghetto – but it does indeed work! My hope is that you learn from this guide, make your own and create something even sexier before we work on our version 2. As always, if you need help, let me know in the comments below.
These are the products we need to make this happen:
- Adafruit Feather M0 WiFi
https://www.adafruit.com/product/3010
https://amzn.to/2EYq2Bq - Flora RGB Smart NeoPixel version 2
https://www.adafruit.com/product/1260
https://amzn.to/2Rw1IbG
- Jumper Wire Kit
https://amzn.to/2Sai2zr - Any wireless dongle
https://amzn.to/2QD81hD
- Cat ears found on Etsy, Amazon or at a convention
https://www.etsy.com/search?ref=tab_search&q=cat+ears
https://amzn.to/2CoZhTH
- Soldering Iron
https://amzn.to/2Cocr3g - Hot glue gun
https://amzn.to/2QHbzzd
- Electrical tape
https://amzn.to/2BtiuSl - Any pair of headphones
https://amzn.to/2R6HN6B
These are useful but not needed:
- Helping Hands
https://amzn.to/2QhDXUj - Arduino For Dummies
https://amzn.to/2qq4cNd - Arduino Starter Kit
https://amzn.to/2yP02mt - Make: Wearable Electronics
https://amzn.to/2EEzkSq - Lithium Ion Polymer battery [if you don’t want to be connected]
https://www.adafruit.com/product/258
https://amzn.to/2EF149l
Before we begin I must state that I am by no means an expert in creating these sort of devices – I just have a lot of patience and a passion for trying new things; if you too have the patience and at least some interest in creating this, you’ll both have fun and learn something new in the process. If you get stuck, have any questions or have a way to improve this guide, feel free to comment below. Since this is version 1, expect many revisions to make these better and better.
Have everything? Time to start!
Let’s begin with setting up the Adafruit Feather M0 WiFi. Since Adafruit’s guides kick ass, I’m going to link you their documentation – just follow it and head back here once you’re done.
This guide will teach how to set up the Arduino IDE for use with Adafruit boards:
https://learn.adafruit.com/adafruit-feather-m0-wifi-atwinc1500/setup
After that is set up, we’re going to continue the Arduino IDE configuration along with installing drivers. Although the Blink sketch is not needed, it is good to do for ensuring everything is working properly. If you’d rather pass it, just head back here after installing the drivers:
https://learn.adafruit.com/adafruit-feather-m0-wifi-atwinc1500/using-with-arduino-ide
Now it’s time to set up the WiFi side of things! Technically all you need to do here is install the WiFi101 library, but you can go through the entire guide in case you want to get more familiar with how WiFi works with the board:
https://learn.adafruit.com/adafruit-feather-m0-wifi-atwinc1500/using-the-wifi-module
Chances are the firmware is out of date – so let’s update that bad boy! Follow the guide here:
https://learn.adafruit.com/adafruit-feather-m0-wifi-atwinc1500/updating-firmware
Hands-on time!
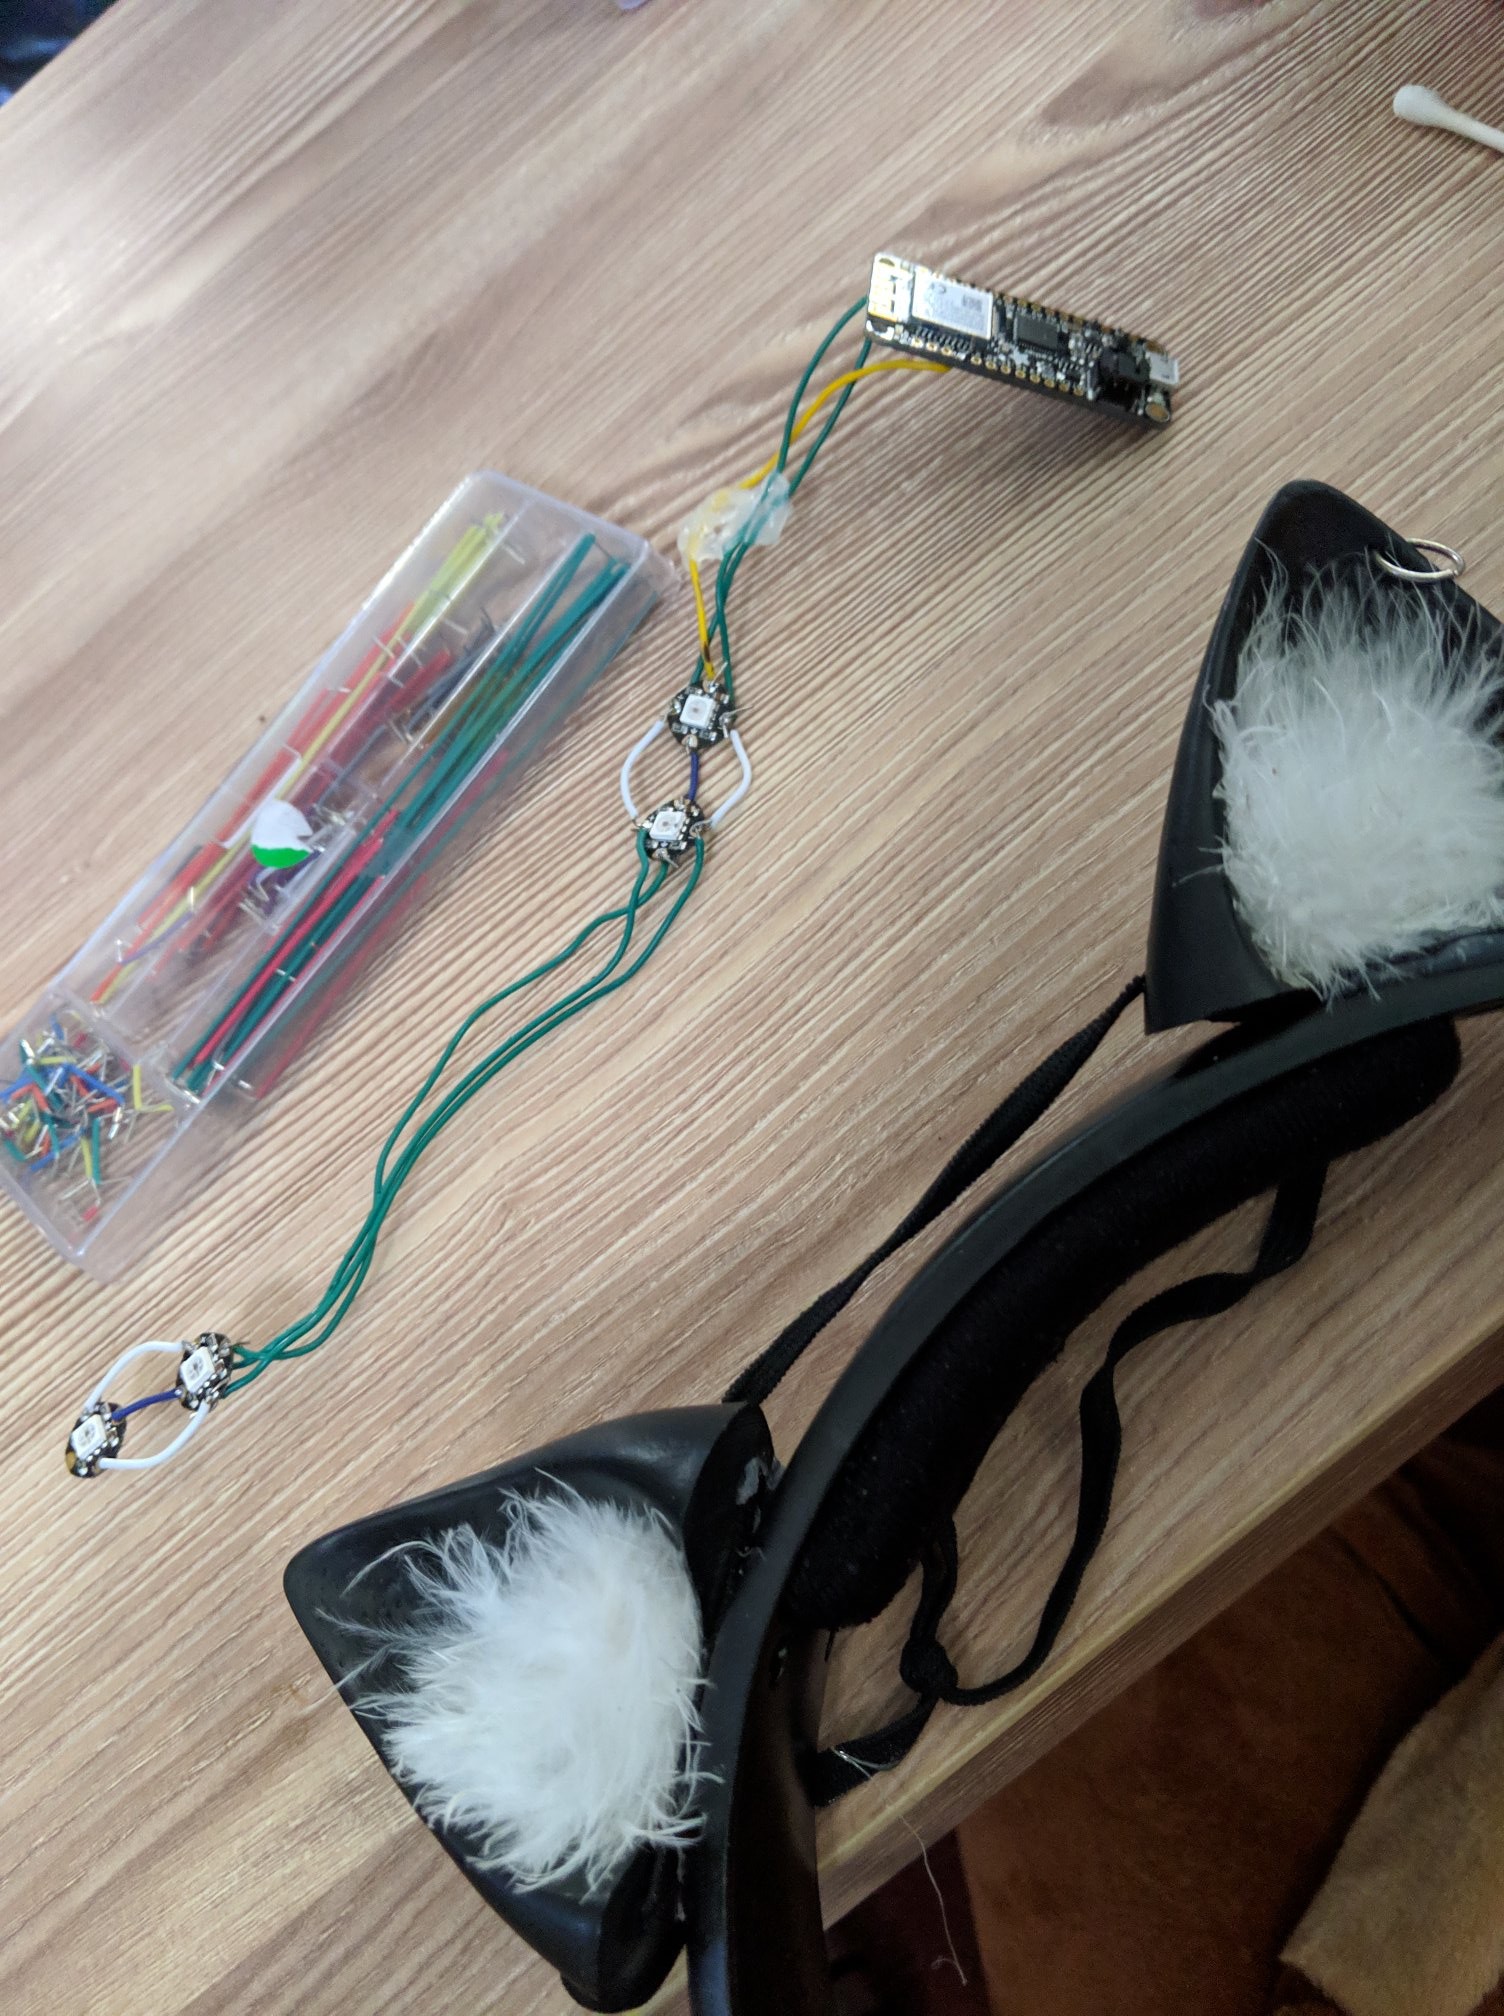
Get the Feather M0, NeoPixels and Jumper Wires ready, it’s time to start wiring. We’re going to connect everything first and test it before actually soldering everything.
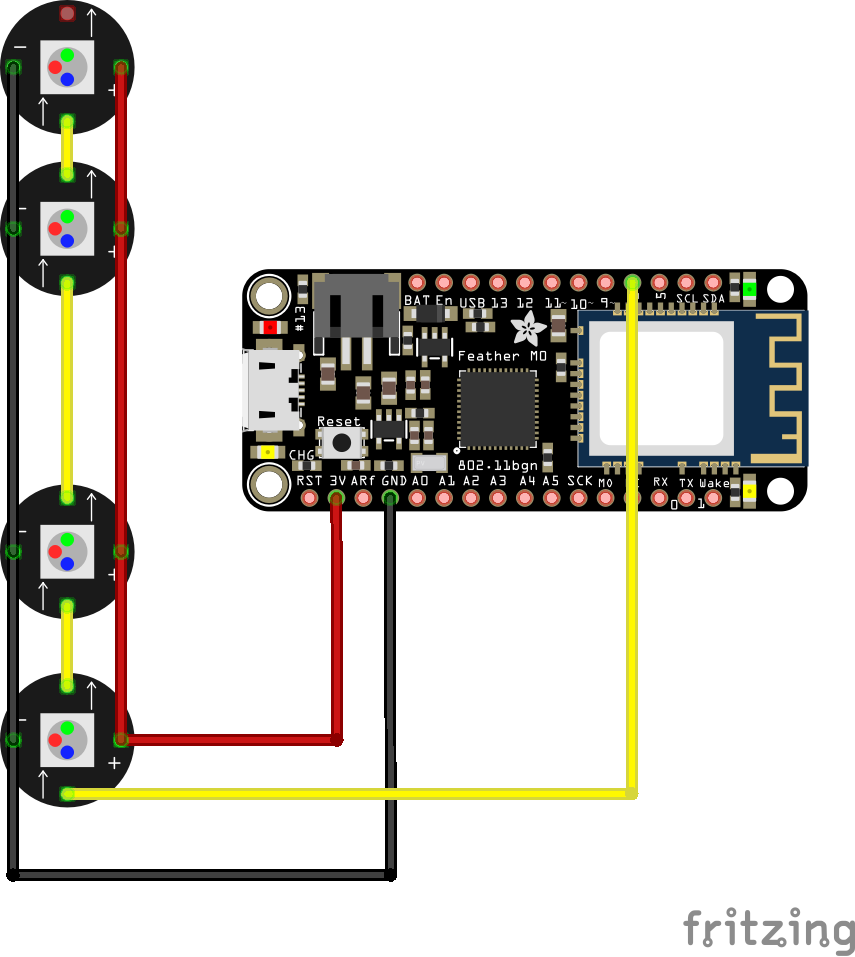
The wiring will go as follows:
- Feather M0 – 3V -> NeoPixel +
- Feather M0 – GND -> NeoPixel –
- Feather M0 – PIN 6 -> NeoPixel arrow pointing to middle
Fritzing diagram on how to set up:
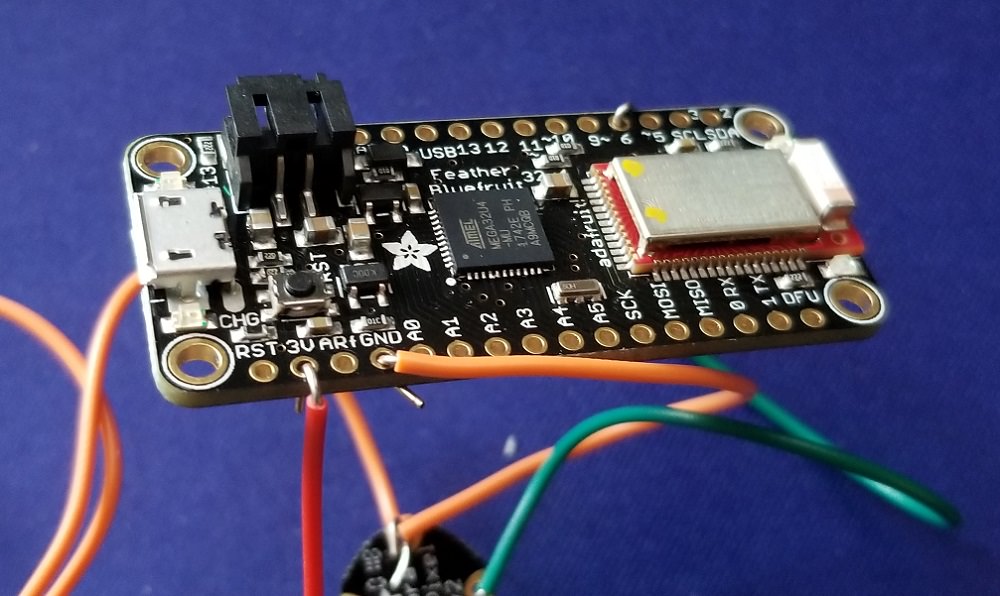
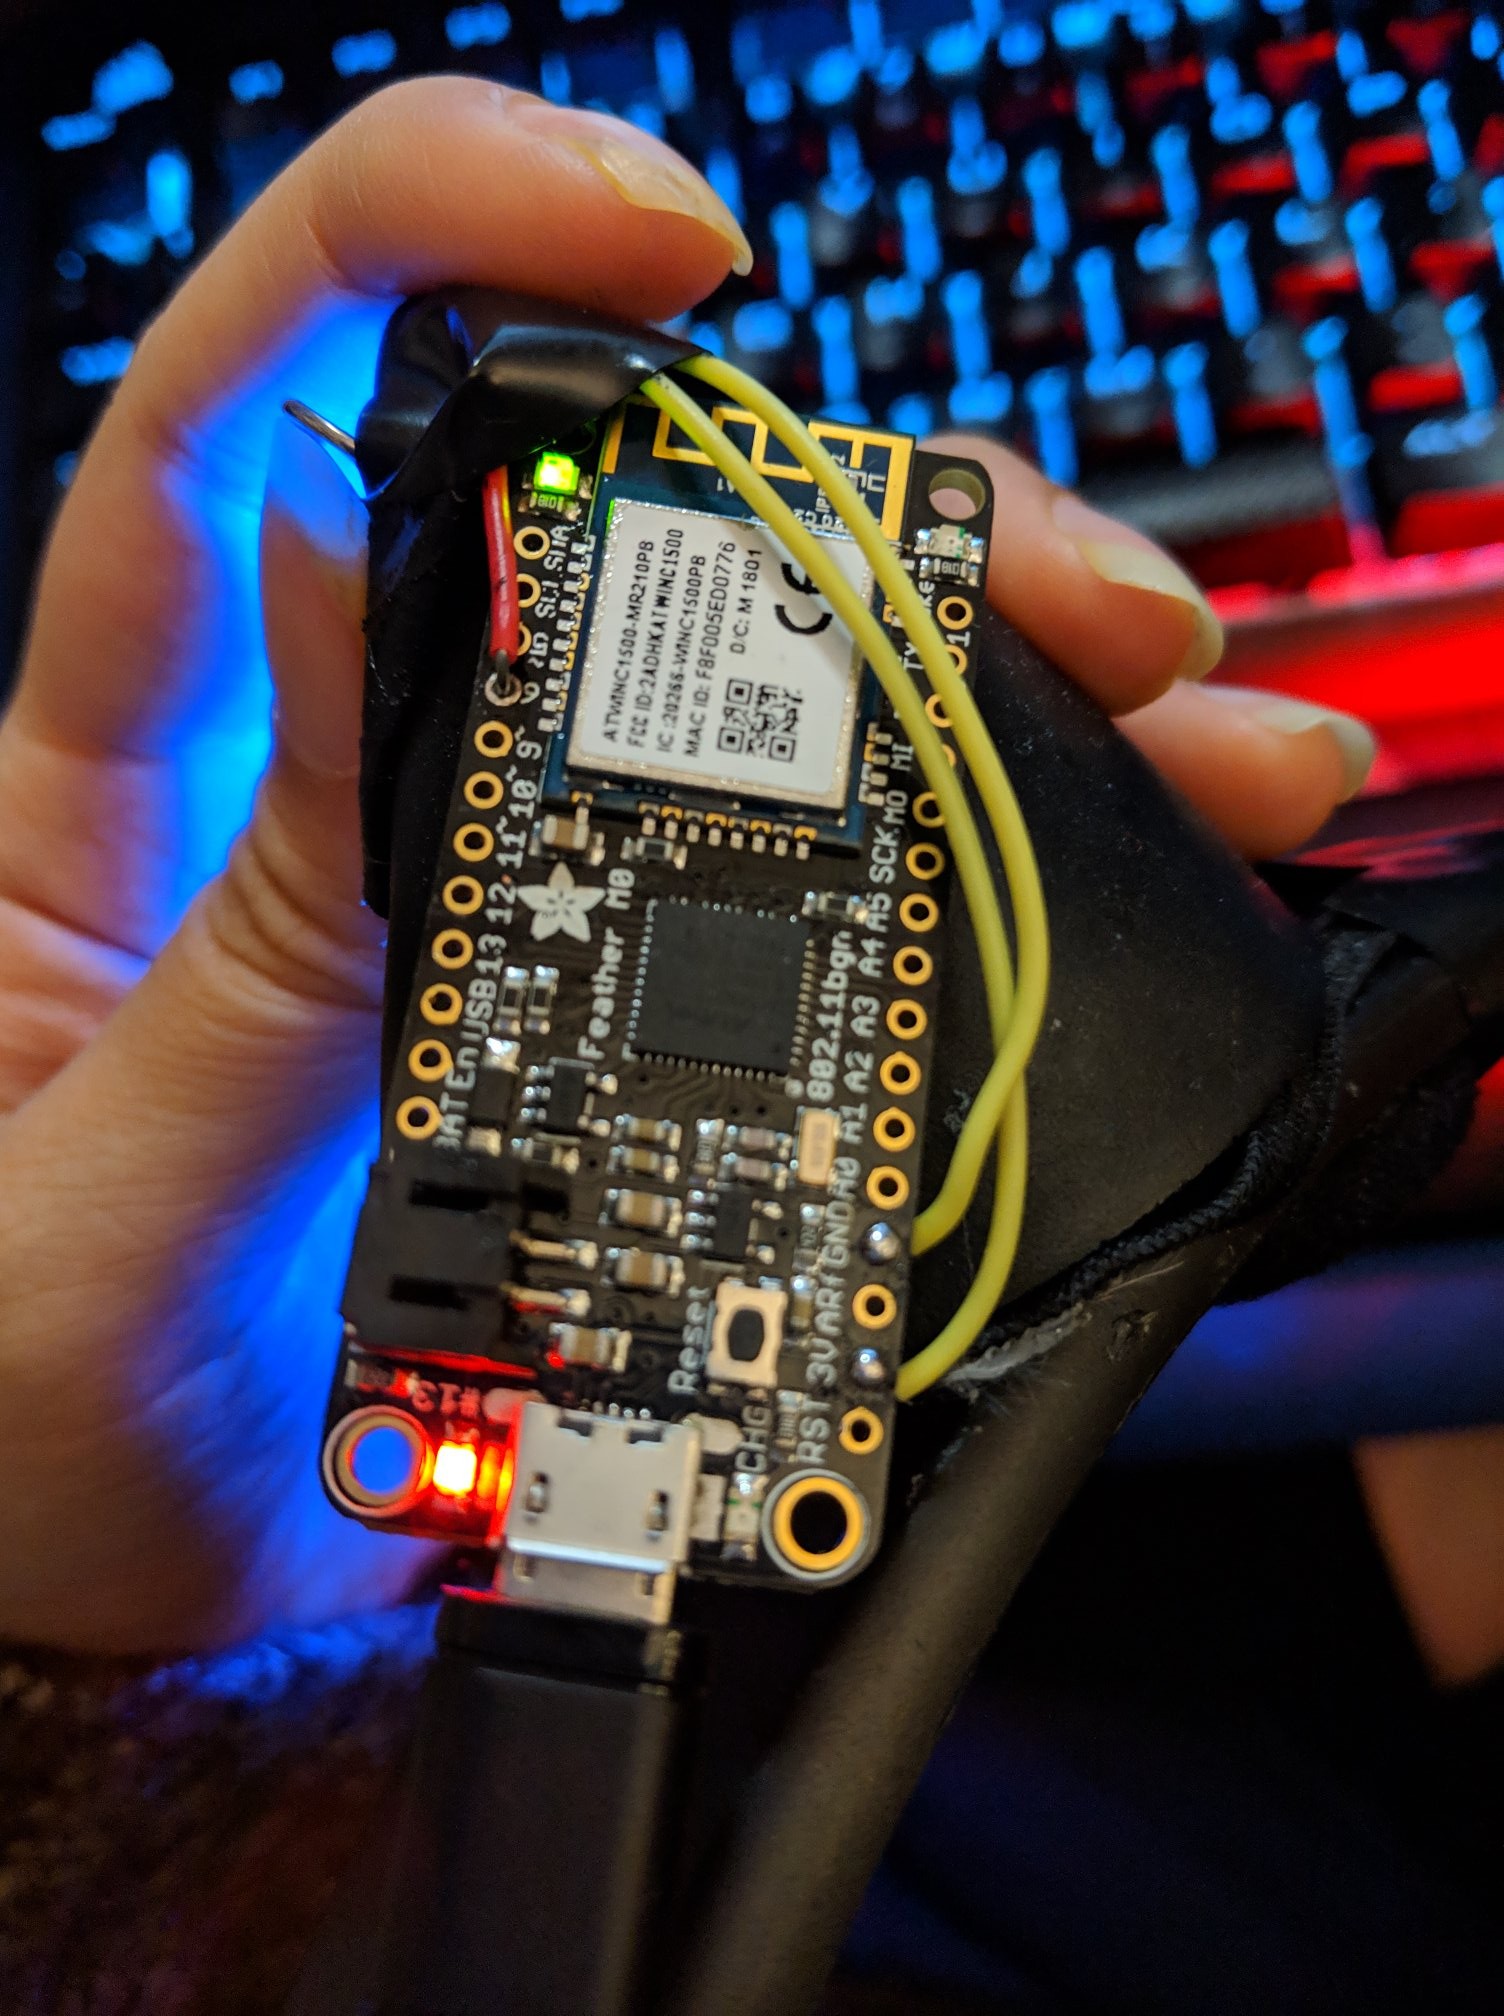
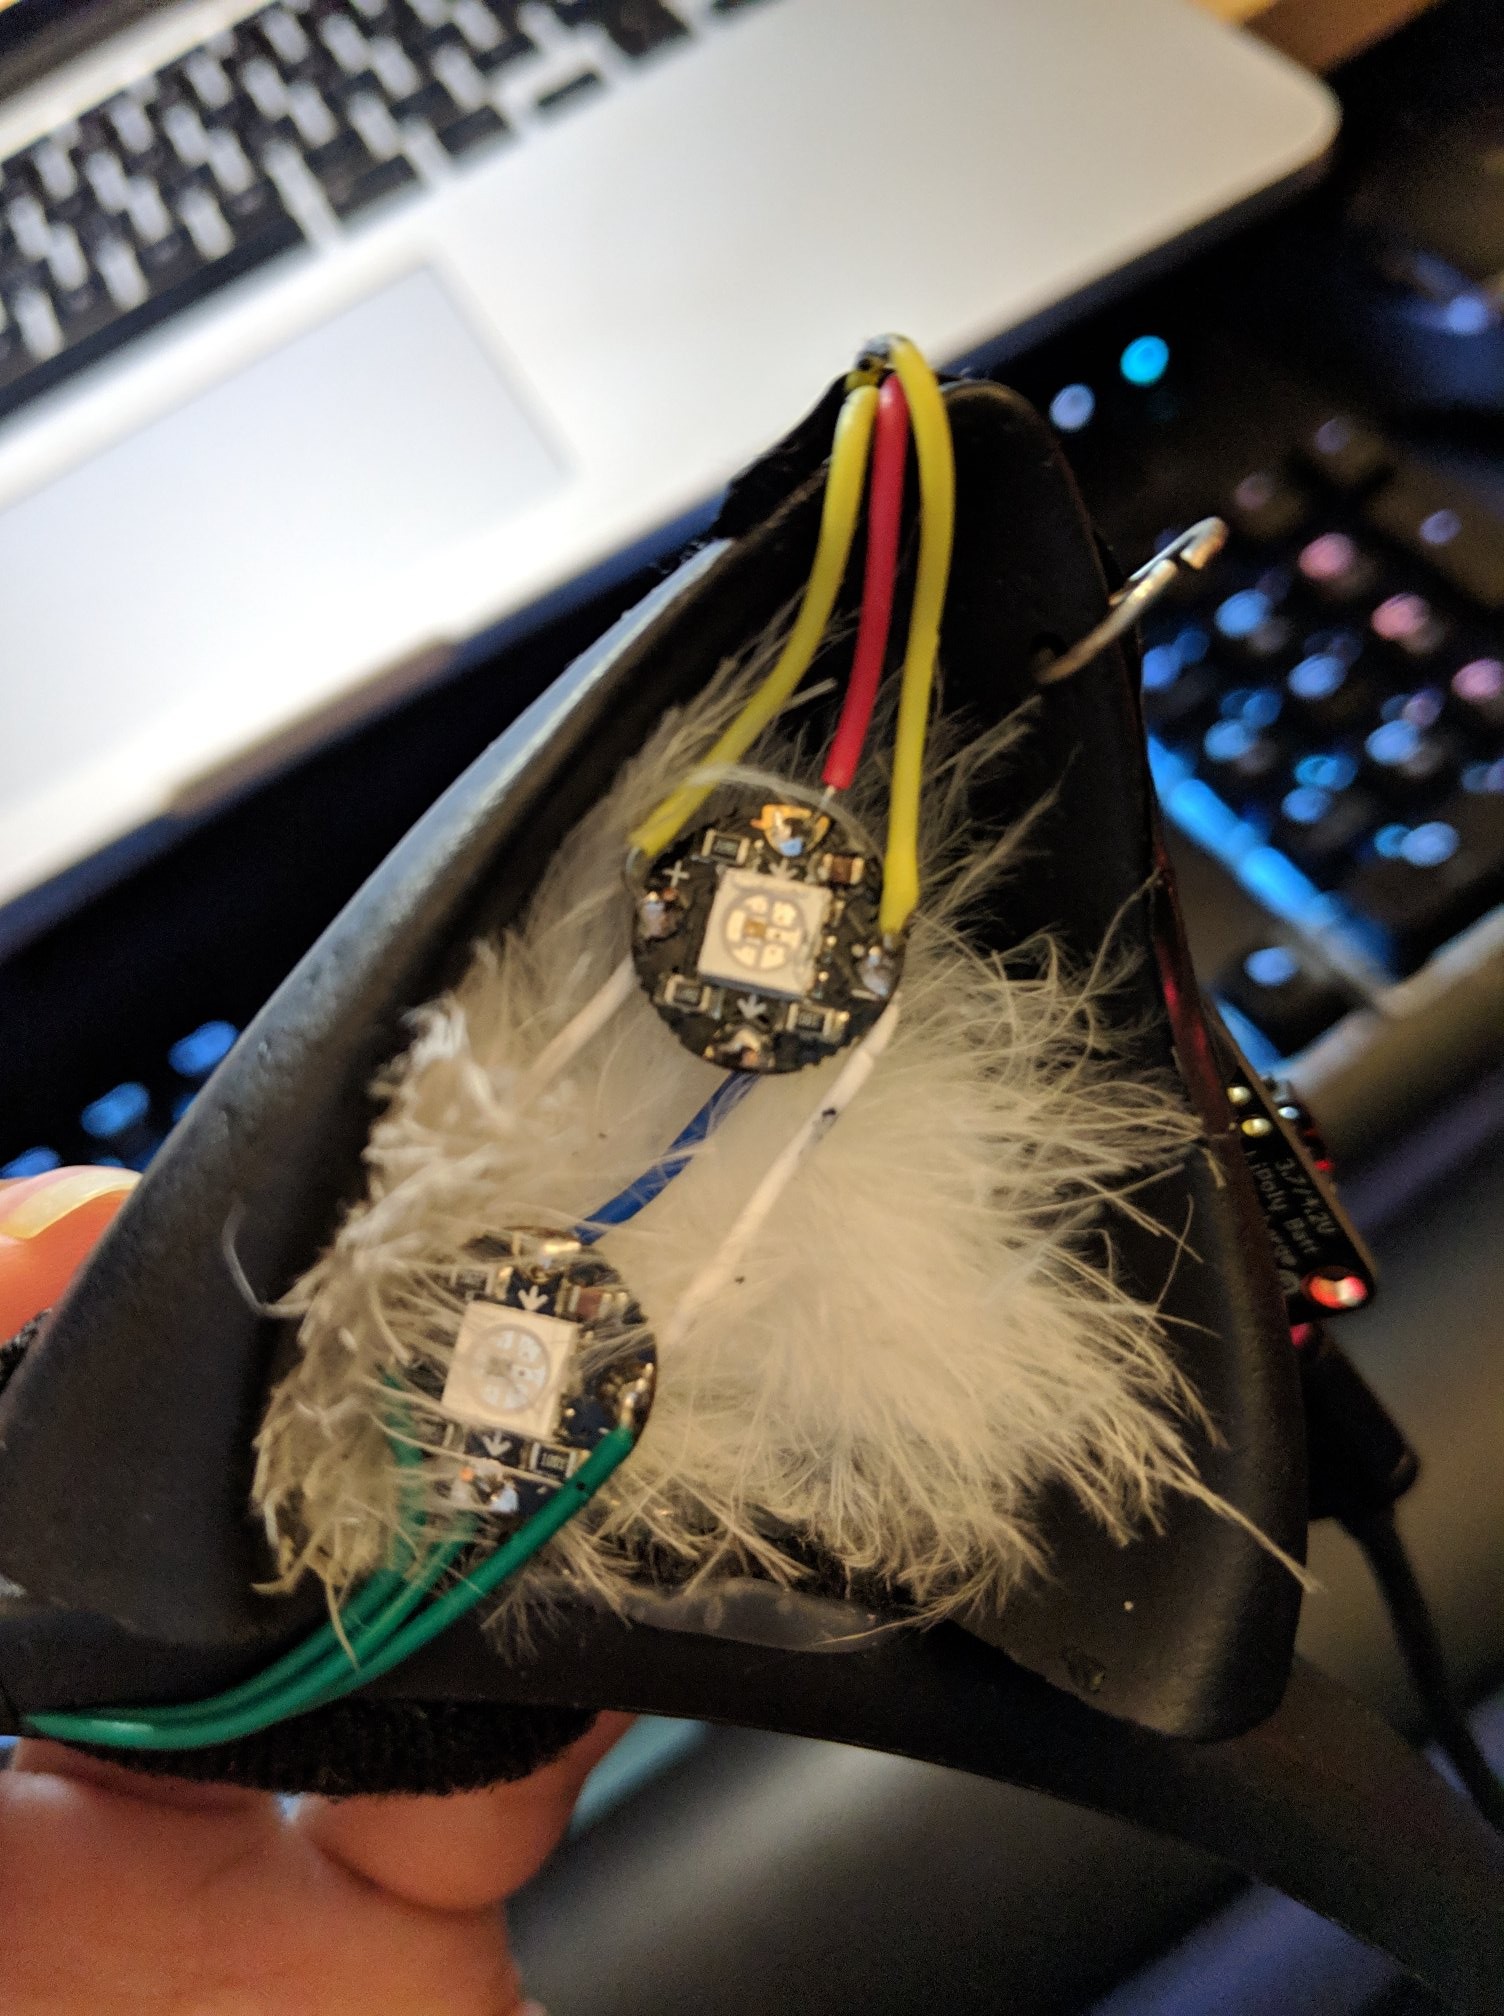
Here is a shot of a different Feather M0 with the correct wiring:
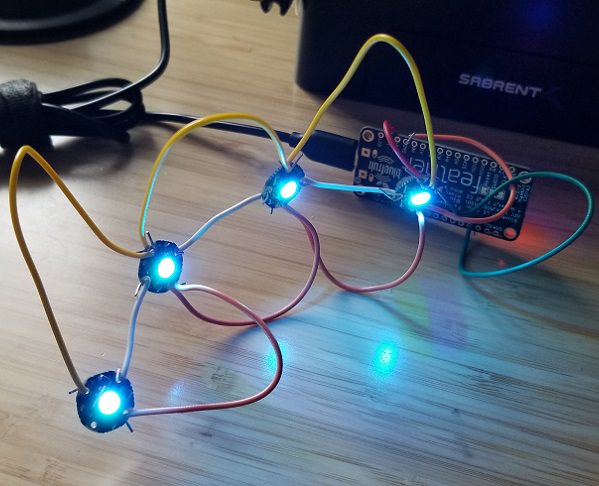
Yay – you wired a bunch of goodness! Hopefully that wasn’t too much trouble. Now it’s time to connect the micro USB cable from the Feather M0 to the PC. The final result should look like this, minus the LEDs being on:
And meow the software side of things…
Reading this section assumes you have properly set up the Arduino IDE to work with adafruit devices and have the Feather M0 connected via USB. If you haven’t done that, get your butt back up a few sections. 
- Download this zip from GitHub and extract it
- Open up CatEarsLED.ino
- Select the Adafruit Feather M0 board [under Tools]
- Select the correct port [under Tools]
- Upload the code [CTRL + U]
- Open the Serial Monitor to confirm WiFi connection [CTRL + SHIFT + M]
- On your PC connect to the Feather SSID via WiFi
- Open your browser and connect to http://192.168.1.1
- Click on one of the links and see the LEDs change color; weeee!
I won’t go into much detail with customization unless requested, but here are a few things to know:
If you need to change the amount of pixels, change this number:
#define NUMPIXELS 4
This line of code changes a certain LED to a certain color:
pixels.setPixelColor(PIXELNUMBER, pixels.Color(RED,GREEN,BLUE));
Example of changing the third LED to blue:
pixels.setPixelColor(2, pixels.Color(0,0,255));
Here is a good guide on NeoPixels showcasing the different types and various info:
https://learn.adafruit.com/adafruit-neopixel-uberguide?view=all
If the LEDs all light up then proceed to the next step. If for whatever reason none of them light up, there are a few things you can look at:
- Does the serial monitor show that the WiFi is broadcasting?
- Did you connect to the Feather SSID from your PC via WiFi?
- Are you connected to the Feather M0 via USB to your PC?
- Are any of the cables loose?
- Are there any errors in the Arduino IDE?
- Is the Feather M0 on-board LED lit up?
If only some of the LEDs light up, check the cables – they’re either loose or need to be replaced.
Once all the LEDs light up and everything looks good then we can proceed. The soldering will come after you confirm jumper wire lengths with the cat ears, so no need to do that yet.
Let’s make a MixPlay board!
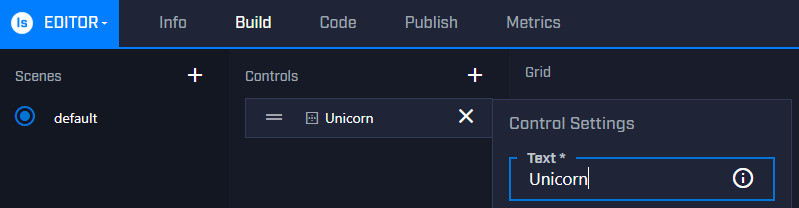
We’ll need to make a new MixPlay board in the developer lab, so head there now and make a new project. Be sure to name the project and set the project game too. Once you’re done with that, head to the Build tab on the top.
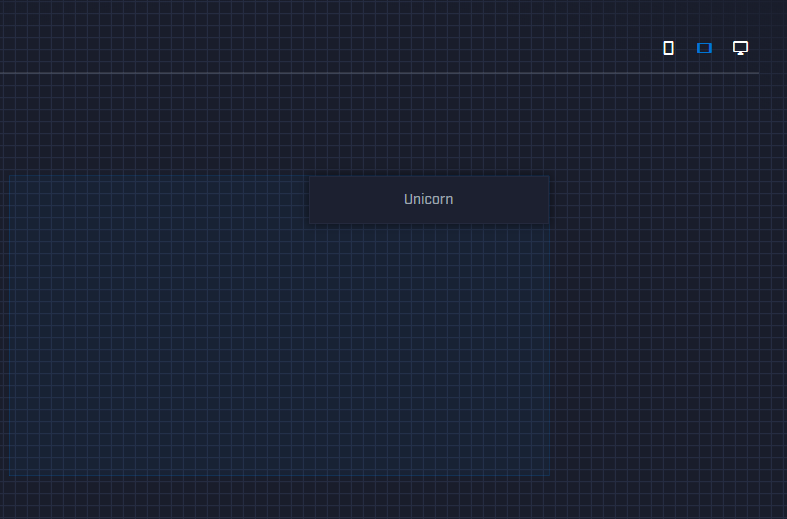
We’re going to make a very generic board just to show you how to make this work, so it’ll be up to you to customize it as you see fit. Create a new control, name it Unicorn and drag it to the board on the right. You’ll want to drag it for each grid type [small, medium & large], so be sure to change that on the right side. After you’ve dragged the button over three times for each grid type, save it.
If you want to dig deeper into the development side of Mixer, head over here, though it isn’t needed for this project.
Mix It Up time!
Mix It Up is a program that helps streamers connect various things with MixPlay, like our LED Cat Ears!
If you don’t have it already, download it now.
- Open Mix It Up, sign into Mixer and go through the new user process
- Click the Menu button and go to MixPlay
- Select your board from the Game dropdown menu
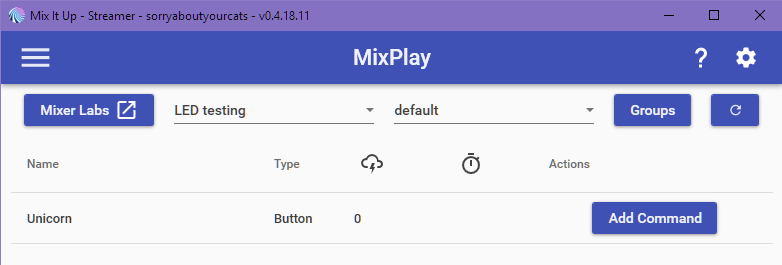
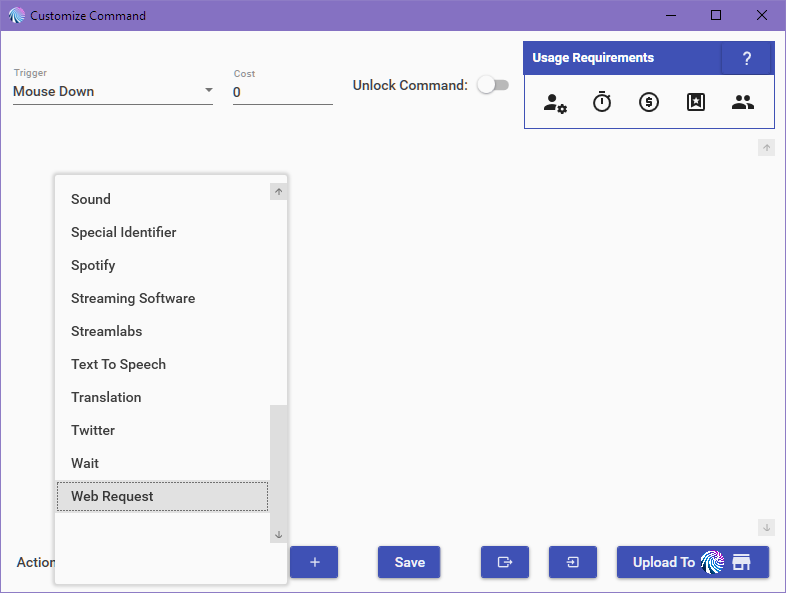
- Click Add Command on the Unicorn button, then click Advanced Command
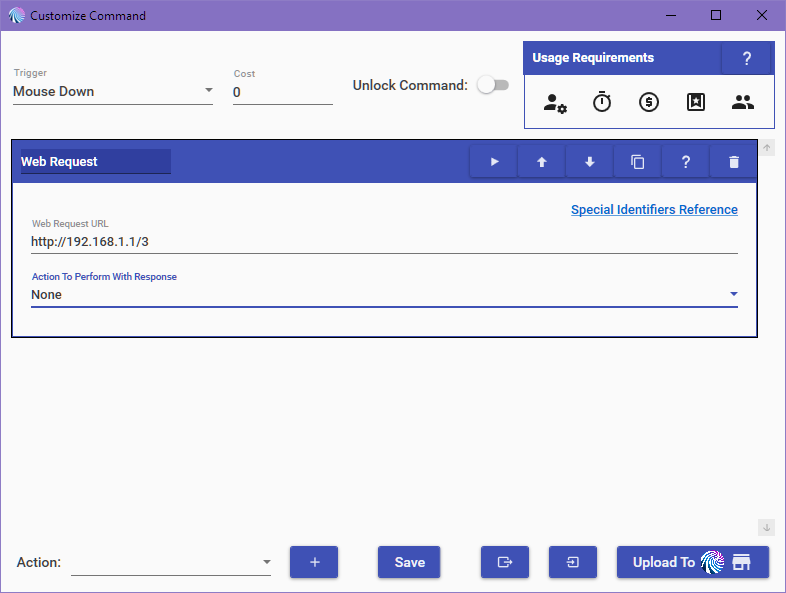
- Under Action select Web Request
- On the Web Request URL put http://192.168.1.1/3, then None from the dropdown and save
- Back at the MixPlay screen, click Connect
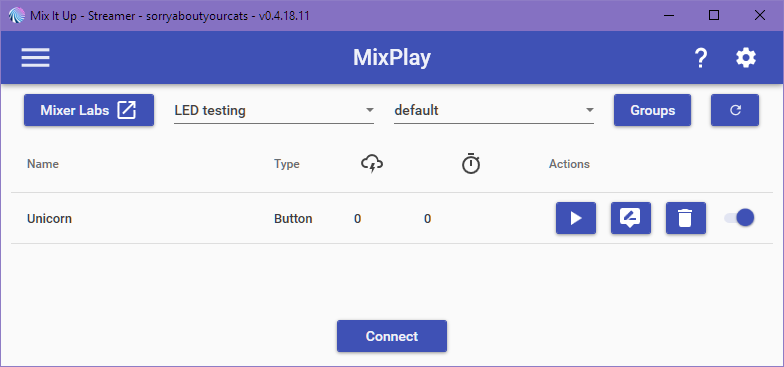
- Go to your Channel page and you should see the buttons below

- Click the button and you should see the ears change colors
There is a lot of stuff you can do with Mix It Up, so definitely check out the Mix It Up wiki if you want to know more about customizing your board. As an example, when someone presses a button on Lychi’s stream, the cat ears change color and a sound effect plays – it also states who pressed it. Besides button presses, you could have event triggers change the lights as well.
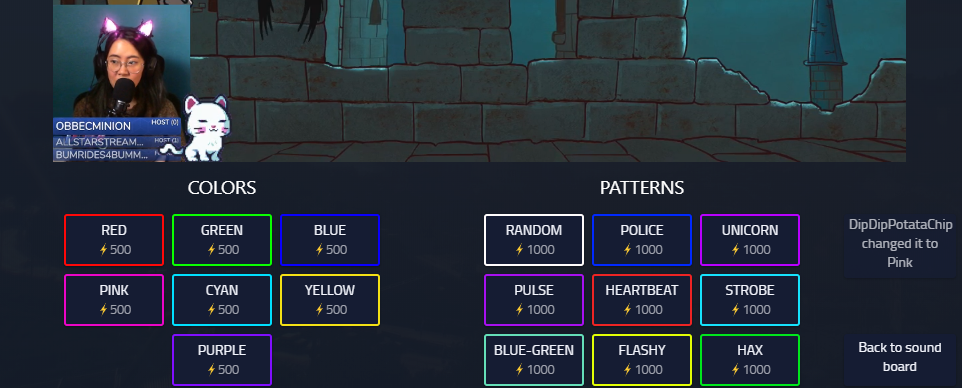
If you want to use a different color or pattern than Unicorn, go to http://192.168.1.1 on your browser while being connected to the Feather M0, right click on the color you want, copy and paste it into the Web Request info. You could also just change the /3 at the end of the URL to one of these:
- /R for red
- /G for green
- /B for blue
- /P for pink
- /T for blue-green
- /Y for yellow
- /U for purple
- /Q for random color
- /1 for police
- /2 for random pattern
- /3 for unicorn
- /4 for purple pulse
- /5 for heartbeat
- /6 for strobe
- /7 for blue green pulse
- /8 for cyan yellow swap
- /9 for hacks
- /X for Christmas
Cat Ears finalization
Honestly this part is going to be a little tricky since you’re not using the exact same headphones or cat ears that was used for this version, so I apologize for this – you will have to use some of your creative skills to make this work; but I mean, if you got this far then I doubt it’ll be an issue for you. I promise that on the next version of these better documentation will be made, but for now your awesome skills will have to do. =D
Version 1 of the MixPlay Cat Ears has the ears directly attached to the headphones. That being said, the first thing to do is hot glue the ears to the headphones. If you bought cat ears that are attached to a headband, you should probably break it apart nicely so you can attach it directly to the headphones, but that really depends on you.
If you haven’t used a hot glue gun before, check this out for tips.
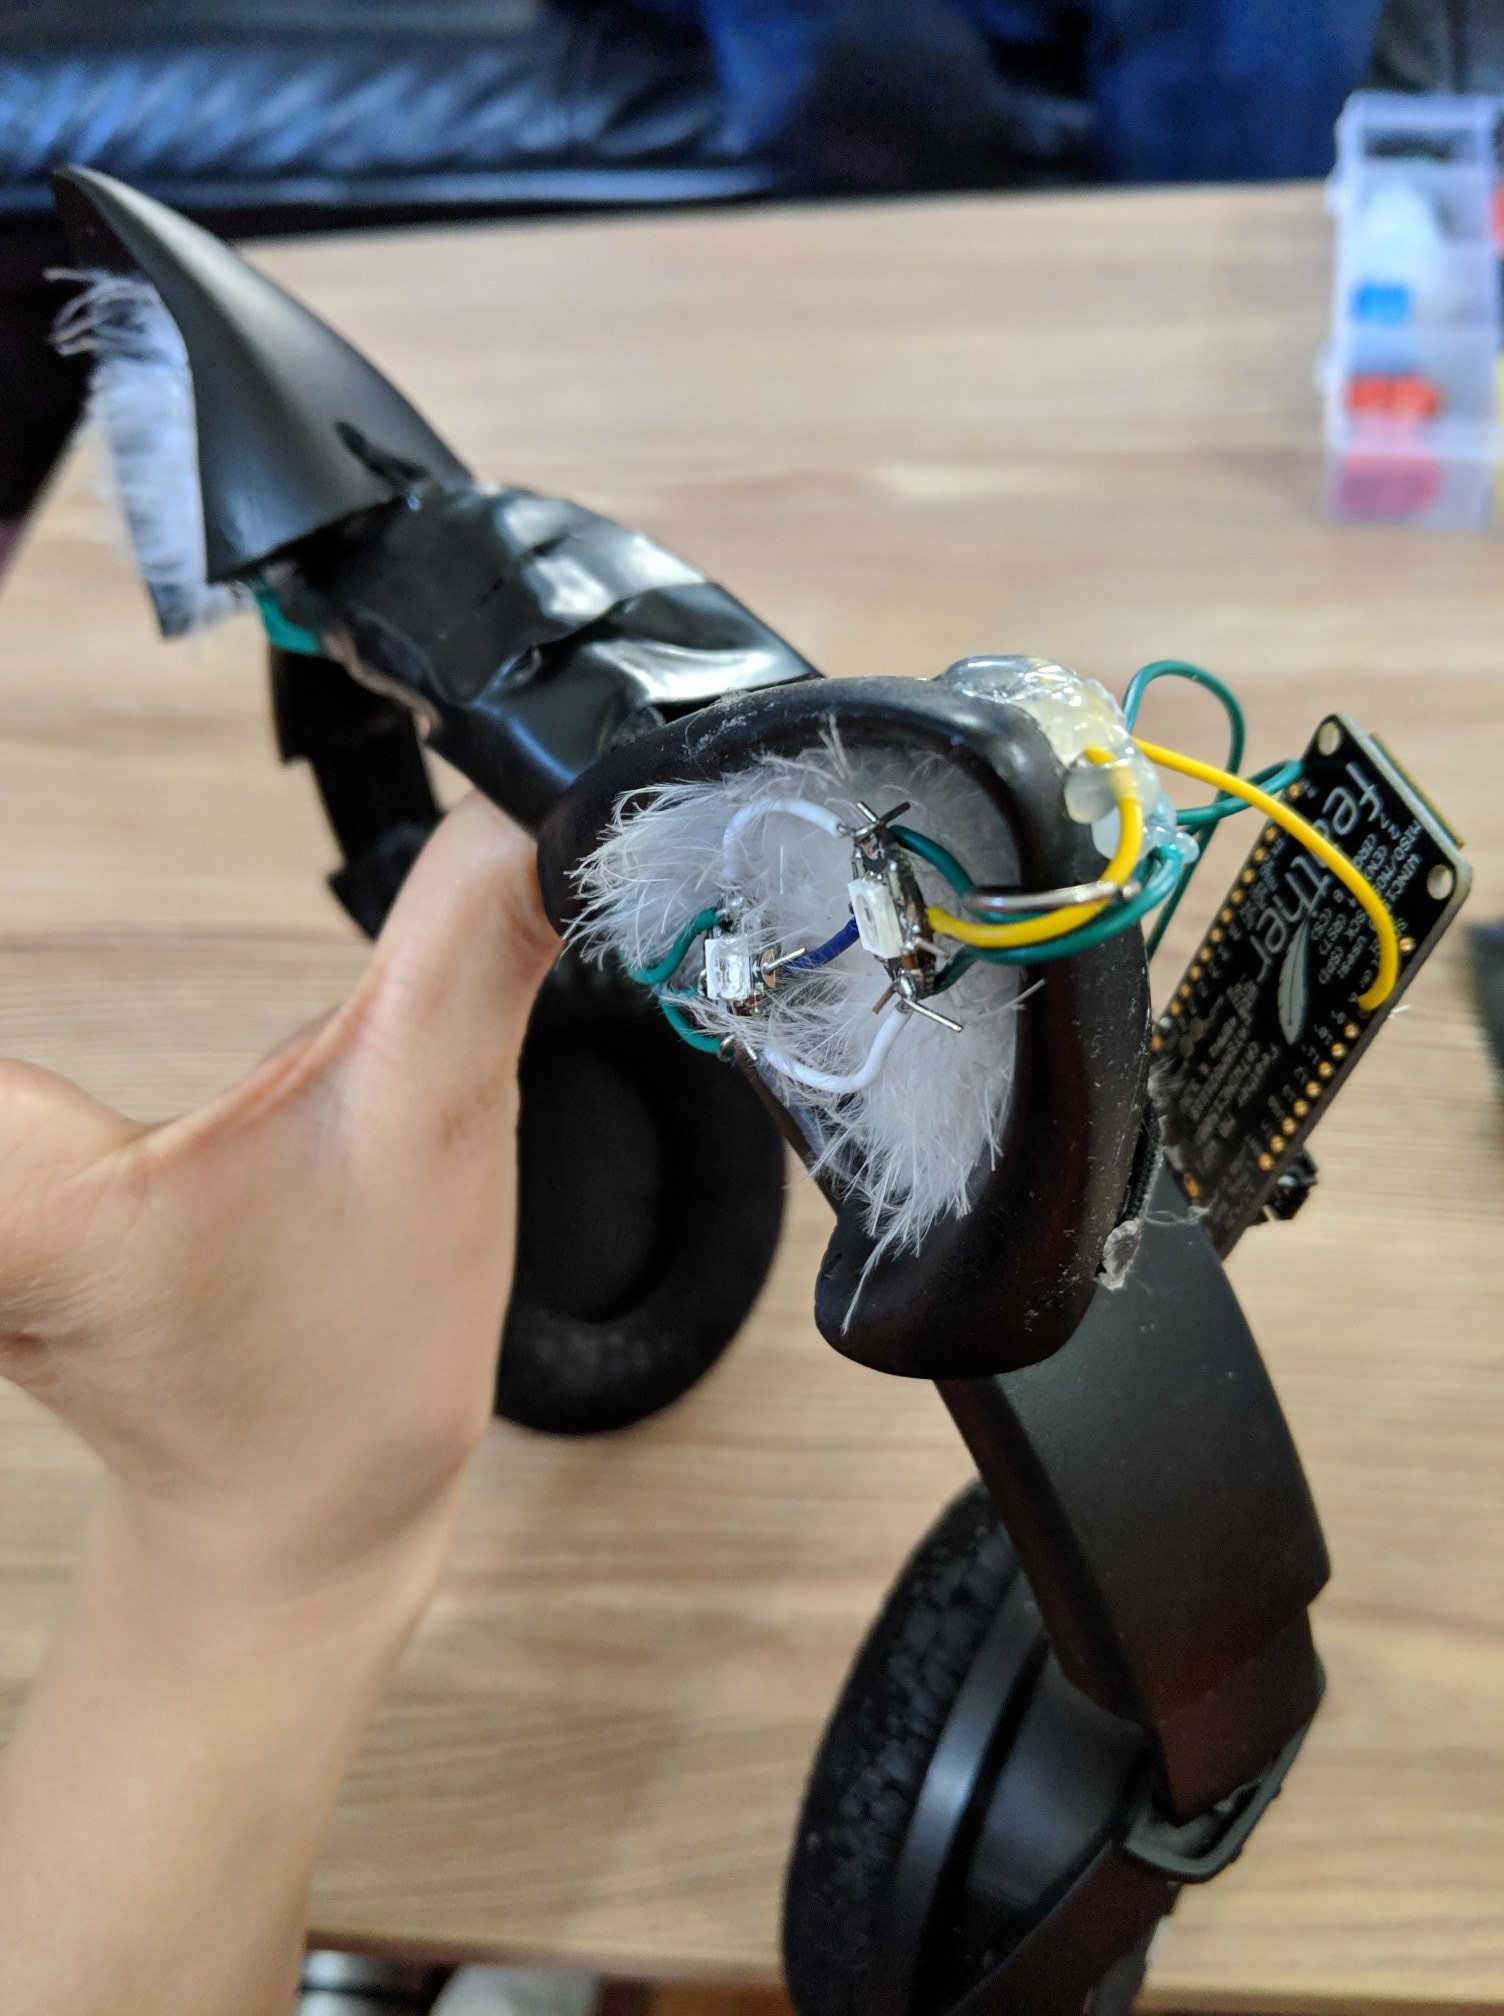
Once the cat ears have been attached to the headphones, put the Feather M0 behind one of the ears [the side where the headphone cable is coming down on], two LEDs in one cat ear and the other two LEDs in the other ear. If you can’t reach to the 2nd cat ear, replace the jumper wire with a longer one. If you do end up changing the wire, test it to make sure the LEDs still work. Although the photo shows electrical tape, do not do that yet as we are just measuring it out.

After confirming the wire jumper length and placement, we’re ready to solder. If this is your first time soldering I highly recommend checking this video out. Here is another video showing a great angle on how to solder as well.
Once every wire point is soldered, test it again. Slightly move the board around to see if any LEDs turn off too as that is a good indication that more soldering is needed [or that the cable sucks and needs replacing].
If all the LEDs turn on and everything looks good, place the Feather M0 and LEDs back to where you had it before. Use electrical tape and hot glue to keep everything solid, or figure out a better way to make it less ghetto – though it still looks pretty good on stream!
Hopefully at this point you have successfully made your version 1 of MixPlay LED Cat Ears! Hope you had fun creating it. Be sure to upload photos and let me know if you have any questions or need any assistance.
Thanks!
Many thanks to Lychi for soldering and putting together the cat ears [and for being a guinea pig for my experiments], adafruit for their awesome guides and hardware, Mixer for being an awesome site to put unique things on, Mix It Up and Firebot for having the ability to do what we want with ease and all the viewers who contribute to the craziness.
Future…
The next version of the MixPlay LED Cat Ears will have 3D printed parts to hide the cables instead of electrical tape, be able to detach/reattach from headphones, and have servos to be able to move up and down. And perhaps I’ll make one for me. Nah, I’ll let Lychi have all the fun with the ears.
Thanks for reading!
sorryaboutyourcats
Let viewers control your colorful cat ears? Yes please!
Guide on how to create your own @WatchMixer MixPlay LED Cat Ears that work with @MixItUpApp right here: https://t.co/HUQd26Urbq
Have any questions or need help just let me know.
pic.twitter.com/XdJBQEsU2T
— sorryaboutyourcats ̡̳̙̲̭͞
