What you’ll be able to do after reading this guide:
- Have viewers shock you with different intensity levels using MixPlay buttons or text commands
- Have viewers send vibrations or beeps with different intensity levels using MixPlay buttons or text commands
- Tips on how to best utilize Mix It Up features for a device like this
What you’ll need:
- Either Pavlok 1 or Pavlok 2 [cheaper renewed version here]
- Android device, iPhone or iPad
- Mix It Up [haven’t tested it in Firebot yet]
Pavlok setup
After ensuring your Pavlok is fully charged, strap it on your wrist, download the app [Android or iOS], sync it up via Bluetooth and test it out by using the Pavlok Remote built into the app.
Although setting it up is pretty straightforward, here are additional resources if you need help or have any questions about the Pavlok:
FAQ | Pavlok 1 Instructions | Pavlok 2 Instructions
Setting up Pavlok Unlocked
Pavlok Unlocked is the web app that connects our Pavlok device to the world.
- Open up the Pavlok app
- Go to More
- Tap Redeem

- Type Unlock_Unlocked and hit OK

- Tap Grant access to my device

- Connect your existing account or create a new one
- You should see this page after connecting:

- Go back to the Pavlok app and go to the Home tab, then scroll down and tap Unlocked

- Create a new Shared Remote

- Name it [case sensitive], copy the URL and tap Generate Link

- Go to the Unlocked URL you just copied and test the functionality

You should have been able to beep, vibrate and zap your Pavlok right from the browser. There might be a delay, so don’t mind that. If for whatever reason this did not work, ensure that the Pavlok is charged and that your phone still has a valid connection to the device – just try beeping from the app. If you’re still having issues just let me know.
Playing with web requests
Obviously we don’t want viewers accessing the page we were just playing with, so instead we’ll be using Mix It Up to send web requests to the Pavlok by adjusting the URL.
Add /beep/150 to the end of your URL – it should look something like this:
https://pavlok-mvp.herokuapp.com/unlocked/remotes/*YOURNAME*/beep/150
Try that in a browser; your device should have beeped from that.
You could replace beep to vibrate or zap, with numbers ranging from 1 to 255.
Mix It Up MixPlay buttons
Viewers can control the Pavlok device via MixPlay buttons using Mix It Up.
Create a new MixPlay project here [or modify an existing one].
Make three new buttons – Beep, Vibrate & Zap, place them on all grids, then hit SAVE.

Open up Mix It Up, go to the MixPlay section and select your board [if you don’t see it, hit the refresh button].

Click Add Command for Beep, then click Advanced Command.

Select Web Request on the Action menu, then hit the + button.

Insert this URL [change the name] as the Web Request:
https://pavlok-mvp.herokuapp.com/unlocked/remotes/*YOURNAME*/beep/255

Hit the Play button to test it, then hit Save.
Repeat the steps for the other two buttons but change beep to vibrate and zap [see pictures]. Perhaps use something more than 5 for the zap if you can’t feel the shocky shocky.


Hit the Connect button in Mix It Up, head to your channel and hit the buttons. Yayy it works [hopefully]!
Tips and tricks
Cooldowns
Be sure to have a shared cooldown for all Pavlok related buttons and make it at least 30 seconds as sometimes there is an unforeseen delay.
Sound or Text To Speech
You can have a sound play so you know a Pavlok event has been trigger. Although this might take away from the surprise factor, it’s good to start out like this for anxiety reasons.
Ranks
If you’re using Mix It Up, you can allow only people of a certain rank to hit the button. Not only does this stop people from abusing the power, but it also grants another incentive to stick around the stream.
User trigger
When a user clicks the button, you can have said button change it’s text to show who actually pressed it – or have a seperate button that displays the status of the Pavlok [e.g. sorryaboutyourcats triggered zap 50]. You can also have this trigger in the chat window or as an overlay. Check out Mix It Up’s documentation for more information on how to achieve that.
Text command
You can also utilize the same actions and put it into a text command, although I would advise against this due to the fact that if too many actions are triggered, Pavlok will have a queue of them – meaning you can get zapped over and over and over and over again. You could restrict this usage to mods or subs only, or add a cooldown to it as well. Go to Commands, then Custom Commands if you want to mess with this.
Trigger for sub, dono, etc.
In the Events section of Mix It Up, you can add the Pavlok commands to anything, such as a new sub or even a donation. The only thing I would advise for this is to temporarily disable any Pavlok related buttons on the MixPlay board for at least 30 seconds – this way a queue of actions isn’t being formed.
Done? Done!
I hope you and your viewers have a lot of fun with this! Go play a scary game, or even Jenga, and let me know how it works out for you. =D
Use ’em sparks,
sorryaboutyourcats
]]>
What you’ll be able to do after reading this guide:
- Have viewers be able to change the color your Nanoleaf lights
- Have viewers be able to change the pattern or rhythm pattern of your Nanoleaf lights
- Have viewers be able to change the rhythm mode [take sound from 3.5mm or via rhythm module mic]
- Trigger your Nanoleaf Lights on alerts, like follows, hosts, etc.
- Be able to control the Nanoleaf lights with your Stream Deck
What you’ll need:
- Either Firebot or Mix It Up
- Access to your router
- Nanoleaf lights
- AutoHotkey
- These three scripts
Obtaining the Nanoleaf IP address
You’ll have to find the IP address of your own Nanoleaf lights.
The easiest way to do this is by looking at the list of your connected devices via your router.
There are many different routers out there, with different interfaces – but I can only guide you using the one I have.
Chances are you can connect to it via 192.168.0.1 / 192.168.1.1 – credentials usually listed physically on device.
On my hitron modem/router, I go to Connected Devices to find the list of devices connected to it.

From there, I search for the Nanoleaf – not by name, but by MAC address.
To do this, on the connected devices page, I do a search for 00:55:DA and find the IP address.

Judging by this, my Nanoleaf lights are 192.168.0.51.
If you have any confusion towards finding your Nanoleaf IP address – send me your router model number!
Nanoleaf authorization & setup
Now it’s time for us to make a new Nanoleaf user.
The first thing we have to do is modify the user.ahk script – so open it up in a text editor.
In the script you should see 192.168.0.51 – place your IP address there instead.
After inputting your IP address, save and close the script.

Hold the power button on the nanoleaf until it starts blinking.
Open user.ahk – you should see a dialog pop up and a new text document called Key.txt in the same folder.

Hit OK on the dialog, open Key.txt and copy the auth token.
If you get a 403 error, then you might not have been fast enough – it only gives you 30 seconds.

Open nanoleaf.ahk in a text editor and modify both the IP address & auth token.

Save the script and close it.
Run the script using AutoHotkey and you should see a white/green H on your taskbar.

Now it’s time to test it! Hold CTRL and press 4 – this should change your lights to blue.
If it didn’t work, be sure the script is running and has the correct information [IP address & auth token].
Close the script by right clicking on the H and going to Exit.

Understanding the script
Open nanoleaf.ahk in your text editor and scroll down until you see ^1:: .
Let’s go over a few lines so that you can modify it to your liking.
^1:: When CTRL and 1 are pressed together, it’ll run whatever is under it.
WinHTTP.Open(“PUT”, “http://” . nanoIP . “:16021/api/v1/” . nanoCode . “/state/brightness”)
bodytext = {“brightness” : {“value”:18, “duration”:0}} Changes brightness to 18 quickly. Max 100.
WinHTTP.Send(bodytext)
WinHTTP.Open(“PUT”, “http://” . nanoIP . “:16021/api/v1/” . nanoCode . “/state”)
bodytext = {“hue” : {“value”:360}} Changes hue to 360, which is red. Max 360.
WinHTTP.Send(bodytext)
WinHTTP.Open(“PUT”, “http://” . nanoIP . “:16021/api/v1/” . nanoCode . “/state”)
bodytext = {“sat” : {“value”: 100}} Changes saturation to 100, which is vibrant color. Max 100.
WinHTTP.Send(bodytext)
return Halts script for meow.
Chances are you’ll leave hue & saturation alone and adjust the brightness according to how it looks on stream.
The script has the following triggers for colors:
[If you would like to change the key trigger, check out the AutoHotkey reference here.]
CTRL + 1 = RED
CTRL + 2 = YELLOW
CTRL + 3 = GREEN
CTRL + 4 = BLUE
CTRL + 5 = PURPLE
CTRL + 6 = PINK
Besides colors, there are also patterns, rhythm patterns & rhythm modes.
Because you can load & remove different patterns, some of the ones on this script might not work for you.
CTRL + p = Color Burst with aux cable as rhythm source
CTRL + o = Northern Lights
CTRL + q = Romantic
CTRL + w = Checkerboard
CTRL + u = Radiate
CTRL + t = Inner Peace
CTRL + n = Nemo
CTRL + i = Dancing Duo with aux cable as rhythm source
To get a list of available patterns, open patterns.ahk and it’ll spit out info into Patterns.txt.
Then all you have to do is copy and paste whatever pattern you want in the bodytext.
Now we’ll take a look at how Dancing Duo is triggered.
^i:: When CTRL and i are pressed together, it’ll run whatever is under it.
WinHTTP.Open(“PUT”, “http://” . nanoIP . “:16021/api/v1/” . nanoCode . “/effects”)
bodytext = {“select” : “Dancing Duo”} Changes to Dancing Duo pattern.
WinHTTP.Send(bodytext)
WinHTTP.Open(“PUT”, “http://” . nanoIP . “:16021/api/v1/” . nanoCode . “/state/brightness”)
bodytext = {“brightness” : {“value”:20, “duration”:0}} Changes brightness to 20 quickly. Max 100.
WinHTTP.Send(bodytext)
WinHTTP.Open(“PUT”, “http://” . nanoIP . “:16021/api/v1/” . nanoCode . “/rhythm/rhythmMode”)
bodytext = {“rhythmMode”:1} Changes source to aux cable. 0 would change it to microphone.
WinHTTP.Send(bodytext)
return Halts script for now.
For additional information on Nanoleaf’s API, check out this postman reference which explains everything in detail.
As always, if none of this is clear and you need additional help, comment below or just message me on Discord.
Control Nanoleaf via Firebot MixPlay buttons
Viewers can control the Nanoleaf via MixPlay buttons using Firebot.
This section will go over the Firebot side of things – scroll down for Mix It Up.
Create a new MixPlay project here [or modify an existing one].
Make two new buttons – Pink & Inner Peace, then hit SAVE.

Click Code on the top to get the code of your board.
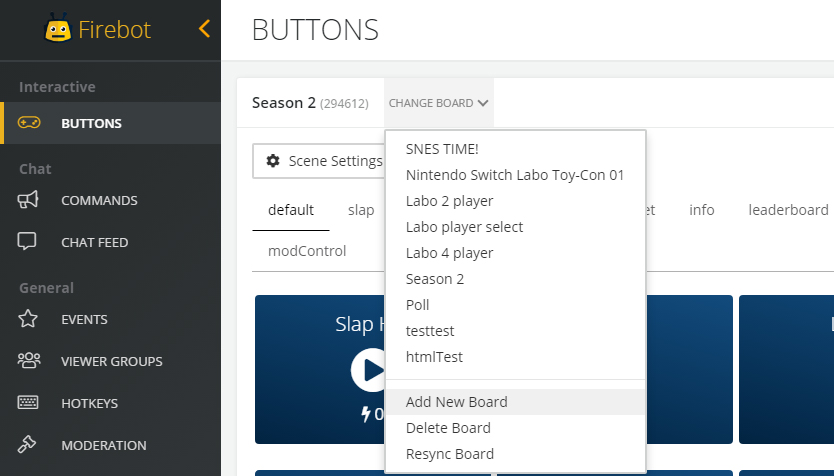
Open Firebot, click CHANGE BOARD, then Add New Board [or select an existing one and resync it].

Edit the Pink button.

Click (+) New Effect under EFFECTS.

Select Game Control, then make the Key To Press 6 and check Control for modifiers, then hit Add.

Copy the Game Control effect, then hit Save Changes.

Click EDIT on the other button, Inner Peace, then paste the effect.

Click Game Control, then change the 6 under Key To Press to t and hit Save, then Save Changes.
Run the nanoleaf.ahk script, then in Firebot click the Play buttons to test it.

Yay! The lights change! You can also connect Firebot to Mixer and test this on your board to ensure it’s okay.
If they don’t change, make sure the script is open and that the effects are striking the correct key.
Control Nanoleaf via Firebot alerts
Firebot can trigger the lights on events like new follows and hosts.
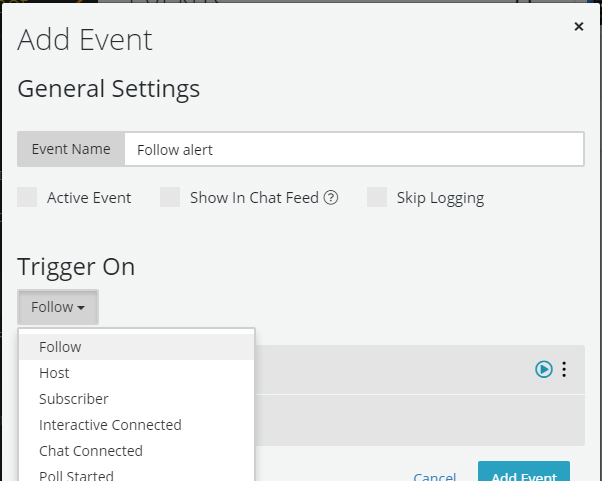
In Firebot, go to EVENTS on the left side, then click (+) New Event.

Name the event, check Active Event and select the Trigger On to Follow.

Click on (+) New Effect and select Game Control just like we did with the buttons.
Set the Key To Press to n and check Control under the Modifiers, then hit Add and then Add Event.
Click the Play button under Follow to test it [or have someone follow you while Firebot is connected].

Congratulations – looks like you got the Nanoleaf working with Firebot! Woo!
For additional information on how to do things in Firebot check out their Wiki here.
Scroll down to check out how to connect the Nanoleaf with the Stream Deck & useful tips.
And as always, if you need additional help – just let me know.
Control Nanoleaf via Mix It Up MixPlay buttons
Viewers can play with your Nanoleaf via MixPlay buttons using Mix It Up.
Create a new MixPlay project here [or modify an existing one].
Make two new buttons – Pink & Inner Peace, then hit SAVE.
Open up Mix It Up, go to the MixPlay section and select your board [if you don’t see it, hit the refresh button].

Click Add Command for Pink, then click Advanced Command.

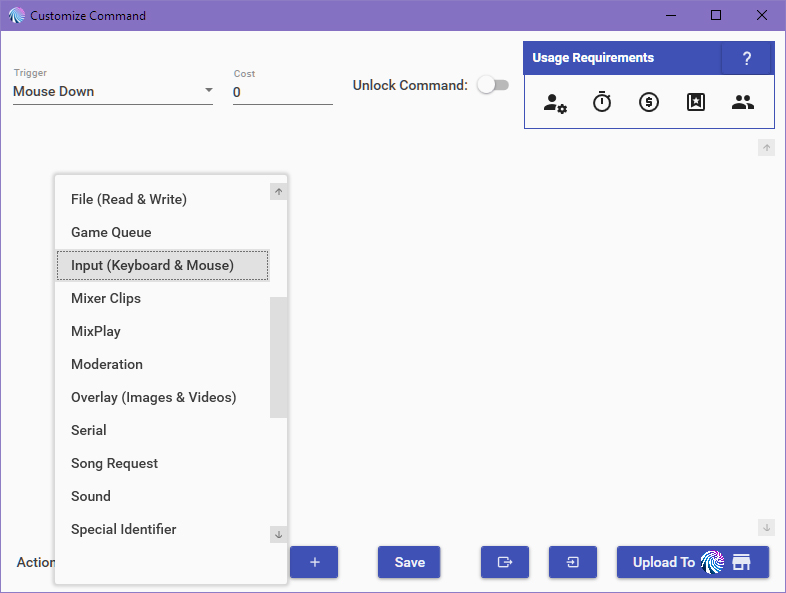
Click the Action dropdown menu and select Input (Keyboard & Mouse), then hit the + button.

Select Keyboard for Type, 6 for Keyboard Key, Click for Action and Control checked, then hit Save.

Repeat the same steps for Inner Peace, but change the Keyboard Key from 6 to T.
Run the nanoleaf.ahk script and click the Play buttons for Pink & Inner Peace.

Funk yesh – the lights change! You can also connect Mix It Up and test this on your board to ensure all is peachy.
If they don’t change, make sure nanoleaf.ahk is open and that the effects are striking the correct key.
Control Nanoleaf via Mix It Up alerts
Mix It Up can also trigger Nanoleaf light changes on events like new follows.
In Mix It Up, click the Menu button and go to Events.
Find Channel Followed and click Add Command, then Advanced Command.

Click the Action dropdown menu and select Input (Keyboard & Mouse), then hit the + button.
Select Keyboard for Type, N for Keyboard Key, Click for Action and Control checked, then hit Save.

Click the Play button for Channel Followed to test it out [or connect Mix It Up and have someone follow you].

Nice – looks like you got the Nanoleaf working with Mix It Up! Great success!
For additional information on how to work with Mix It Up, check out their Wiki.
There are additional tips and tricks below that should help you get the most out of your board.
And as always, if you need more help or have questions – just let me know.
Stream Deck set up
When you allow viewers to modify goodness like the Nanoleaf lights, it’s good to have some type of override.
This is where the Stream Deck comes in – just drag a hotkey onto one of the boxes and set it accordingly.
Keep in mind that nanoleaf.ahk needs to be running in order for this to work.

Tips and tricks
Script startup
The nanoleaf.ahk script can load on Windows startup , this way you don’t have to open it up each time.
Hold the Windows Key & hit R, then type in shell:startup, hit enter and the Startup folder should open.
Create a shortcut of the script [or move the actual script] over to the Startup folder and… that’s it!
Lights may look strange on stream
You can either adjust the exposure of your camera or the brightness of the Nanoleaf lights.
Lychi uses 17-20 for brightness on her lights but your settings may differ, so mess around with it!
MixPlay
Be sure to create buttons for all three grid types and test your buttons on a phone, Xbox, tablet and PC if possible.
Set up the Nanoleaf controls in one cooldown group, otherwise someone’s color change might only show briefly.
You can also have it so that subs [or another role] have access to certain colors that regulars don’t have access to.
Definitely check out Firebot & Mix It Up’s guides or videos on how to achieve this.
Closing
So there you have it! Viewers can now control your sexy Nanoleaf lights! Yayyyy!
If this has helped in any way be sure to tell me on ‘da Twitters or below.
And as always, if you need more help or can’t figure something out, let me know.
All the best,
sorryaboutyourcats
Let @WatchMixer viewers control your @Nanoleaf lights with MixPlay, using @FirebotApp or @MixItUpApp! Guide here: https://t.co/CQd6sBBRPZ pic.twitter.com/HiT3teLRBa
— sorryaboutyourcats ̡̳̙̲̭͞
(@SryAbtYourCats) January 28, 2019

]]>
So what are we going to have viewers be able to funk with today? Lights!
After this guide you’ll be able to:
- Have viewers change the colors of your Hue lights via MixPlay buttons
- Have Hue lights trigger effects and color changes for alerts like follows, hosts, subs or donations
- Have viewers trigger colorloop and light flash effects
- Have Hue lights controlled using a Stream Deck
Gimme da’ lights
If you haven’t purchased any Hue lights yet, be sure to get the newer generation lights.
There is a drastic difference in colors as seen here. Gen 3 are the ones I use.
This kit includes a Hue bridge (which is needed) and two newer generation Hue lights. I’d also recommend this LED strip as it’s both vivid and easy to slap on anywhere. There are plenty of other Hue products you can use too – just do your research before purchasing, as with any product.
Setting up WinHue
We’ll start with WinHue, the program that controls the Hue lights for Windows.
After we have a few hotkeys set up, we’ll go over the Mixer side of things.
This should be set up on the same computer as your MixPlay control program [like Firebot & Mix It Up].
If you have a dedicated streaming computer set it up on there.
Setting up WinHue is fairly straightforward:
- Download WinHue 3.0.1386 here [hotkeys seem to be borked on newer version when I tried it]
- Install and open WinHue
- Connect your bridge [be sure to hit the button when it asks]
- Make sure it finds all your lights [easy to set up via phone app]
- Rename the lights [double click the light to turn it off/on to ensure it’s the right one]

Let’s make hotkeys
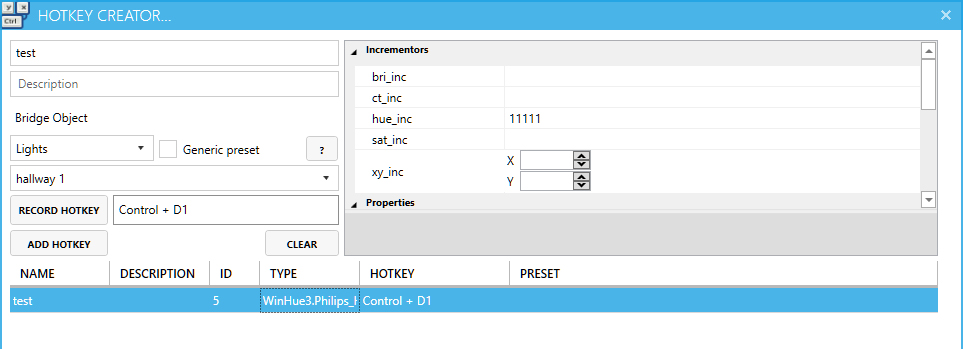
Open the HotKey creator in WinHue and let’s start messing around.
I’ll only be going over the features that I see useful – for additional info head over to the wiki.

Let’s go over some of the values we can change and then we’ll funk with some examples.
Select Lights for a single light and Groups for multiple lights [you can make a group inside WinHue].
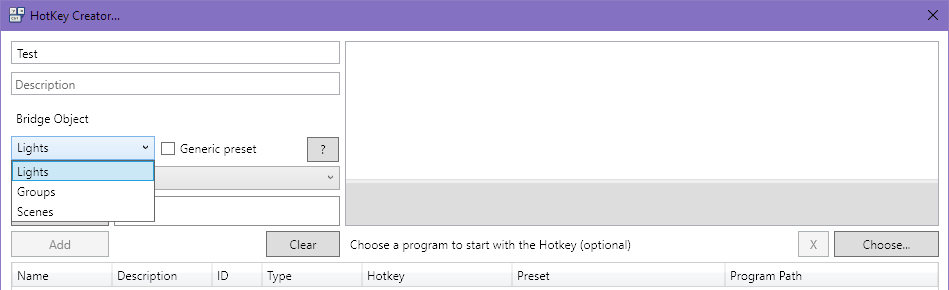
The next dropdown menu will let you pick the light or group.
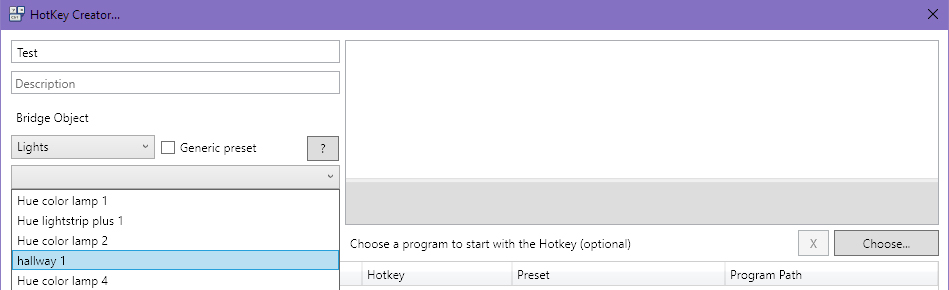
You should see the right side fill up with stuff after selecting the light.
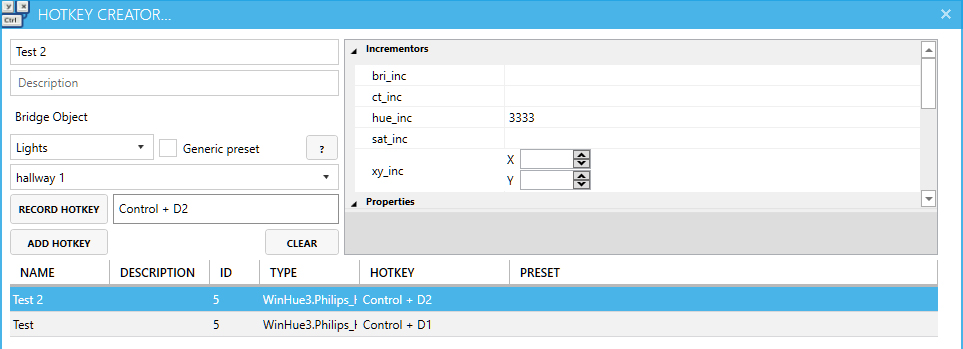
Let’s make the hotkey! Click Record Hotkey and press a combo of two keys – hold CTRL and hit 1 for this test.

Now it’s time to go over the incrementors & properties.
Adjust any incrementors and it’ll add/subtract the value relative to whatever the current value is.
Adjust any properties and it’ll just set whatever value you throw at it.
A hotkey can have a few different incrementors and property adjustments so you can mix and match if you’d like.
Incrementors
bri_inc [0 = min brightness | 254 = max brightness]
Increases or decreases the brightness of light/group. To decrease just do -X.
This value does not loop – if you’re at 234 brightness and you add 50, your light will be set to 254 brightness.
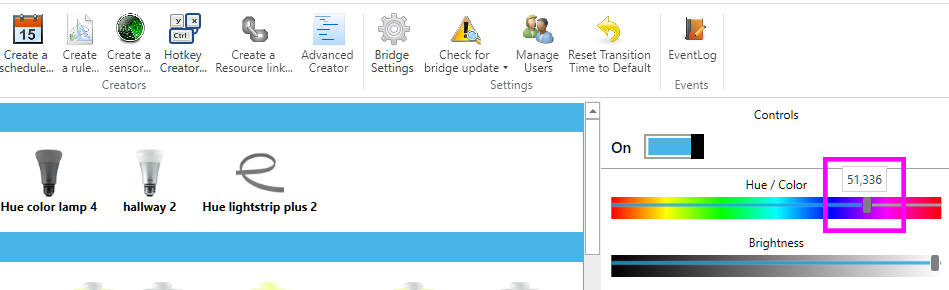
hue_inc [0 = red | 22,000 = green | 44,000 = blue]
Increases or decreases the hue value (color) of the light/group. To decrease just do -X.
This value loops – if you’re at 55,000 hue (pink) then add 22,000 more, you’ll be at 11,195 hue (yellow).
sat_inc [0 = no color | 254 = max color]
Increases or decreases the saturation (color potency) of light/group. To decrease just do -X.
This value does not loop – if you’re at 227 saturation and you add 65, your light will be set to 254 saturation.
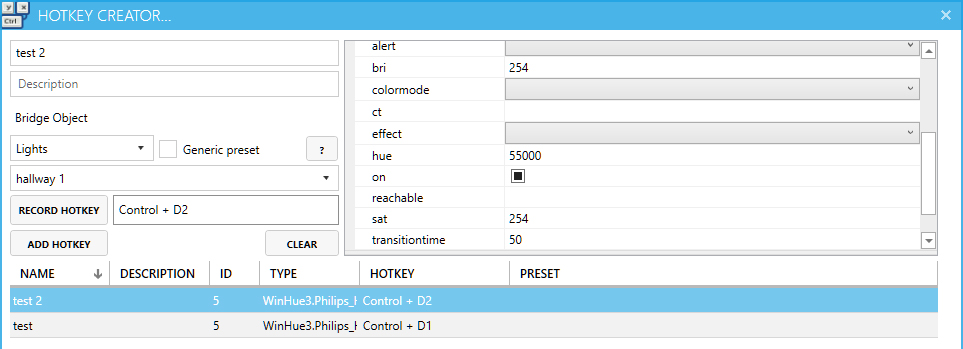
Properties
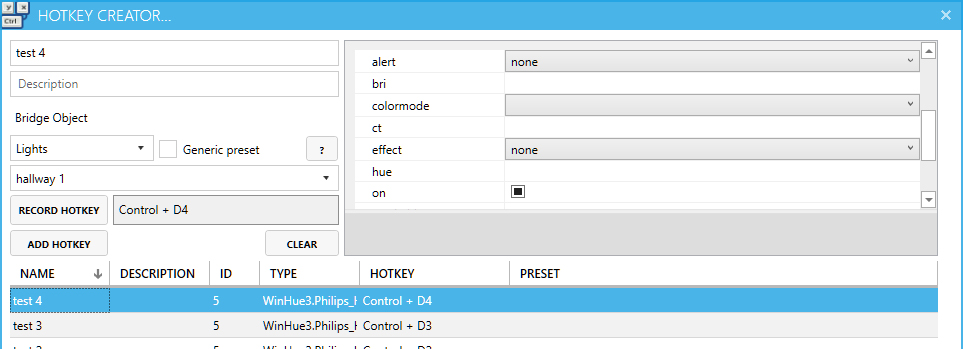
alert [select = blink once | lselect = blinks a lot | none = stops the blinking]
The selected light/group will blink off and on.
effect [colorloop = loops all the colors | none = shuts off colorloop]
The selected light/group with cycle through all the colors.
bri [0 = min brightness | 254 = max brightness]
Sets the brightness of the light/group to whatever value you set.
hue [0 = red | 22,000 = green | 44,000 = blue]
Sets the hue of the light/group to whatever value you set.
sat [0 = no color | 254 = max color]
Sets the saturation of light/group to whatever value you set.
transitiontime [0 = instant | 4 = default]
Transition time between color adjustments, done in multiples of 100ms.
Tips
Instead of inputting a random number to get the exact color you want, just move the control slider for the values.
Adjusting hotkeys automatically saves.
Just click the hotkey on the bottom, make the adjustment on the right and close HotKey Creator.
You can also erase a hotkey just by clicking on it and hitting the delete key on the keyboard.
Make these examples
We’re going to make a few hotkeys – two that work with a button press and two that are triggered with an alert.
These hotkeys will work with both Firebot & Mix It Up. Open the HotKey Creator back up and let’s get to it!
Increases hue | CTRL + 1
Slowly sets color to pink | CTRL + 2
Turns on colorloop & flashes a few times | CTRL + 3

Turns off colorloop & stops the flashing | CTRL + 4
Close out the HotKey Creator and test the hotkeys – you should be able to trigger all of them.
If they don’t work, make sure the correct hotkeys are recorded and your settings are one to one of my screenshots.
Connecting with Mixer
There are two popular tools for Mixer that integrate with MixPlay – Firebot & Mix It Up.
Regardless of which one you use, you’ll need a MixPlay board for viewers to interact with.
You can create the board by heading over to the Developer Lab, logging in and creating a board.
[If you need help on how to create a board from scratch, follow my cat ears guide.]
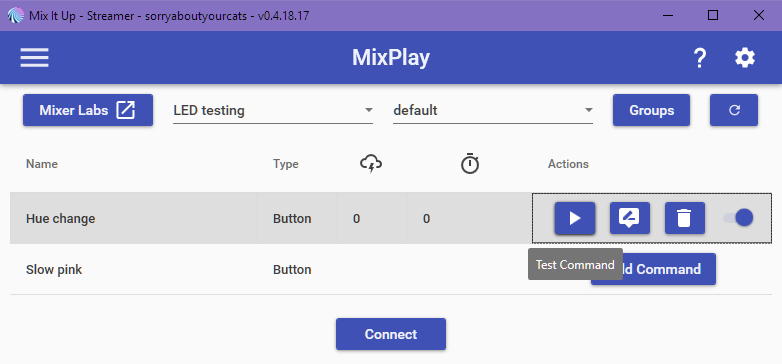
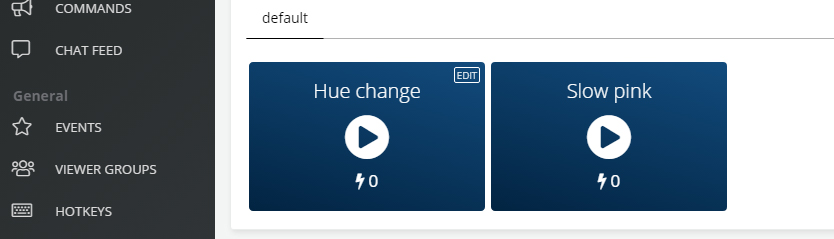
Make sure you create two buttons on the board – Hue change & Slow pink.
We’ll be setting it with Mix It Up next. If you’re using Firebot just scroll past it.
Mix It Up & Hue lights
We’re going to start with having two MixPlay buttons that can alter the lights.
- Go to MixPlay and select the board you created in the Developer Lab from the dropdown menu
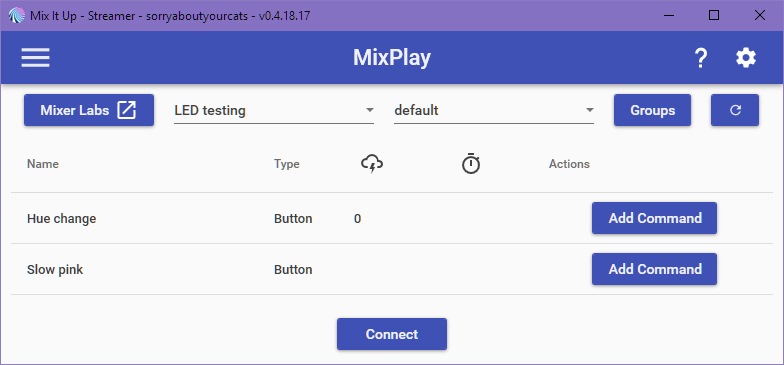
- Click on Add Command for Hue change and select Advanced Command
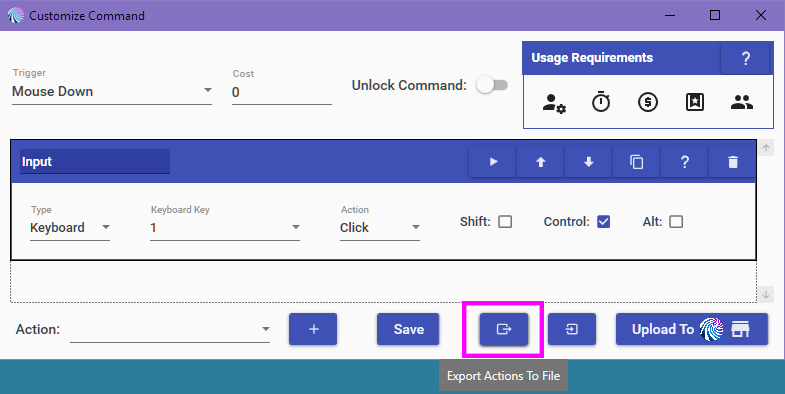
- Create new action Input (Keyboard & Mouse)
- Set type to Keyboard, Key to 1, Action to Click and check the Control checkbox

- Export the Actions to a file
- Hit Save
- Test the button
- Add command to Slow Pink and select Advanced command
- Import Actions from a file (pick the same file you exported before)
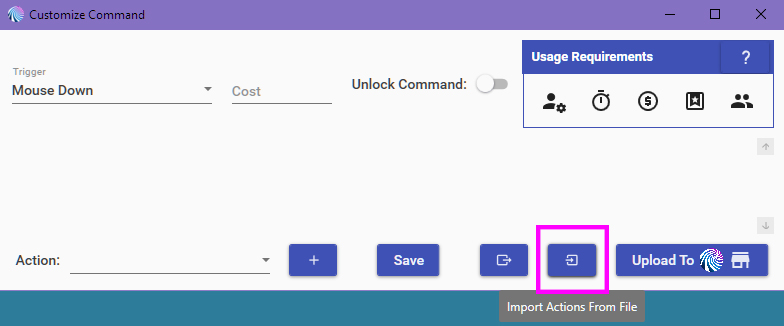
- Expand Input and change the Key from 1 to 2
- Save it and go back to the MixPlay page then click Connect
- Go on your channel, click the buttons and have fun with the pretty colors
The next thing we’ll be doing is setting up an alert when someone follows!
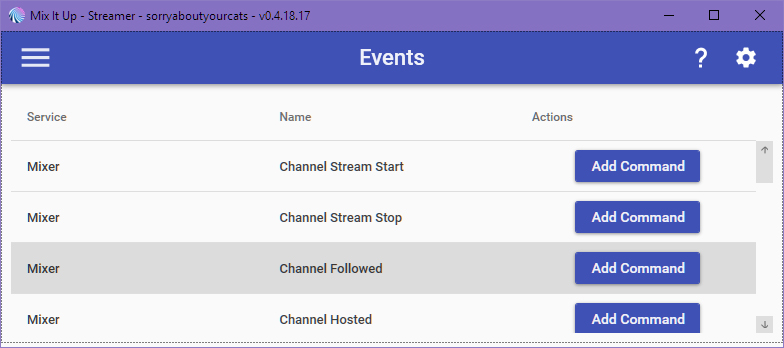
Mix It Up alert trigger
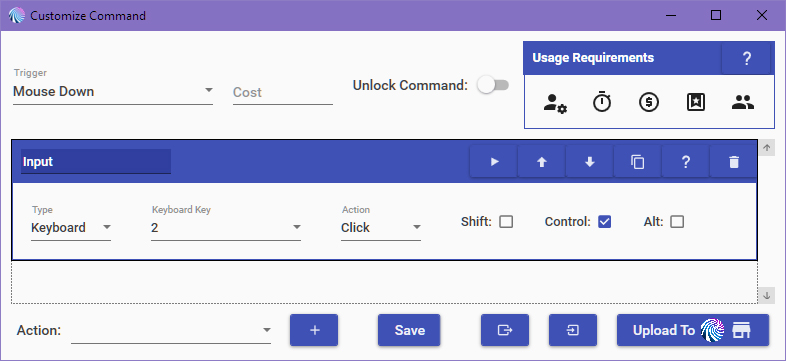
- Go to Events and click Add Command under Channel Followed, then select Advanced Command
- Import Actions from a file (pick the same file you exported before)
- Expand Input and change the Key from 1 to 3
- Add Wait Action and set it to 2 seconds
- Duplicate the Input action then change the key from 3 to 4
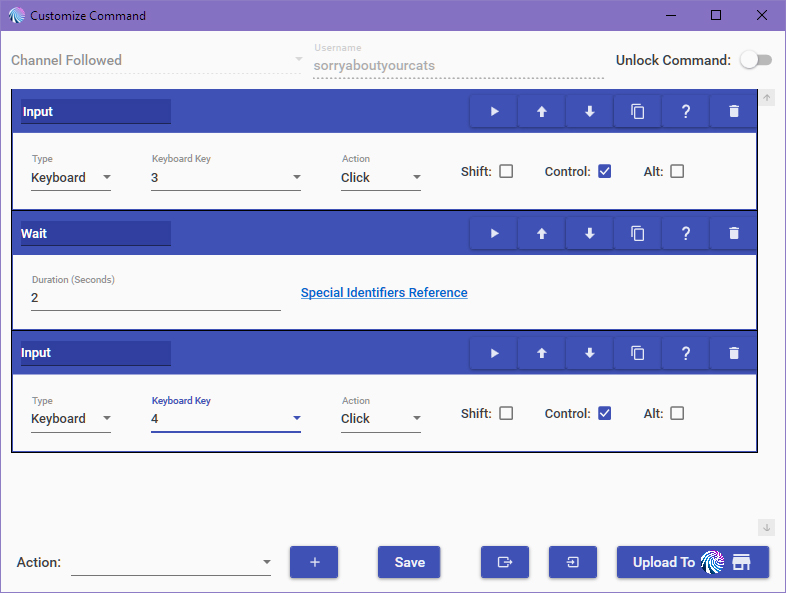
- Hit Save then hit the Play button on the Events page
That should get you started on how to get this all set up! Have fun customizing it to your heart’s desire.
If it doesn’t work for whatever reason or you get stuck, let me know in the comments below or on Twitter.
Firebot & Hue lights
We’re going to make two MixPlay buttons that can mess with the lights.
- Head to the Developer Lab, grab the code of your new board and put it into Firebot
- Hover over Hue change and click EDIT
- Click New Effect, select Game Control and set the pressed key to 1 and Control for Modifier, then click Add
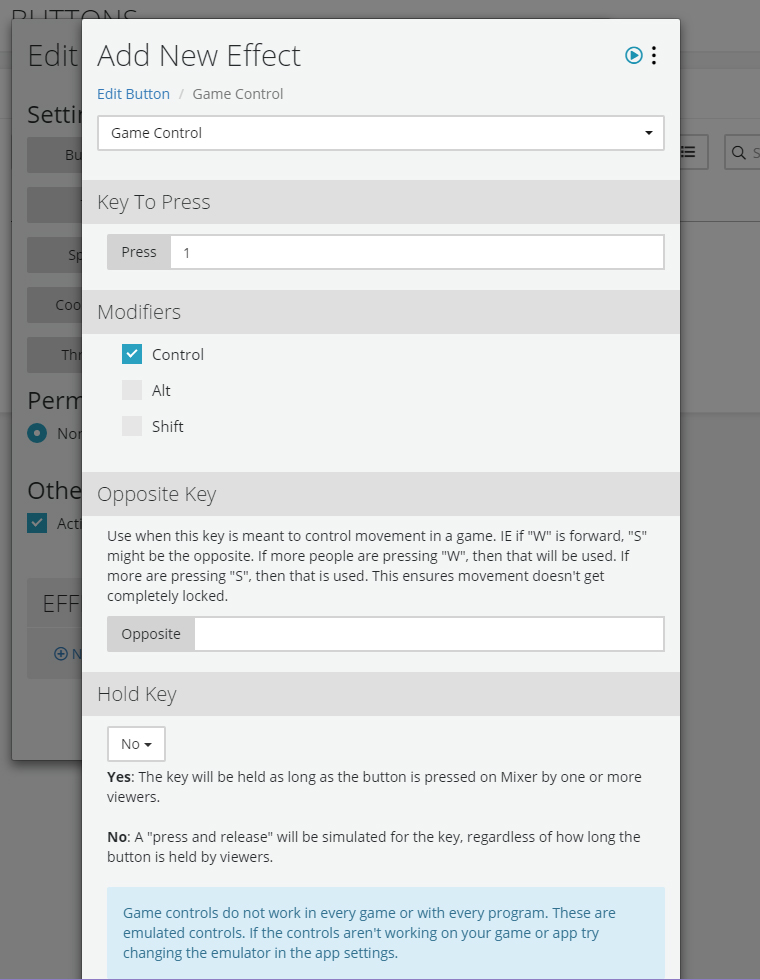
- Click on the Game Control menu, Copy it then click Save Changes
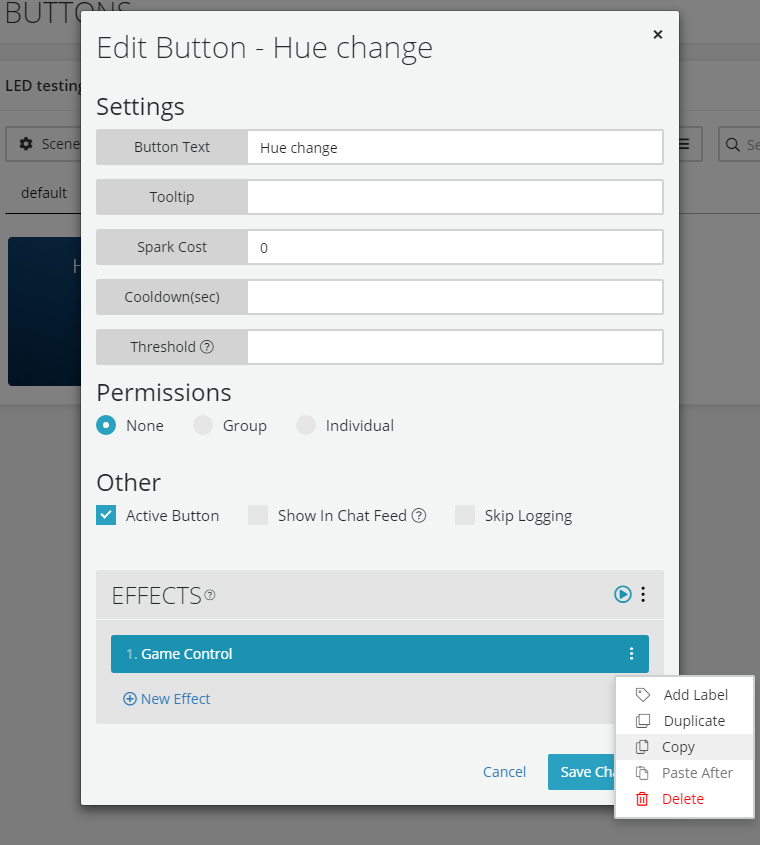
- Hit the Play button on Hue change to confirm it works
- Click the EDIT button on Slow pink
- Click the EFFECTS menu and Paste Effects
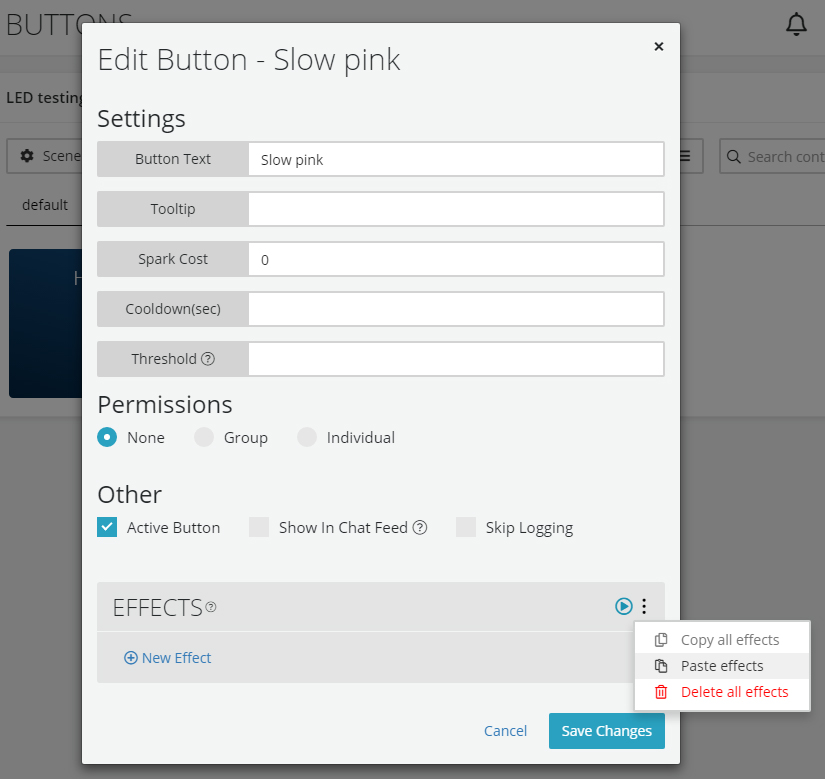
- Click Game Control and change Key To Press from 1 to 2, then click Save, then Save Changes
- Click the play button to test
- Connect Firebot to MixPlay, go on your channel and click the buttons for light fun time!
Firebot alert trigger
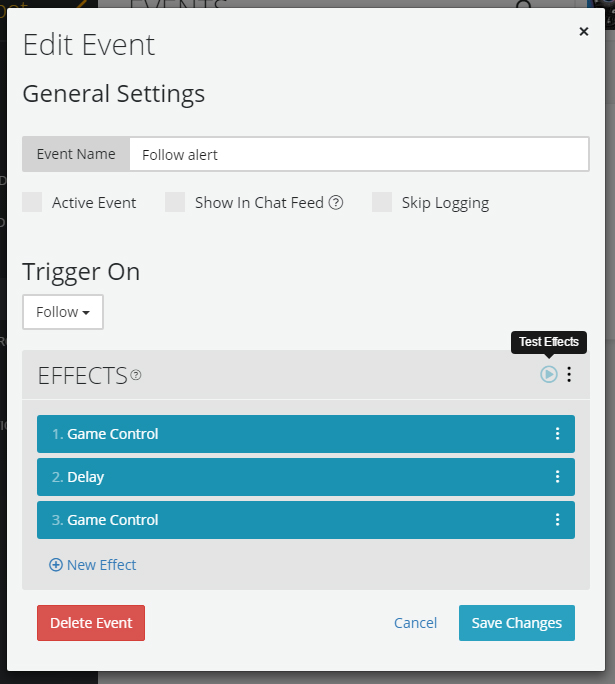
- Go to the EVENTS page and click on New Event

- Name the event and select Follow from the Trigger On dropdown menu
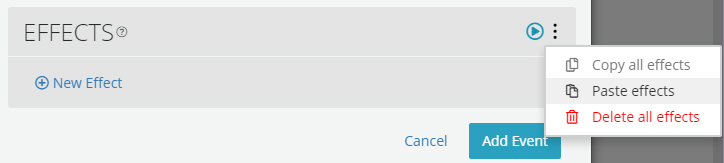
- Click the EFFECTS menu and Paste Effects
- Click Game Control and change the Key To Press from 1 to 3 then hit Save
- Click New Effect and select Delay then set Seconds to 2 and hit Add
- Click the EFFECTS menu again and Paste Effects… again
- Click Game Control on the newly pasted item and change the Key To Press from 1 to 4 then hit Save
- Click the Test Effects button on the EFFECTS section and rejoice at the funky lights!
This should set you on your path towards customized lights! Have fun funking around.
If it doesn’t work for whatever reason or you get stuck, let me know in the comments below or on Twitter.
Stream Deck
It’s also useful to have the Stream Deck control Hue lights, just in case you want things back to normal.
All you have to do is drag the Hotkey button to your grid and set up the hotkey that’s assigned in WinHue – easy!
Yay pretty lights!
With WinHue combined with Mixer’s MixPlay [using Firebot or Mix It Up], you can do a lot of fun things with Hue lights. I hope you enjoyed this guide on how to set up the Hue lights to work with Mixer’s MixPlay and alerts.
There is more customization using Processing, like creating light patterns [e.g. emulating cop lights].
Since my 2016 guide is long gone, I’ll have to recreate it eventually – so look out for it!
Thanks for reading,
sorryaboutyourcats
Updated guide on controlling Hue lights with @WatchMixer‘s MixPlay using @FirebotApp, @MixItUpApp & the Stream Deck. https://t.co/1vnpGPcKtZ pic.twitter.com/u00ONAEZZu
— sorryaboutyourcats ̡̳̙̲̭͞
]]>
But wouldn’t it be cool if every time a stream donation came in, the LED cat ears lit up? Well this is exactly what Lychi & I wanted to do for this week’s charity event, but there was no easy way to do it… until meow!
I had to figure out a way to get alerted when a donation gets in – so I thought the banner, which gets updated each time, would be the perfect target. The next thing I had to figure out is how to send a web request to the LED cat ears to trigger a pattern. I am using xampp 1.7.7 on Windows 10 to do this, so if you have issues with replication, use that version.
So let’s begin!
- Install xampp and start Apache from the control panel
- Go to http://localhost on any browser to confirm Apache is running
- Create a new folder called checker in the C:\xampp\htdocs\ directory
- Create a new file called checker.php in C:\xampp\htdocs\checker directory
- Open checker.php in your most tolerable text editor and get ready to copy paste and modify
Code time!
This will keep refreshing the page to check for changes – modify the $sec value if you need it slower or quicker for whatever reason.
<?php
$page = $_SERVER['PHP_SELF'];
$sec = ".5";
?>
The next few lines check for changes in the website by comparing the hash every few seconds. Anything before the } else { will run when no site changes occur [no donation], and anything after the } else { triggers after site changes [donation occurred].
If you wish to do something else other than a web request, remove $remote = fopen(“http://[WEB REQUEST]”, “r”); & fpassthru($remote); and put something else in there that you want triggered when a donation occurs. Be sure to add your event where it states [EVENT NAME HERE] as well.
<?php
$contents = file_get_contents('https://tiltify.com/events/[EVENT NAME HERE]/overlay/dashboard');
$hash = file_get_contents('hash');
if ($hash == ($pageHash = md5($contents))) {
} else {
$remote = fopen("http://[WEB REQUEST]", "r");
fpassthru($remote);
$fp = fopen('hash', 'w');
fwrite($fp, $pageHash);
fclose($fp);
}
?>
And lastly, some HTML.
<!DOCTYPE html PUBLIC "-//W3C//DTD XHTML 1.0 Transitional//EN" "http://www.w3.org/TR/xhtml1/DTD/xhtml1-transitional.dtd">
<html xmlns="http://www.w3.org/1999/xhtml">

<head>
<meta http-equiv="refresh" content="<?php echo $sec?>;URL='<?php echo $page?>'">
<title>Donation Checker</title>
</head>

<body>
Checking for donations...
</body>
</html>
I’m not sure how useful this will be for anyone else other than Lychi but hey, I figured I’d post it in case someone else is trying to do something similar and is having issues figuring it out. I know the guide is far from perfect, so if there are any issues with this or if you have questions feel free to ask them below! 
Love you like tacos,
sorryaboutyourcats