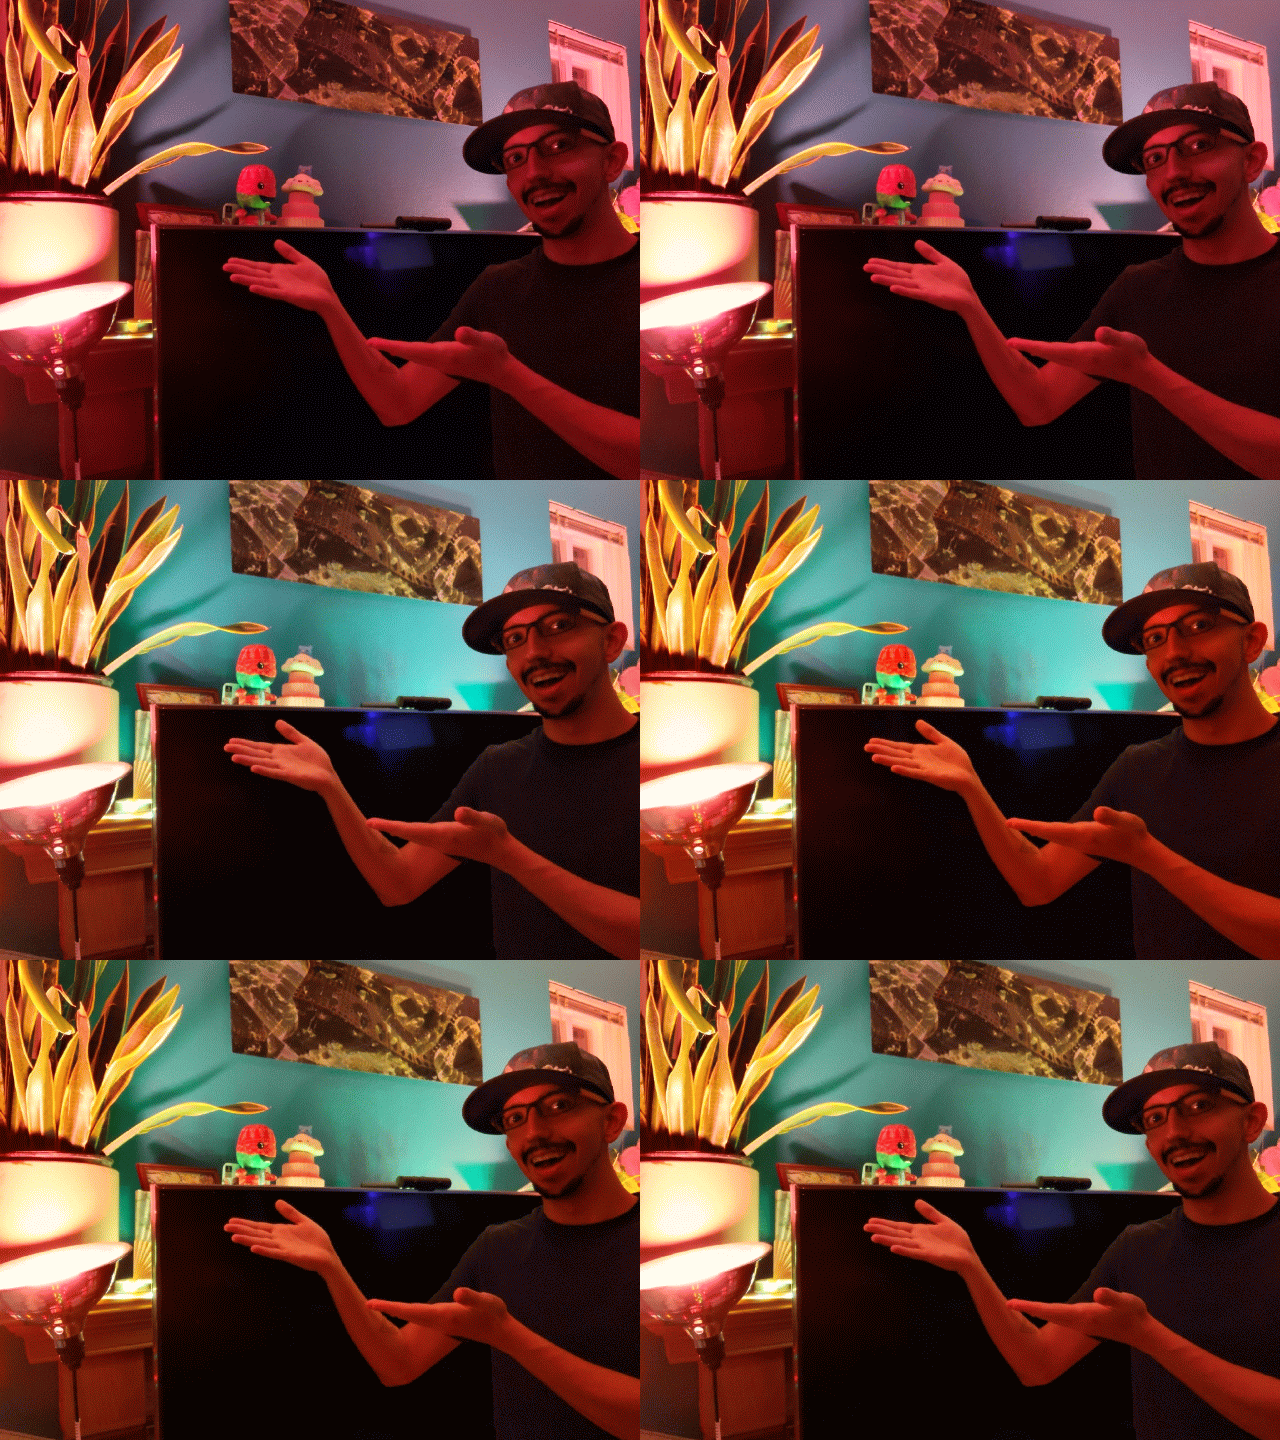
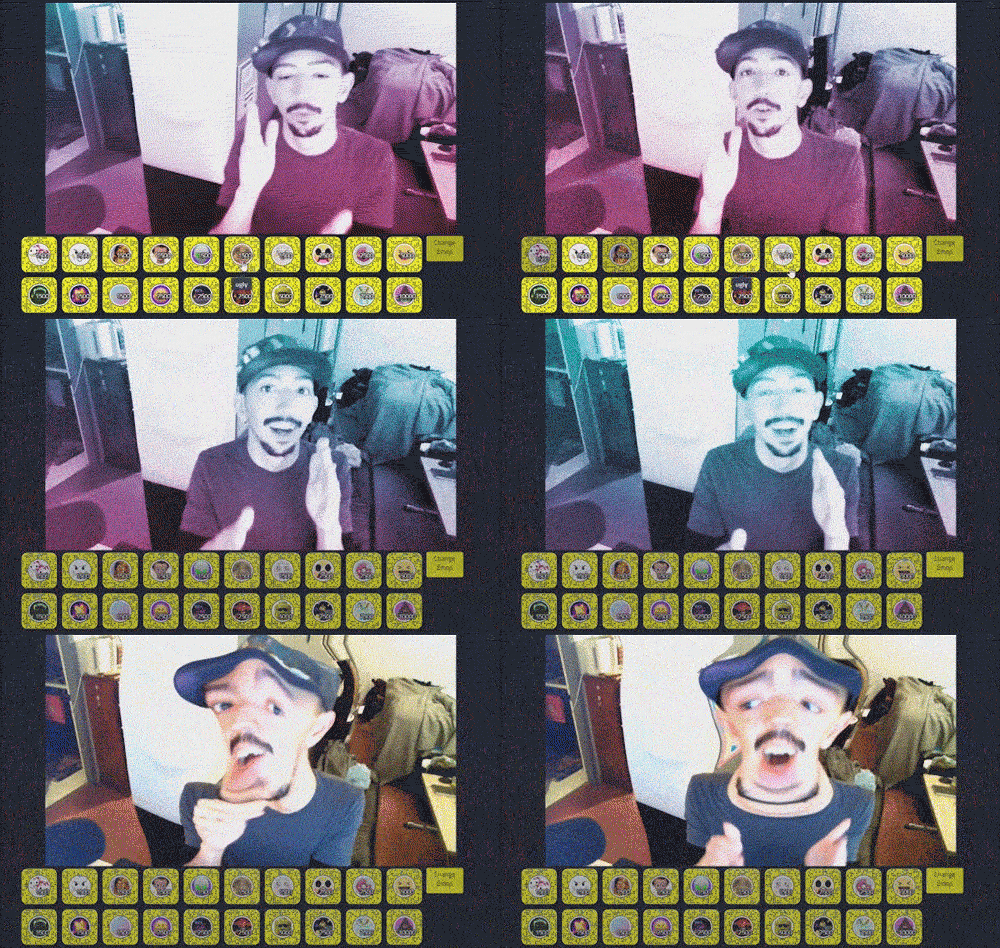
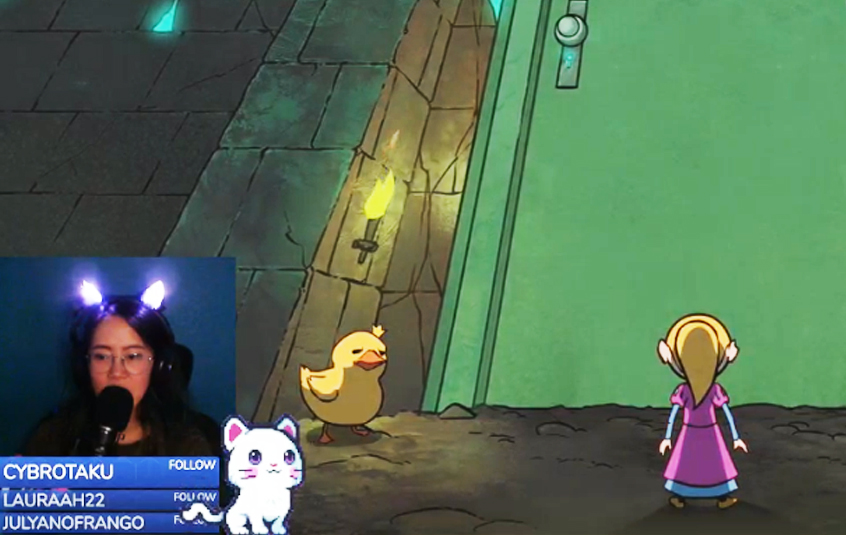
Anything you can think of can be controlled using Mixer’s MixPlay.
So what are we going to have viewers be able to funk with today? Lights!
After this guide you’ll be able to:
- Have viewers change the colors of your Hue lights via MixPlay buttons
- Have Hue lights trigger effects and color changes for alerts like follows, hosts, subs or donations
- Have viewers trigger colorloop and light flash effects
- Have Hue lights controlled using a Stream Deck
Gimme da’ lights
If you haven’t purchased any Hue lights yet, be sure to get the newer generation lights.
There is a drastic difference in colors as seen here. Gen 3 are the ones I use.
This kit includes a Hue bridge (which is needed) and two newer generation Hue lights. I’d also recommend this LED strip as it’s both vivid and easy to slap on anywhere. There are plenty of other Hue products you can use too – just do your research before purchasing, as with any product.
Setting up WinHue
We’ll start with WinHue, the program that controls the Hue lights for Windows.
After we have a few hotkeys set up, we’ll go over the Mixer side of things.
This should be set up on the same computer as your MixPlay control program [like Firebot & Mix It Up].
If you have a dedicated streaming computer set it up on there.
Setting up WinHue is fairly straightforward:
- Download WinHue 3.0.1386 here [hotkeys seem to be borked on newer version when I tried it]
- Install and open WinHue
- Connect your bridge [be sure to hit the button when it asks]
- Make sure it finds all your lights [easy to set up via phone app]
- Rename the lights [double click the light to turn it off/on to ensure it’s the right one]

Let’s make hotkeys
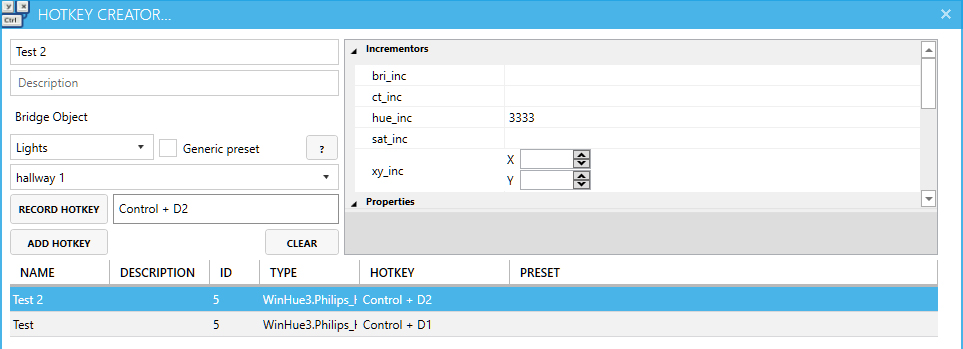
Open the HotKey creator in WinHue and let’s start messing around.
I’ll only be going over the features that I see useful – for additional info head over to the wiki.

Let’s go over some of the values we can change and then we’ll funk with some examples.
Select Lights for a single light and Groups for multiple lights [you can make a group inside WinHue].

The next dropdown menu will let you pick the light or group.

You should see the right side fill up with stuff after selecting the light.
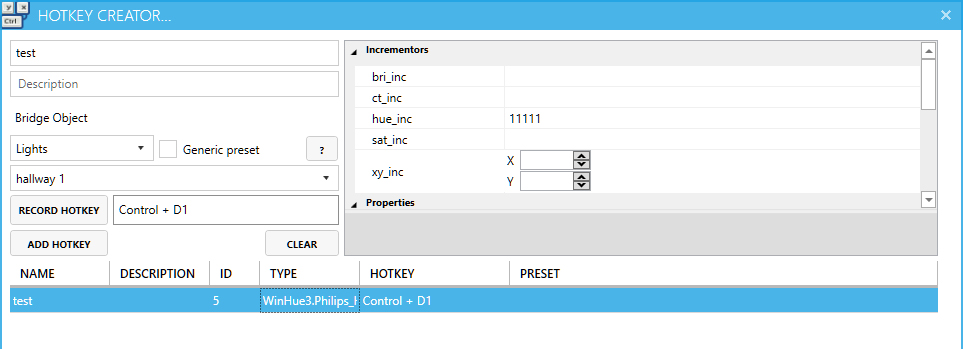
Let’s make the hotkey! Click Record Hotkey and press a combo of two keys – hold CTRL and hit 1 for this test.

Now it’s time to go over the incrementors & properties.
Adjust any incrementors and it’ll add/subtract the value relative to whatever the current value is.
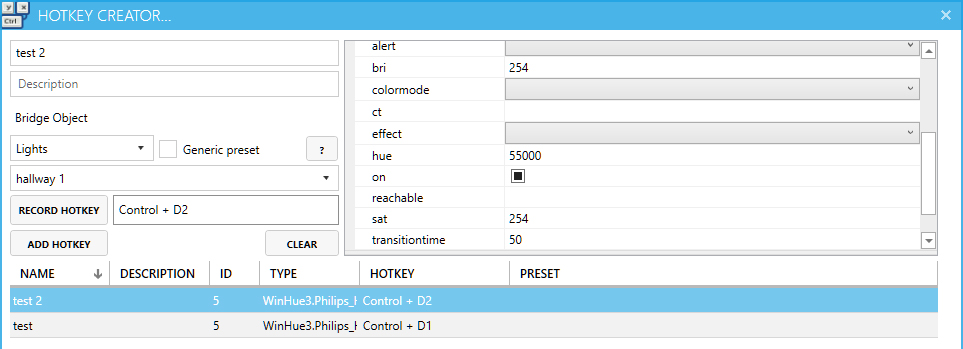
Adjust any properties and it’ll just set whatever value you throw at it.
A hotkey can have a few different incrementors and property adjustments so you can mix and match if you’d like.
Incrementors
bri_inc [0 = min brightness | 254 = max brightness]
Increases or decreases the brightness of light/group. To decrease just do -X.
This value does not loop – if you’re at 234 brightness and you add 50, your light will be set to 254 brightness.
hue_inc [0 = red | 22,000 = green | 44,000 = blue]
Increases or decreases the hue value (color) of the light/group. To decrease just do -X.
This value loops – if you’re at 55,000 hue (pink) then add 22,000 more, you’ll be at 11,195 hue (yellow).
sat_inc [0 = no color | 254 = max color]
Increases or decreases the saturation (color potency) of light/group. To decrease just do -X.
This value does not loop – if you’re at 227 saturation and you add 65, your light will be set to 254 saturation.
Properties
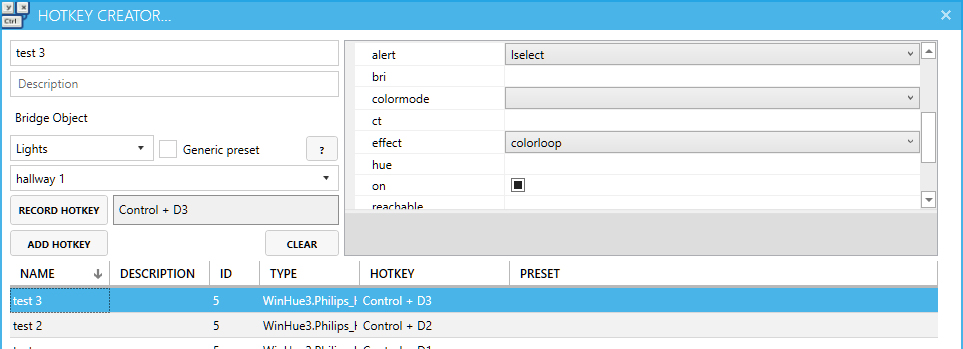
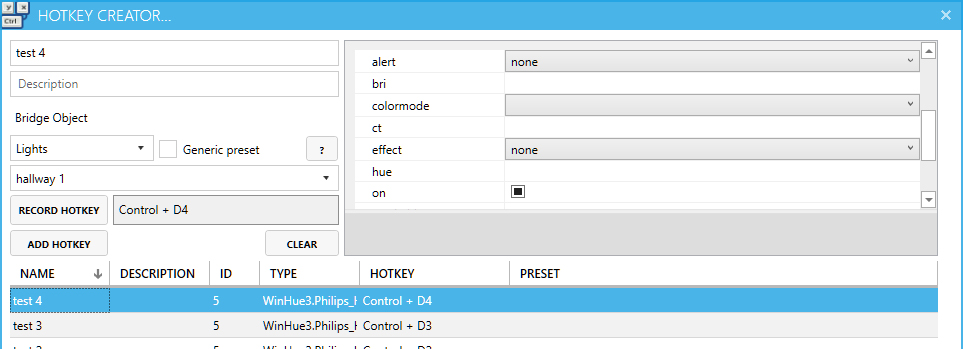
alert [select = blink once | lselect = blinks a lot | none = stops the blinking]
The selected light/group will blink off and on.
effect [colorloop = loops all the colors | none = shuts off colorloop]
The selected light/group with cycle through all the colors.
bri [0 = min brightness | 254 = max brightness]
Sets the brightness of the light/group to whatever value you set.
hue [0 = red | 22,000 = green | 44,000 = blue]
Sets the hue of the light/group to whatever value you set.
sat [0 = no color | 254 = max color]
Sets the saturation of light/group to whatever value you set.
transitiontime [0 = instant | 4 = default]
Transition time between color adjustments, done in multiples of 100ms.
Tips
Instead of inputting a random number to get the exact color you want, just move the control slider for the values.

Adjusting hotkeys automatically saves.
Just click the hotkey on the bottom, make the adjustment on the right and close HotKey Creator.
You can also erase a hotkey just by clicking on it and hitting the delete key on the keyboard.
Make these examples
We’re going to make a few hotkeys – two that work with a button press and two that are triggered with an alert.
These hotkeys will work with both Firebot & Mix It Up. Open the HotKey Creator back up and let’s get to it!
Increases hue | CTRL + 1
Slowly sets color to pink | CTRL + 2
Turns on colorloop & flashes a few times | CTRL + 3
Turns off colorloop & stops the flashing | CTRL + 4
Close out the HotKey Creator and test the hotkeys – you should be able to trigger all of them.
If they don’t work, make sure the correct hotkeys are recorded and your settings are one to one of my screenshots.
Connecting with Mixer
There are two popular tools for Mixer that integrate with MixPlay – Firebot & Mix It Up.
Regardless of which one you use, you’ll need a MixPlay board for viewers to interact with.
You can create the board by heading over to the Developer Lab, logging in and creating a board.
[If you need help on how to create a board from scratch, follow my cat ears guide.]
Make sure you create two buttons on the board – Hue change & Slow pink.
We’ll be setting it with Mix It Up next. If you’re using Firebot just scroll past it.
Mix It Up & Hue lights
We’re going to start with having two MixPlay buttons that can alter the lights.
- Go to MixPlay and select the board you created in the Developer Lab from the dropdown menu
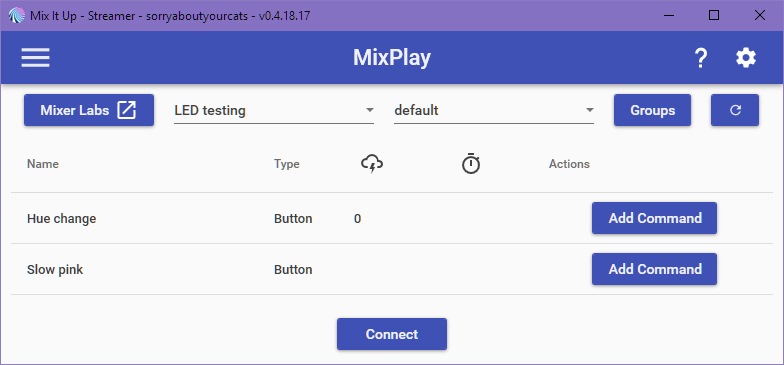
- Click on Add Command for Hue change and select Advanced Command
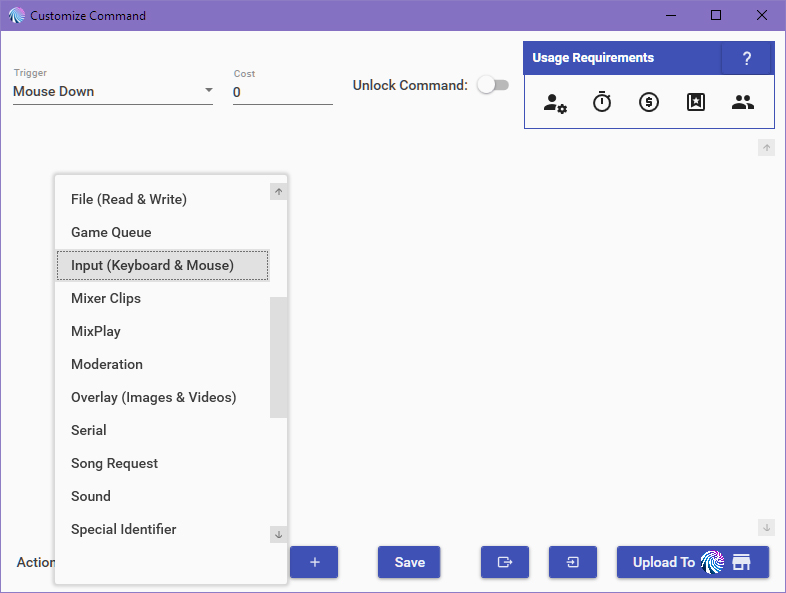
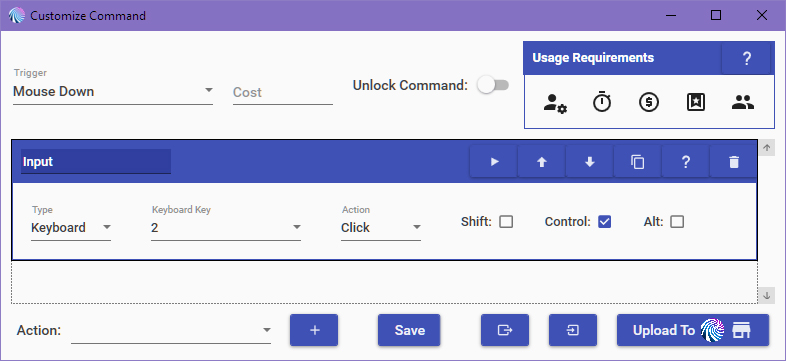
- Create new action Input (Keyboard & Mouse)
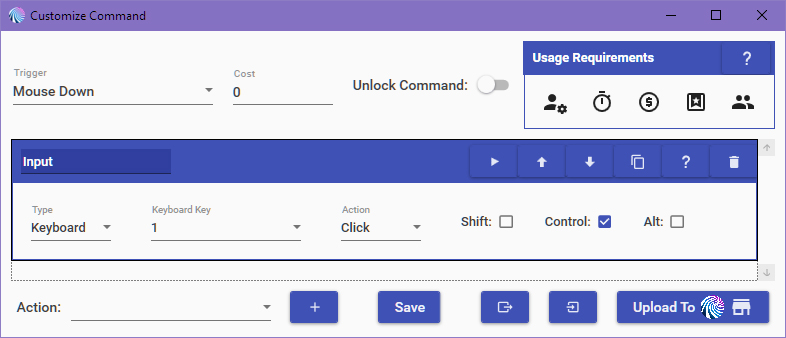
- Set type to Keyboard, Key to 1, Action to Click and check the Control checkbox
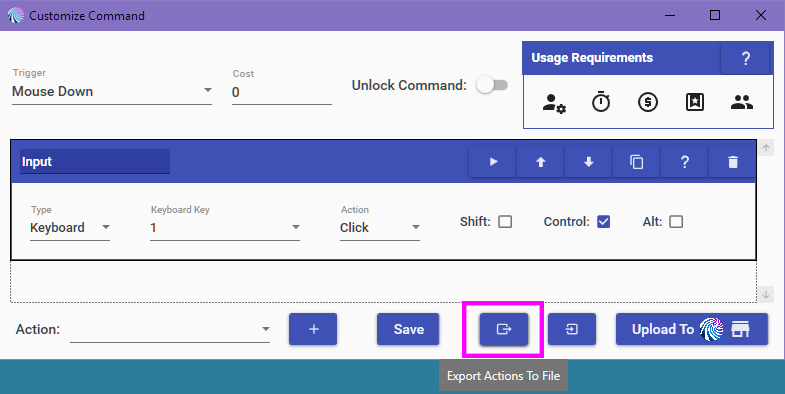
- Export the Actions to a file
- Hit Save
- Test the button
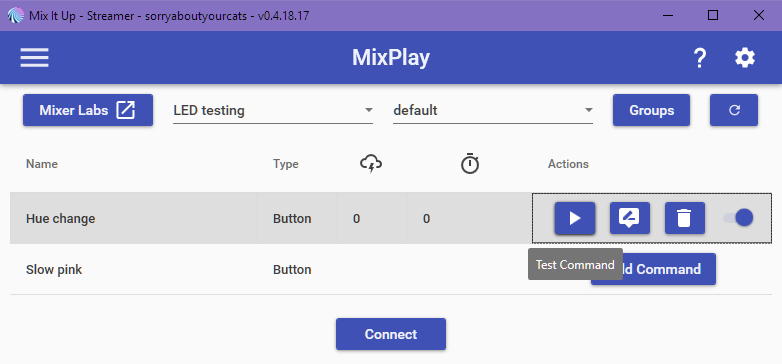
- Add command to Slow Pink and select Advanced command
- Import Actions from a file (pick the same file you exported before)
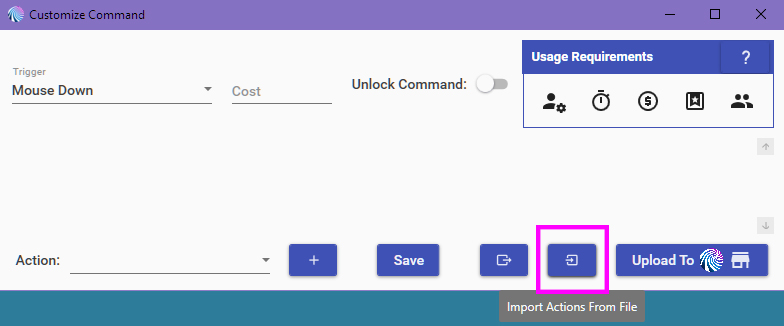
- Expand Input and change the Key from 1 to 2
- Save it and go back to the MixPlay page then click Connect
- Go on your channel, click the buttons and have fun with the pretty colors
The next thing we’ll be doing is setting up an alert when someone follows!
Mix It Up alert trigger
- Go to Events and click Add Command under Channel Followed, then select Advanced Command
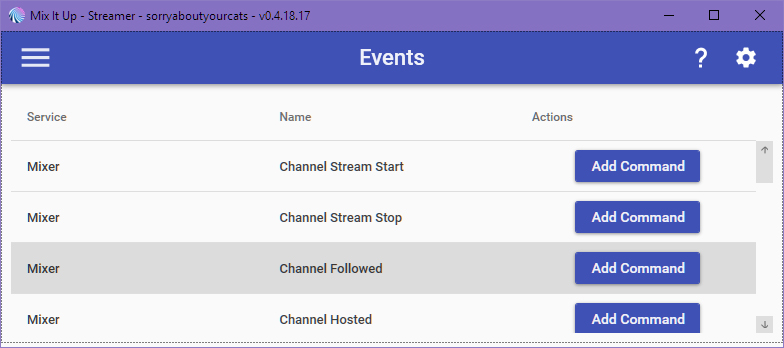
- Import Actions from a file (pick the same file you exported before)
- Expand Input and change the Key from 1 to 3
- Add Wait Action and set it to 2 seconds
- Duplicate the Input action then change the key from 3 to 4
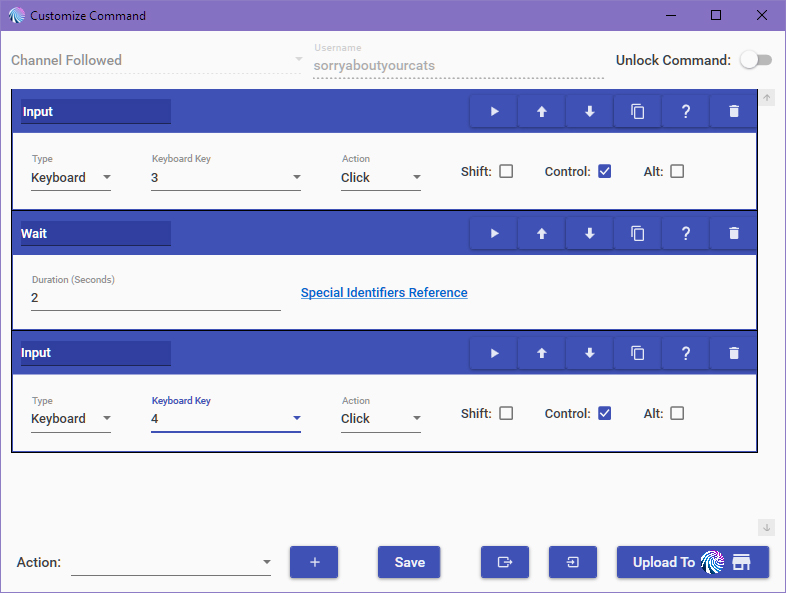
- Hit Save then hit the Play button on the Events page
That should get you started on how to get this all set up! Have fun customizing it to your heart’s desire.
If it doesn’t work for whatever reason or you get stuck, let me know in the comments below or on Twitter.
Firebot & Hue lights
We’re going to make two MixPlay buttons that can mess with the lights.
- Head to the Developer Lab, grab the code of your new board and put it into Firebot
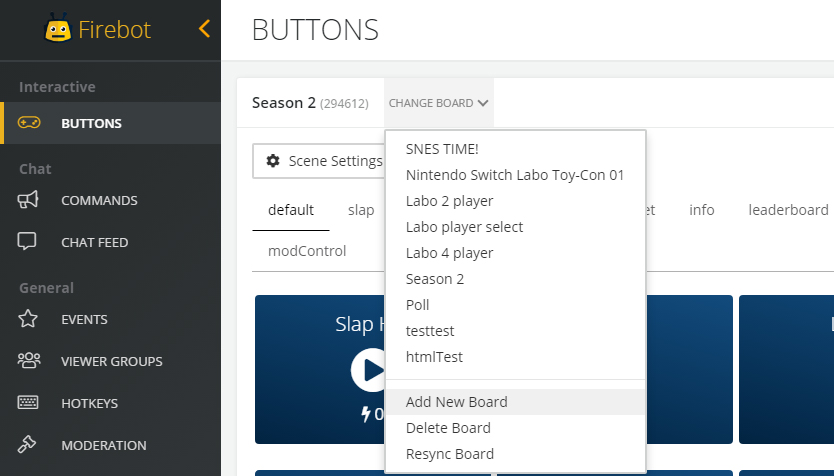
- Hover over Hue change and click EDIT

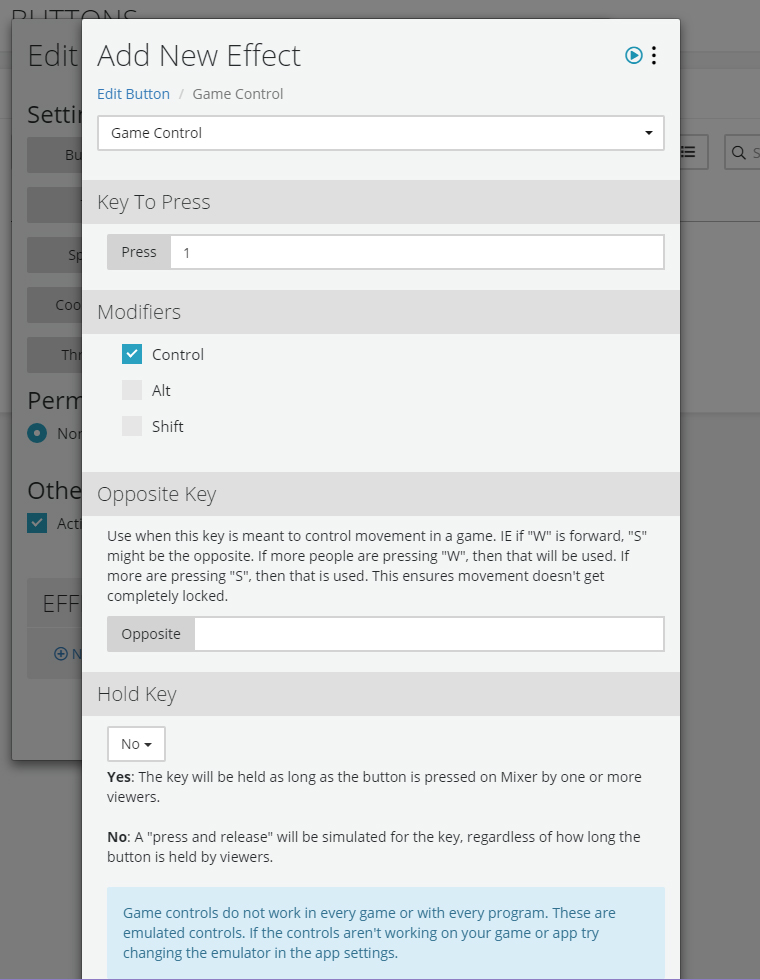
- Click New Effect, select Game Control and set the pressed key to 1 and Control for Modifier, then click Add
- Click on the Game Control menu, Copy it then click Save Changes
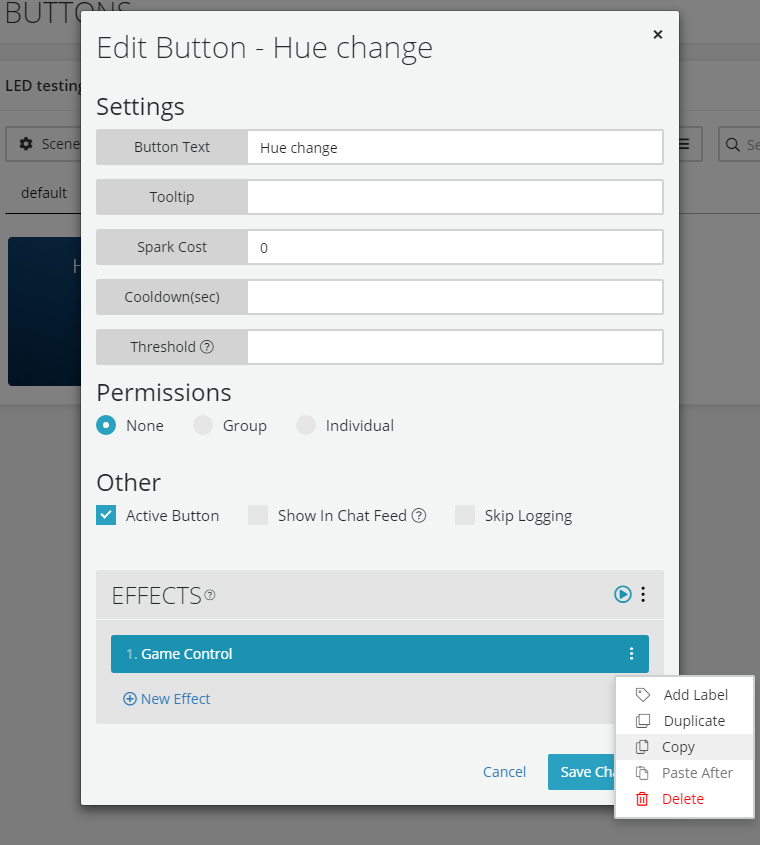
- Hit the Play button on Hue change to confirm it works
- Click the EDIT button on Slow pink
- Click the EFFECTS menu and Paste Effects
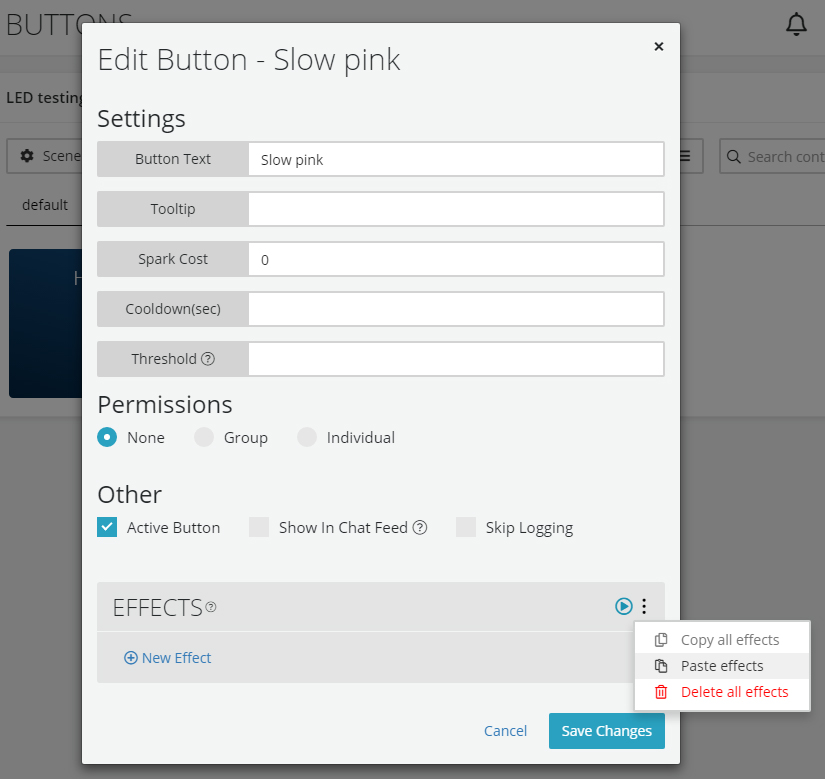
- Click Game Control and change Key To Press from 1 to 2, then click Save, then Save Changes
- Click the play button to test
- Connect Firebot to MixPlay, go on your channel and click the buttons for light fun time!
Firebot alert trigger
- Go to the EVENTS page and click on New Event

- Name the event and select Follow from the Trigger On dropdown menu
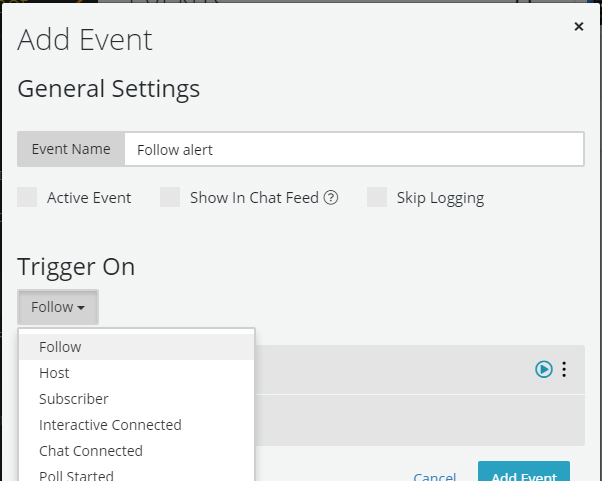
- Click the EFFECTS menu and Paste Effects

- Click Game Control and change the Key To Press from 1 to 3 then hit Save
- Click New Effect and select Delay then set Seconds to 2 and hit Add
- Click the EFFECTS menu again and Paste Effects… again
- Click Game Control on the newly pasted item and change the Key To Press from 1 to 4 then hit Save
- Click the Test Effects button on the EFFECTS section and rejoice at the funky lights!
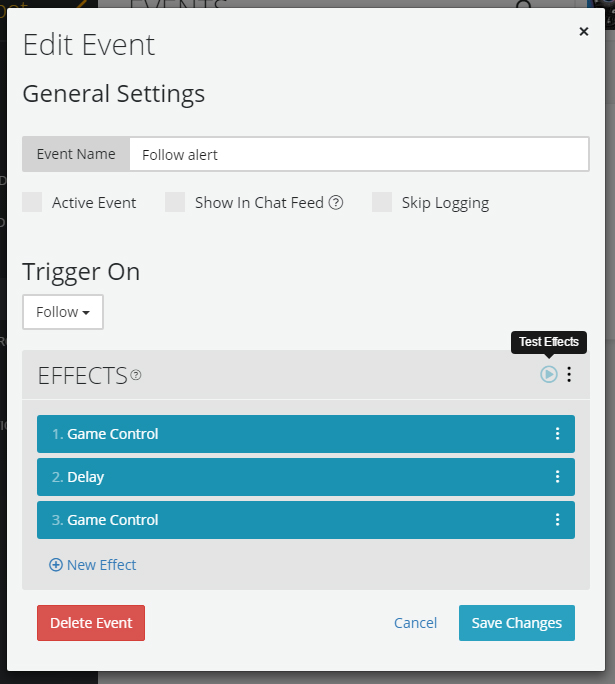
This should set you on your path towards customized lights! Have fun funking around.
If it doesn’t work for whatever reason or you get stuck, let me know in the comments below or on Twitter.
Stream Deck
It’s also useful to have the Stream Deck control Hue lights, just in case you want things back to normal.
All you have to do is drag the Hotkey button to your grid and set up the hotkey that’s assigned in WinHue – easy!
Yay pretty lights!
With WinHue combined with Mixer’s MixPlay [using Firebot or Mix It Up], you can do a lot of fun things with Hue lights. I hope you enjoyed this guide on how to set up the Hue lights to work with Mixer’s MixPlay and alerts.
There is more customization using Processing, like creating light patterns [e.g. emulating cop lights].
Since my 2016 guide is long gone, I’ll have to recreate it eventually – so look out for it!
Thanks for reading,
sorryaboutyourcats
Updated guide on controlling Hue lights with @WatchMixer‘s MixPlay using @FirebotApp, @MixItUpApp & the Stream Deck. https://t.co/1vnpGPcKtZ pic.twitter.com/u00ONAEZZu
— sorryaboutyourcats ̡̳̙̲̭͞ 😺👍 (@SryAbtYourCats) December 26, 2018
